Call Flow Designer
Call Flow Designer allows you to create inbound call workflows using a visual, drag-and-drop editor. Call flows can be built entirely from scratch or using pre-configured templates. Once a call flow is assigned to a number, it goes live immediately.
Accessing Call Flow Designer
To access Call Flow Designer, follow the steps:
- Log in to the VoIPstudio Admin Dashboard.
- In the left-hand navigation menu, click Call Flow Designer.
- Click Add to create a new call flow, or click on a name of the existing call flow to open it in the editor.
Creating a call flow: Templates or custom build
When creating a new call flow, you can either use a template or create it from scratch.
Templates provide a fast starting point and can be modified after loading, allowing users to fully customize the call logic.
1. Use a template
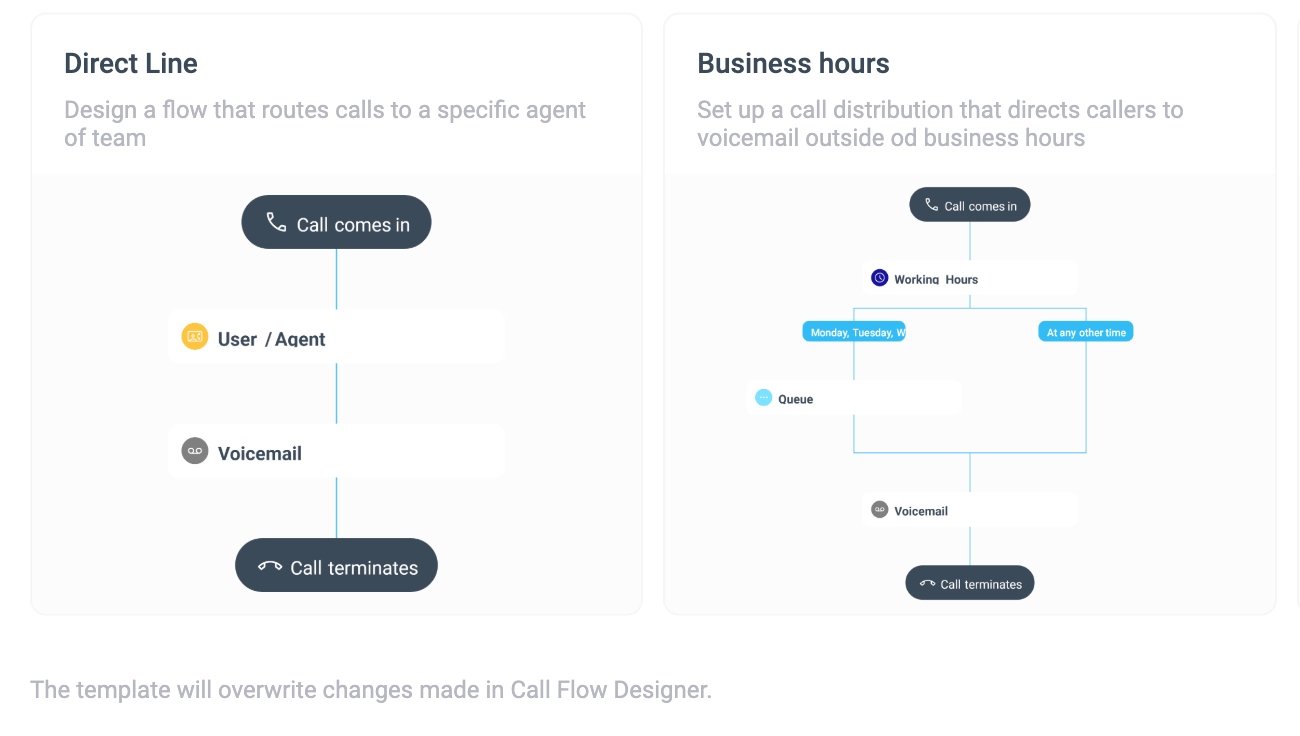
To create a call flow from a template, click Select Template at the top bar. Two pre-built templates are available:
-
Direct Line
Routes the call directly to a specific user or agent, then to voicemail if unanswered. -
Business Hours
Routes callers differently based on working hours (e.g., to a queue during working hours and voicemail outside business hours).
Your custom templates will appear in the same list, once you save a call flow as a template.
Note: Selecting a template will overwrite any current changes in the editor.
2. Build a call flow from scratch
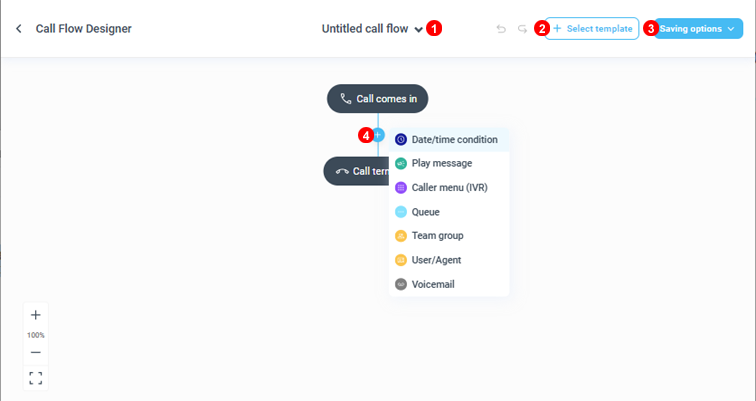
To build from scratch, click the + icon between “Call comes in” and “Call terminates” and choose from the available conditions.
Available call flow conditions
You can build a call flow by adding individual conditions and configuring their settings. Each condition defines how calls should be routed at a specific point in the flow.
Below is a guide on how to set up every available condition.
1. Date/time condition
Use this to route calls differently based on business hours, weekdays, holidays, or custom schedules.
How to set it up:
-
Add the Date/time condition node to the flow.
-
Enter a Title to help identify the rule.
-
Select a Time zone.
-
Under Branch settings, choose the days of the week for this branch.
-
Set a From / To time range.
-
(Optional) Add additional time slots or configure Date exceptions (e.g., holidays).
-
Create new branches as needed (e.g., Working hours vs. Outside hours).
2. Play Message
Use this to play a recorded announcement or a text-to-speech message to the caller.
How to set it up:
-
Add the Play message node.
-
Enter a Title for the message.
-
Under Message settings, select an existing announcement, or create a new one.
-
To generate audio:
-
Expand Add sounds,
-
Select Text to speech,
-
Enter a Name for the file,
-
Choose a Voice,
-
Type the Message text,
-
Click Generate audio.
-
To upload a new audio file:
-
Expand Add sounds,
-
Select Upload file,
-
Drag and drop or choose a file to upload. Supported format: MP3.
-
(Optional) Select Normalize volume level to optimize the volume.
-
Click Upload file to server.
-
Save the message settings.
3. Caller Menu (IVR)
Use this to create a keypad menu (e.g., “Press 1 for Sales, 2 for Support”).
How to set it up:
-
Add the Caller menu (IVR) node.
-
Enter a Title for the menu.
-
Under Message settings, select or generate an announcement that explains the options.
-
Set Timeout and Repeat values.
-
Under Key branches, assign a destination node for each key (0–9).
-
Add new branches as needed.
Note: Complex IVR structures (multi-instance or chained menus) are only available with the CX Add-on. If you need to build advanced, multi-step IVR menus, please refer to the pricing page for details on upgrading your plan.
4. Queue
Use this to place callers in a queue until an agent becomes available.
How to set it up:
-
Add the Queue node.
-
Enter a Title.
-
Select Music on hold and Language.
-
Choose a Ring strategy:
-
Ring All – Rings all available agents at the same time until one answers.
-
Hunt – Rings agents in a fixed order, moving to the next agent if the call is not answered.
-
Memory Hunt – Continues ringing from the agent after the one who last answered, distributing calls more evenly.
-
Random – Rings a randomly selected available agent for each incoming call.
-
Set the Ring time.
-
Click Select members to assign one or more queue members.
-
Configure Max wait time for callers.
5. Team Group
Use this to ring multiple team members simultaneously or sequentially.
How to set it up:
-
Add the Team group node.
-
Enter a Title.
-
Choose a Ring strategy:
-
Ring All – Rings all available agents at the same time until one answers.
-
Hunt – Rings agents in a fixed order, moving to the next agent if the call is not answered.
-
Memory Hunt – Continues ringing from the agent after the one who last answered, distributing calls more evenly.
-
Random – Rings a randomly selected available agent for each incoming call.
-
Set a Ring time.
-
Click Select members to assign one or more members.
6. User / Agent
Use this to route the call directly to a specific user or agent.
How to set it up:
-
Add the User/Agent node.
-
Enter a Title.
-
Select the User who should receive the call.
-
Set the Ring time before fallback occurs.
7. Voicemail
Use this to send the caller to voicemail when no agents are available or as an end-point.
How to set it up:
-
Add the Voicemail node.
-
Enter a Title.
-
Assign a User whose mailbox will receive the message.
-
Choose or create an announcement.
-
(Optional) Upload or generate a new text-to-speech message through the Add sounds section.
Navigating Call Flow Designer
Call Flow Designer includes several built-in tools to help you move around the canvas, manage changes, and edit call flow nodes efficiently.
Switch between call flows
Use the call flow selector at the top of the editor to switch between existing call flows without leaving the Call Flow Designer. This allows you to quickly open, review, or edit other saved flows or templates.
Zoom in and out
Use the zoom controls to adjust the view of the call flow:
-
Zoom in to work on detailed sections of the flow.
-
Zoom out to get an overview of complex or multi-step call flows.
This is especially useful when working with larger or multi-branch designs.
Recenter the canvas
Click the recenter icon to automatically reposition the call flow in the center of the editor.
This helps quickly restore your view if you’ve panned away from the main flow area.
Undo and redo changes
The back (undo) and forward (redo) arrows allow you to:
-
Revert recent changes step by step.
-
Reapply actions that were undone.
These controls help you experiment safely without losing work.
Saving call flows
At any point during editing, users can save the call flow using the options at the top bar.
1. Save (Draft)
Saves the current state of the call flow without publishing it.
2. Save as Template
Converts the flow into a reusable template that can be assigned to numbers.
Note: Only call flows saved as templates can be assigned to phone numbers.
3. Assign to Number
After saving as a template, choose Assign to number to publish the call flow.
-
Select one or more numbers.
-
Confirm by clicking Assign and make live.
Once assigned, the call flow becomes live immediately.
Editing сall flows
Call flows can be edited at different stages of their lifecycle. What you can change, and how those changes are saved, depends on whether the call flow is a draft, live (assigned to a number), or a template.
Understanding these differences helps avoid unintended changes and ensures call routing behaves as expected.
Editing draft call flows
Draft call flows can be edited freely.
-
You can add, remove, or modify any condition.
-
Changes are applied only when you explicitly save the flow.
-
Drafts are not active and do not affect live call routing.
Use drafts to build or test call logic before making it available for assignment.
Editing live call flows (assigned to numbers)
Call flows that are assigned to numbers can also be edited.
-
You can modify conditions, routing logic, announcements, and schedules.
-
Changes take effect after saving.
-
The updated logic applies immediately to incoming calls once saved.
This allows administrators to adjust live routing without recreating the flow.
Note: Make changes carefully, as edits to live call flows impact active call handling once saved.
Editing templates
Templates behave differently from draft and live call flows.
-
Templates cannot be edited directly and saved over the original.
-
When you open a template and make changes, you need to save it as a new template to preserve those changes.
-
The original template remains unchanged.
This ensures template stability and prevents accidental changes from affecting the template.
Deleting call flows
You can remove any existing call flow, draft, template or assigned. Deleting a call flow is permanent, so review your selection before confirming.
How to delete a call flow
- Log in to the VoIPstudio Admin Dashboard.
- In the left-hand navigation menu, click Call Flow Designer.
- Click on a name of the call flow you want to delete.
-
Select the call flow you from the dropdown at the top of the screen.
-
The dropdown displays all drafts, saved templates, and assigned flows.
- Each entry includes a delete icon (🗑️) next to it.

-
Click the delete icon next to the call flow you want to delete.
-
In a confirmation window, click Delete to permanently remove the call flow, or Cancel to keep it.
Once deleted, the call flow will be unassigned from the number(s), will no longer appear in the list and cannot be recovered.