Hardware Configuration - Auto Provisioning - Cisco
Cisco phones can be auto provisioned by VoIPstudio VoIP service. This greatly simplifies device deployment and configuration.
If your phone was purchased from VoIPstudio, it has been already pre configured and there is no need to provision it. Please refer to Phone edit section to assign extensions. If your phone was not purchased from VoIPstudio, please perform a Factory Reset described in Factory Reset section above and Firmware upgrade.
You can obtain your phone IP by following the steps described in Find phone IP section above.
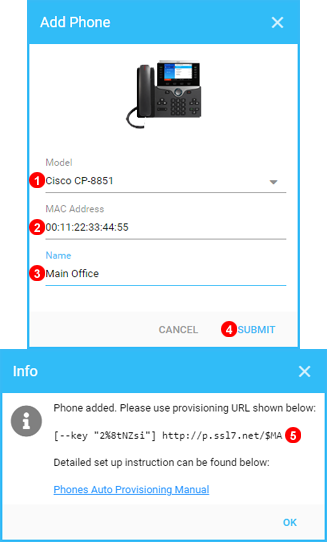
Add Phone to VoIPstudio Customer control Panel as Indicated below before Proceeding.

To add a phone purchased from the third party vendor:
Click Add button located in Phones panel.
1. Select your device model.
2. Enter your device MAC address - five groups of digits and letters separated by a colon sign for example: 00:1a:4d:5c:25:8d. Usually printed on the label located at the back of the device.
3. Name Device as required.
4. Click Submit button.
5. Copy and Paste URL into Phone Configuration as shown below.
Once a supported devices is added to our system you can obtain auto-provisioning URL, enter it into device settings and manage the phone via your web based control panel.
CP-XXXX
These instructions apply to all Cisco CP-XXXX service devices.

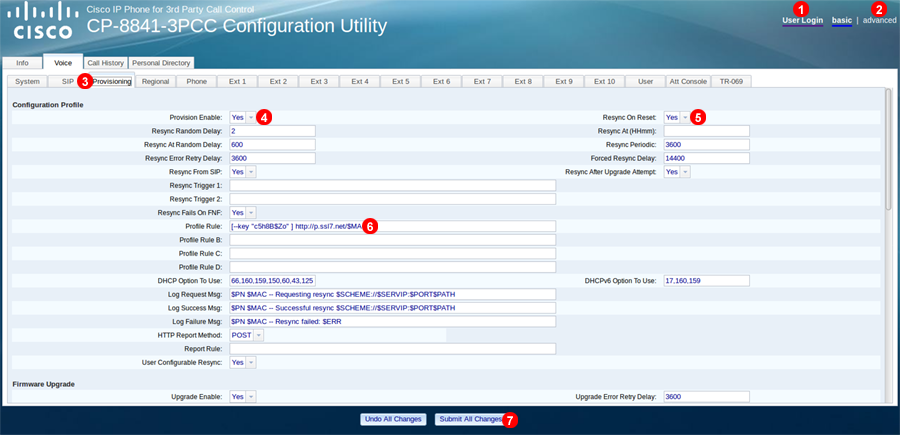
To auto provision Cisco CP-XXXX login into the web interface of the device and follow steps below:
- Click
Admin Loginlink at the top of the page. - Click
Advancedlink at the top right part of the page. - Select
Provisioningtab at the top. - Make sure
Provision Enableis set toYes. - Make sure
Resync On Resetis set toYes. - Copy and paste your
Profile URL- see(2)in Figure 9.1 above - into field(6). - Click
Submit All Changesbutton.
After a short while your Cisco phone will reboot and obtain configuration data from VoIPstudio provisioning service.
SPAXXX
These instructions apply to all Cisco SPAXXX service devices.

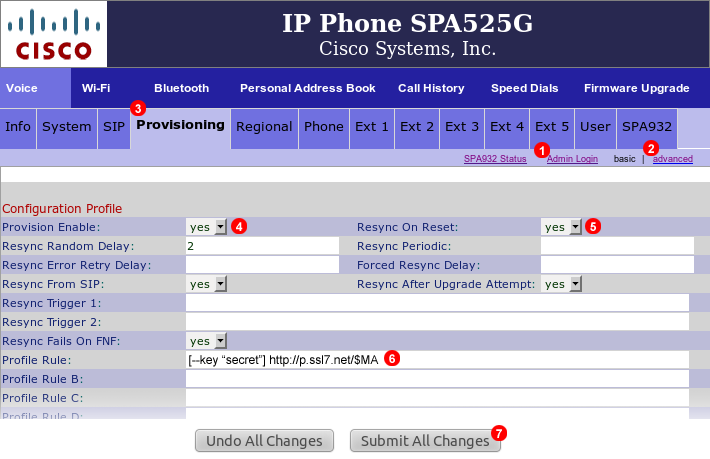
To auto provision Cisco SPAXXX login into web interface of the device and follow steps below:
- Click
Admin Loginlink at the top of the page. - Click
Advancedlink at the top right part of the page. - Select
Provisioningtab at the top. - Make sure
Provision Enableis set toYes. - Make sure
Resync On Resetis set toYes. - Copy and paste your
Profile URL- see(2)in Figure 9.1 above - into field(6). - Click
Submit All Changesbutton.
After a short while your Cisco phone will reboot and obtain configuration data from VoIPstudio provisioning service.
PAP2 Adapter
If your phone was purchased from VoIPstudio, it has been already pre configured and there is no need to provision it. Please refer to Phone edit section to assign extensions. If your phone was not purchased from VoIPstudio, please perform a Factory Reset described in Factory Reset section above and Firmware upgrade.
You can obtain your phone IP by following the steps described in Find phone IP section above.
Add Phone to VoIP Studio Customer control Panel as Indicated below before Proceeding.

To add a phone purchased from the third party vendor:
Click Add button located in Phones panel.
1. Select your device model.
2. Enter your device MAC address - five groups of digits and letters separated by a colon sign for example: 00:1a:4d:5c:25:8d. Usually printed on the label located at the back of the device.
3. Name Device as required.
4. Click Submit button.
5. Copy and Paste URL into Phone Configuration as shown below.
Once a supported devices is added to our system you can obtain auto-provisioning URL, enter it into device settings and manage the phone via your web based control panel.

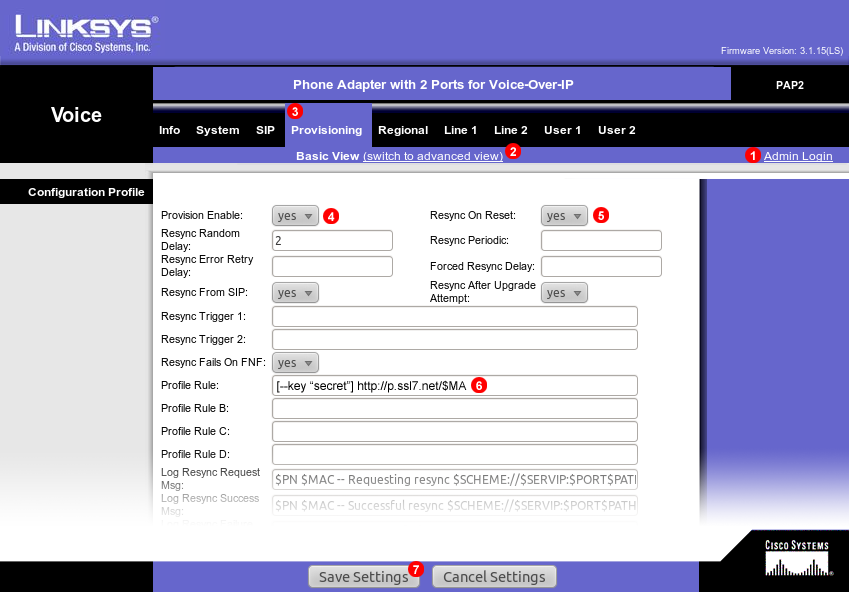
To auto provision Cisco PAP2 login into web interface of the device and follow steps below:
- Click
Admin Loginlink at the top of the page. - Click
Advancedlink at the top right part of the page. - Select
Provisioningtab at the top. - Make sure
Provision Enableis set toYes. - Make sure
Resync On Resetis set toYes. - Copy and paste your
Profile URL(see(2)in Figure %IMG_PHONES_CISCO_RESET% above) into field(6). - Click
Save Settingsbutton.
After a short while your Cisco VoIP adapter will reboot and obtain configuration data from VoIPstudio provisioning service.