Hardware Configuration - Manual Configuration - Grandstream
GXP 1400
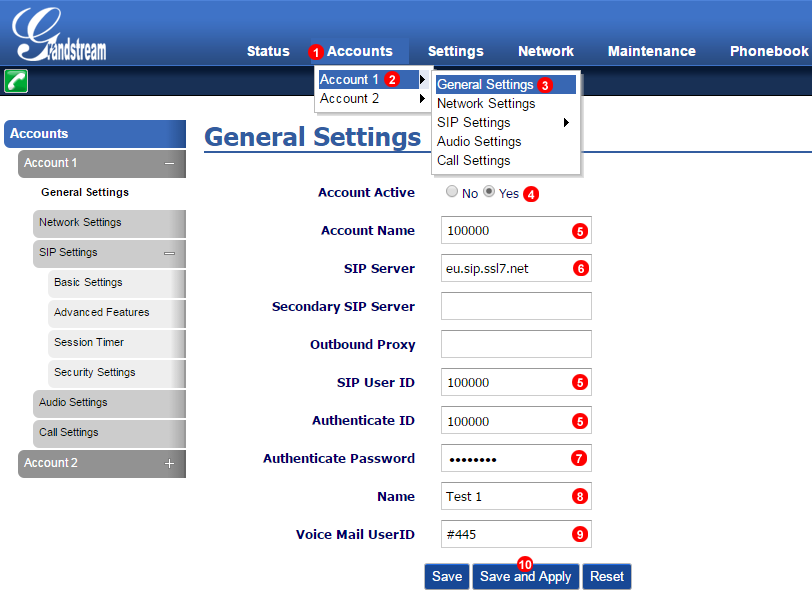
Figure 50.1 GrandStream GXP 1400 manual configuration.
- Select Accounts.
- Select Account 1.
- Click Basic Settings.
- Select Active.
- Enter your SIP username into field (5).
- Enter your SIP domain into field (6).
- Enter your SIP password into field (7).
- Enter Identifier of Choice for account.
- Enter Voicemail number #445
- Click Save and Apply.
Call Settings
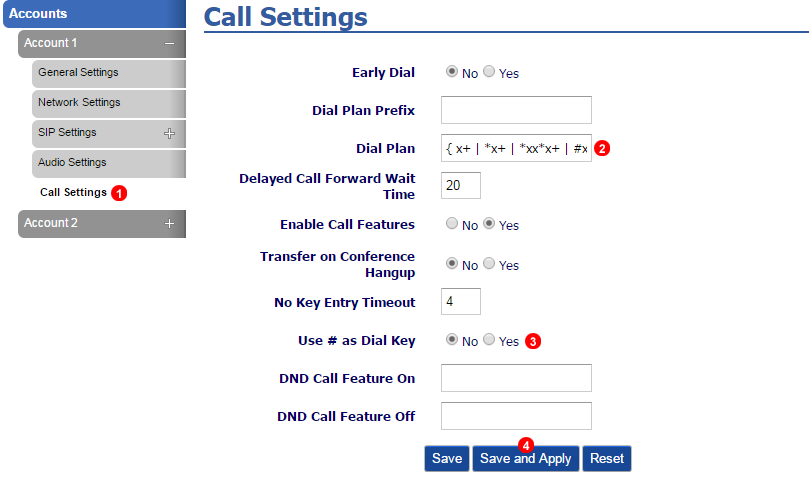
Figure 50.2 GrandStream GXP 1400 manual configuration.
- Select Call Settings.
- Change Dialplan to
{ x+ | *x+| *x*x+ | *xx*x+ | *xxx*x+ | #xxx | #x+ | #x+* } - Select No.
- Click Save and Apply.
BLF (Busy Lamp Field)
Busy Lamp Field on the Grandstream monitors other extension and the current status for example when the extension is on a call.
The LED lights will change colour and state depending on the current status of the Phone.
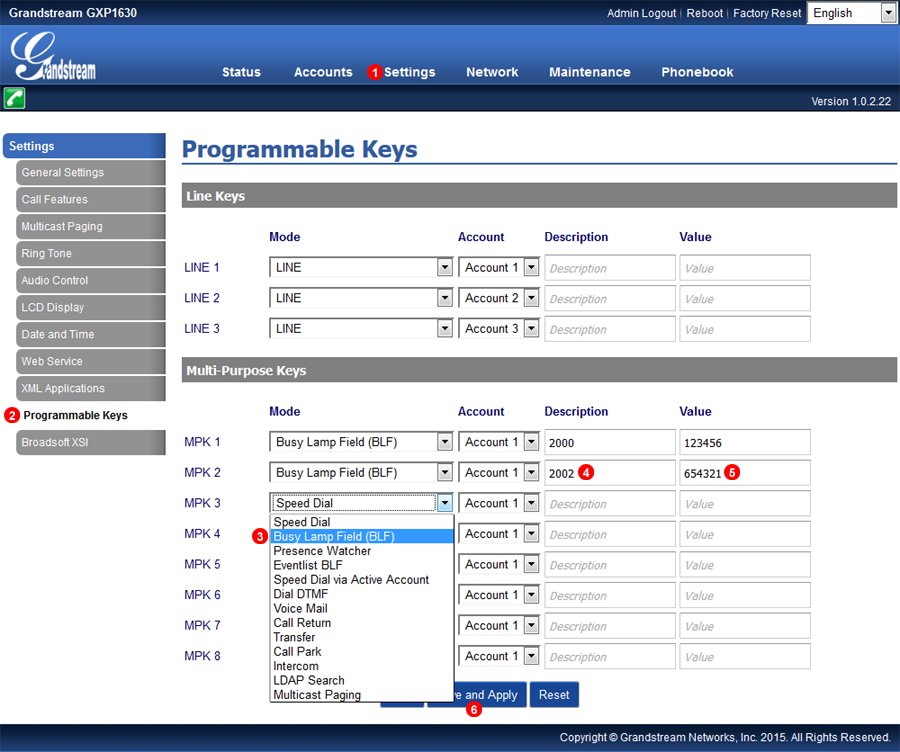
Figure 50.3 GrandStream GXP 1400 BLF.
- Click Settings.
- Select Programmable Keys.
- Select Busy Lamp Field (BLF) form the drop down menu.
- Enter a description in this example it is the Extension number.
- Enter the 6 digit SIP User name of the Extension.
- Click Save and Apply.
Security Settings
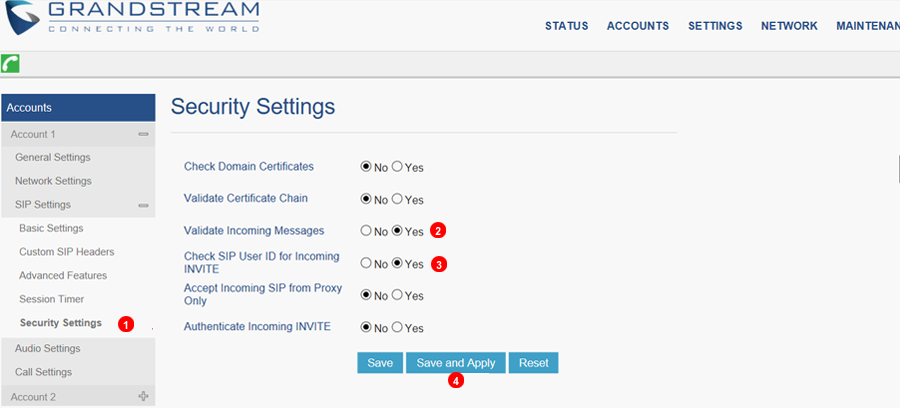
Figure 50.4 GrandStream Security Settings.
The following configuration will help to prevent Ghost Calls:
- Navigate to: Security Settings
- Set
Validate Incoming MessagestoYes - Set
Check SIP User ID for Incoming InvitetoYes. - Click Save
VoIP TLS/SRTP Encryptation setup
Transport Layer Security (TLS) is a security protocol designed to facilitate privacy and data security encrypting voice traffic. To enalbe this feature follow steps bellow:
step 1 adjust transport protocol
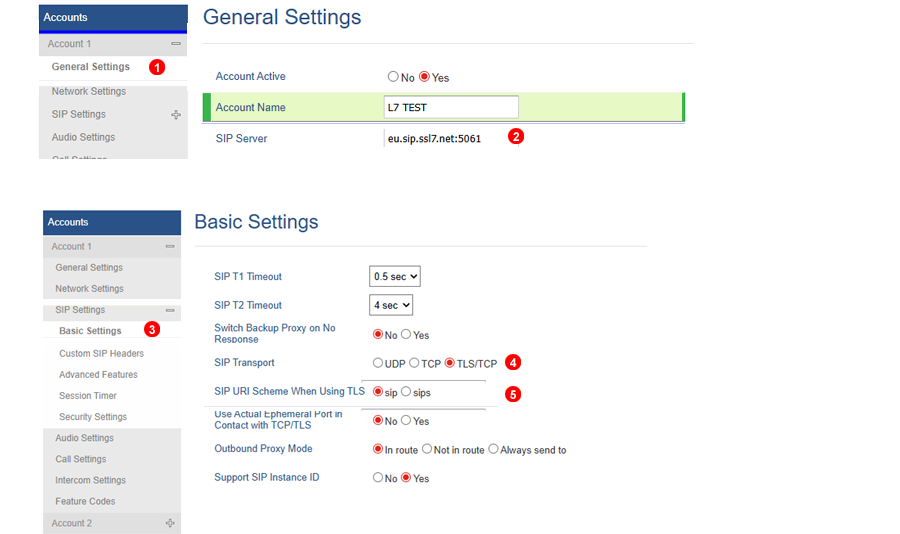
Figure 50.5 Yealink TLS
- Under
Account xbrowseGeneral Settings - Include to SIP server port number 5061
eu.sip.ssl7.net:5061 - Under SIP Settings > Basic Settings
Register - Set transport protocol to TLS.
- Select SIP as SIP URI Scheme when using TLS.
Step 2. Set SRTP as compulsory
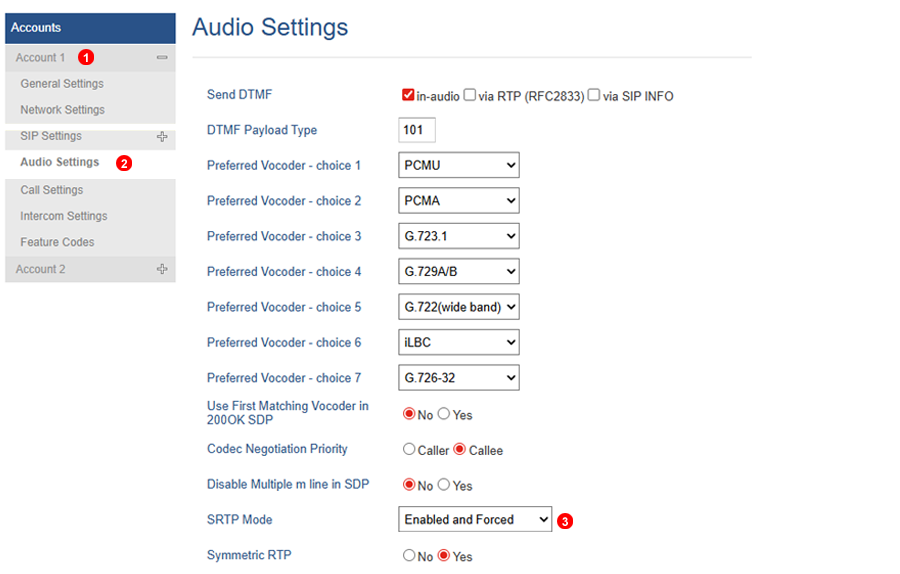
Figure 50.6 Grandstream SRTP
- Under
Account x - Browse
Audio Settings. - Set
Enabled and ForcedasSRTP Mode. - Confirm changes.
GXV 3240

Figure 50.7 GrandStream GXV 3240 manual configuration.
Navigate to General Settings->Account->Account 1 and fill as shown below:
- Put your account name into field number 1
- Enter your SIP domain into field number 2
- Enter your SIP username into field number 3
- Enter your SIP password into field number 4
- Enter Voicemail number #445 into field number 5
- Click Save
Call Settings
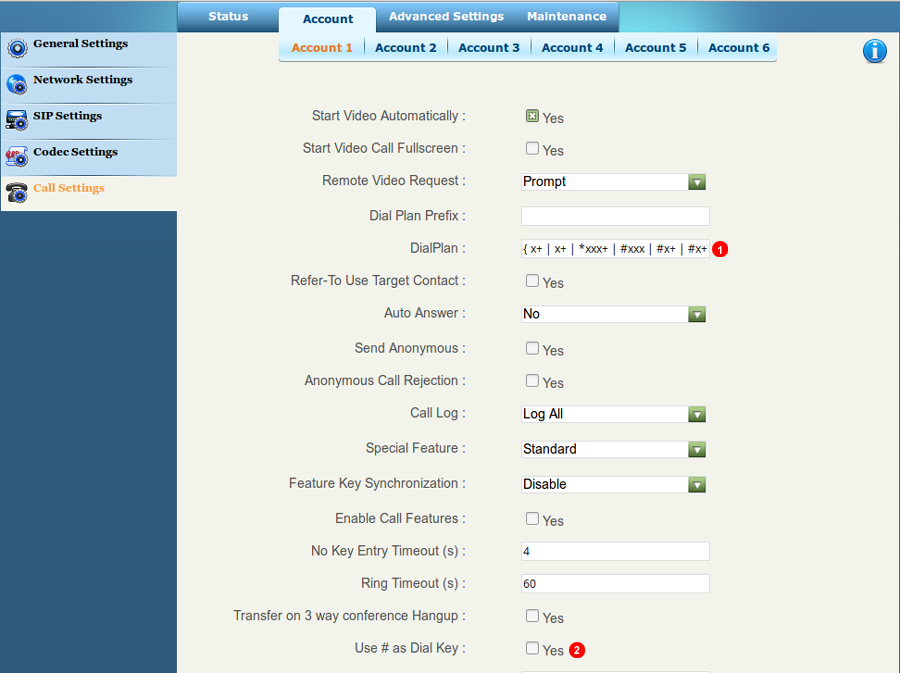
Figure 50.8 GrandStream GXV 3240 Call Settings.
Go to Call settings and fill as shown below
- Put Dialpplan
{ x+ | *x+ | *xx*x+ | #xxx+ | #x+ | #x+* }into field number 1 - Make sure that "use # as Dial Key" is unmarked under field number 2
- Click Save
Codec Settings
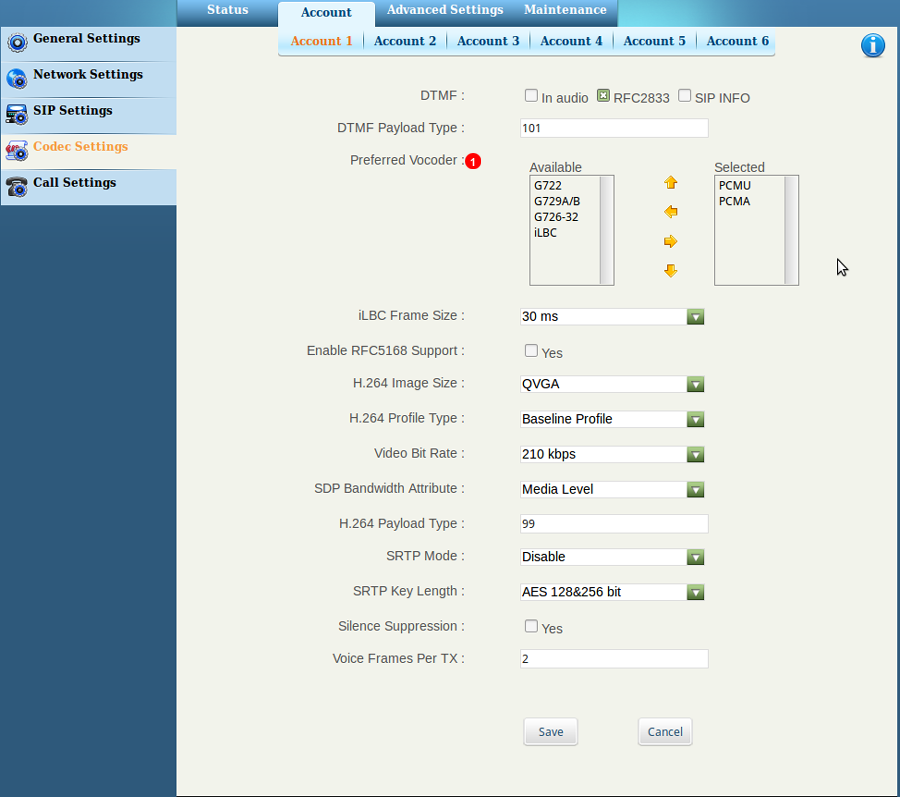
Figure 50.9 GrandStream GXV 3240 Codec configuration.
Navigate to Codec settings
- Put only PCMU and PCMA into selected codec field under point 1
- Click Save
DP715 DECT handset
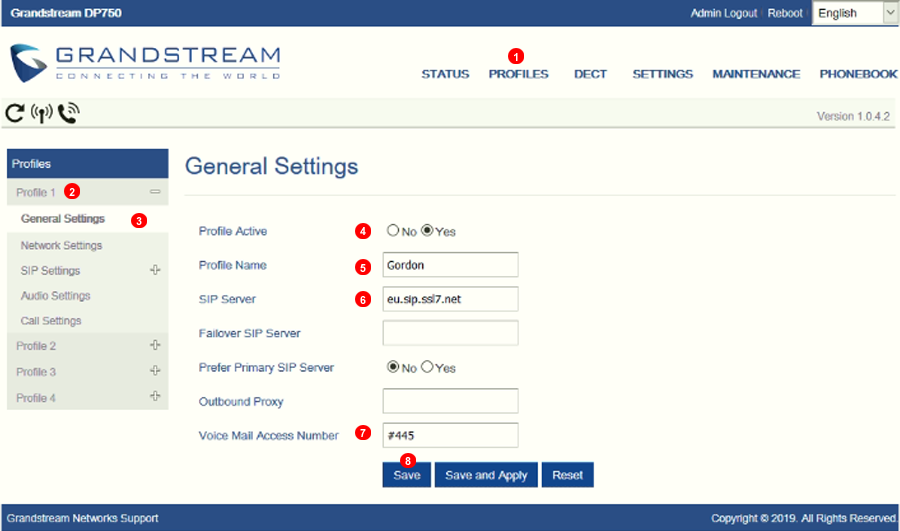
Figure 50.10 GrandStream DP715 DECT manual configuration.
- From Profiles section (1).
- Select Profile 1.
- Edit General Settings (3) under profile 1.
- Set profile to
Active - Put your account name into field
Profile Name - Enter your SIP domain into field
SIP Server - Enter Voicemail number #445 into field number 7
- Click Save
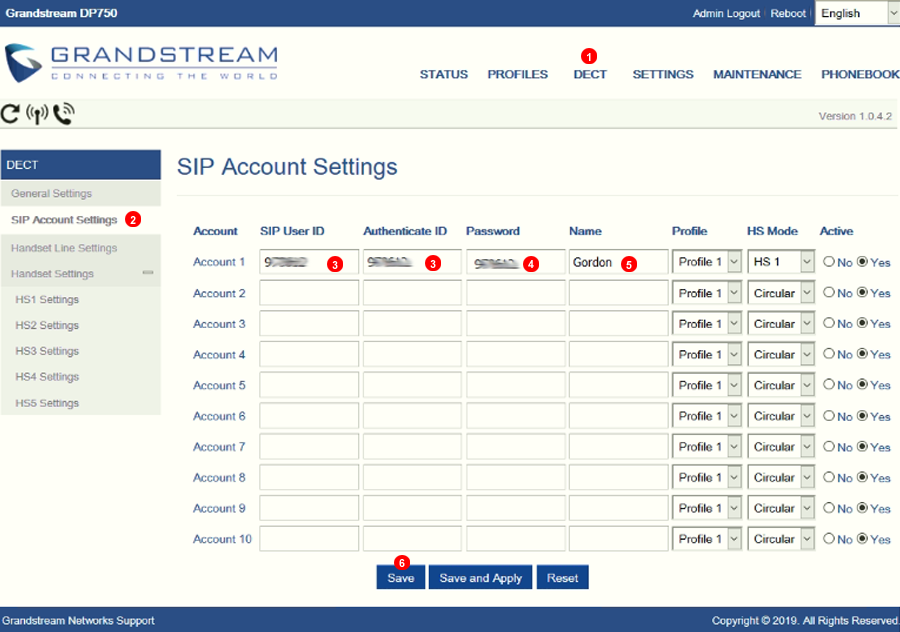
Figure 50.11 GrandStream DP715 DECT manual configuration.
- Navigate to (1)DECT.
- Select SIP Account Settings.
- Enter your SIP username into field
SIP User IDandAuthenticate ID - Enter your SIP password into field
Password - Put your account name into field
Name - Click Save
Call Settings
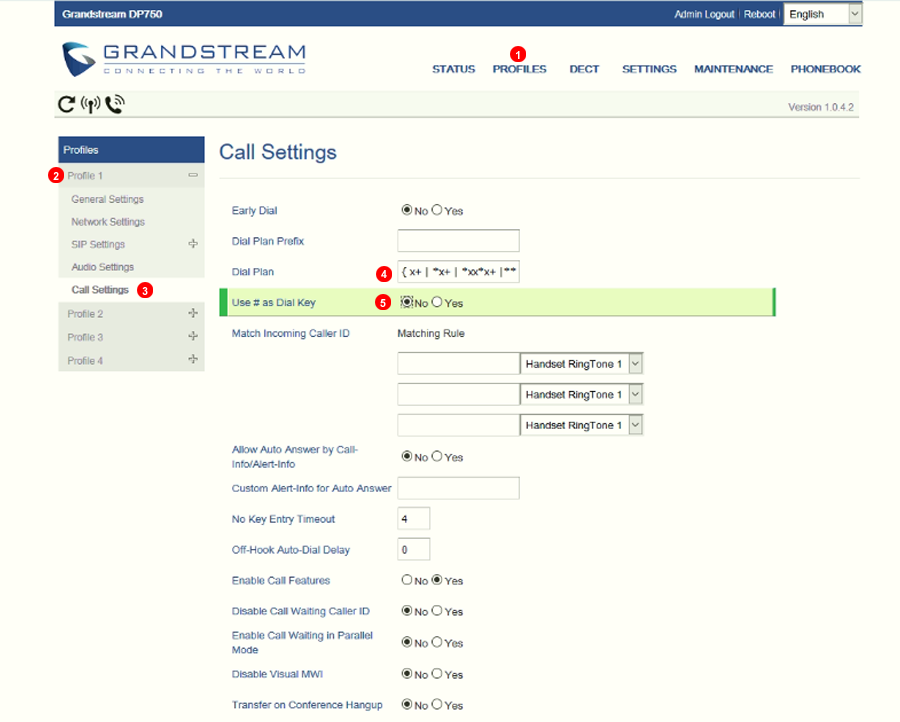
Figure 50.12 GrandStream DP715 Call Settings.
- From Profiles section (1).
- Select Profile 1.
- Edit (3)Call Setting under profile 1.
- Put Dial plan
{ x+ | *x+ | *xx*x+ | #xxx+ | #x+ | #x+* }into field number 4. - Make sure that "use # as Dial Key" is unmarked
- Click Save
Analogue adapter - ATA
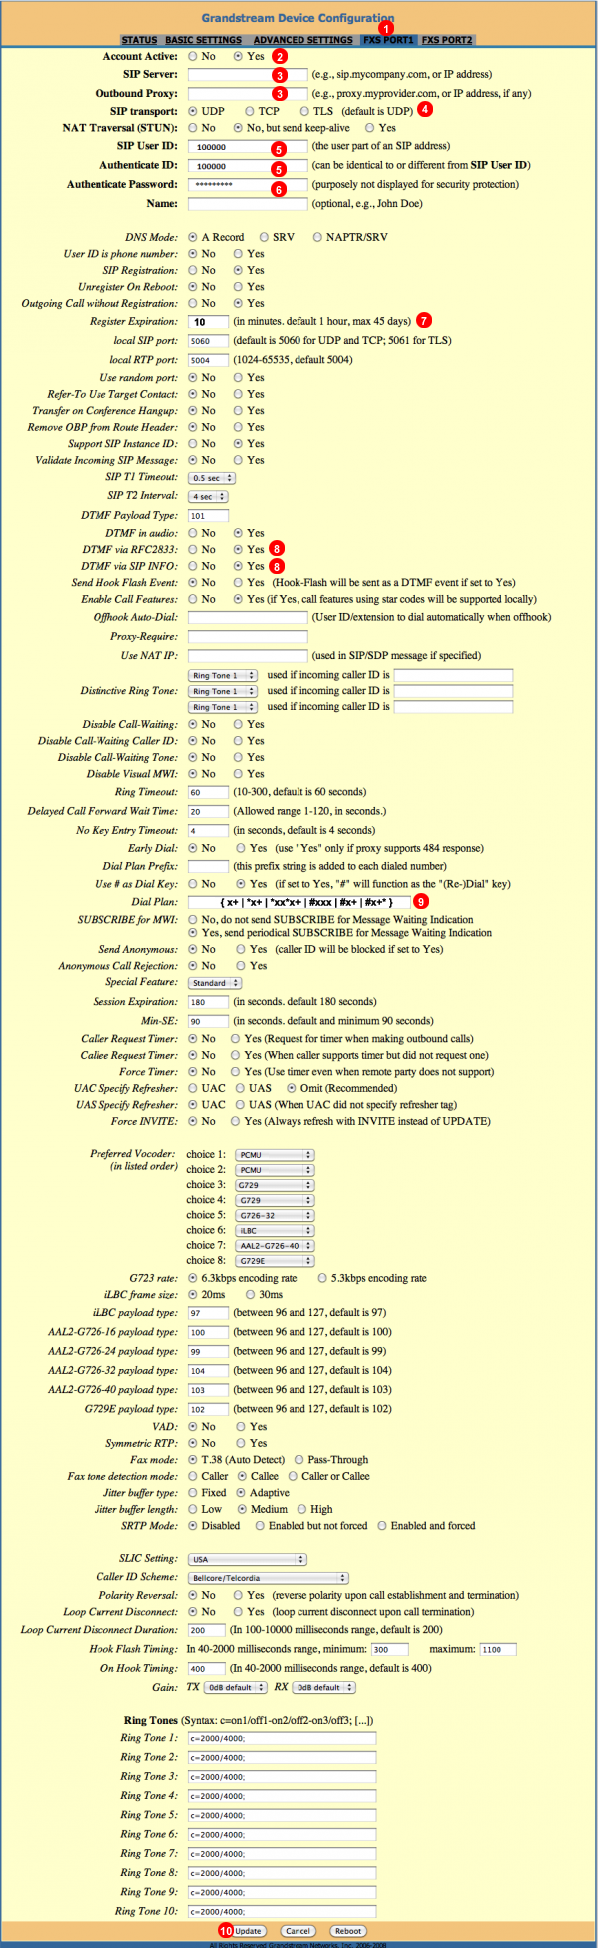
Figure 50.13 GrandStream ATA manual configuration.
- Navigate to corresponding FXS port you like to set up
- Set "Profile active" to YES
- Enter sip domain. Use
eu.sip.ssl7.netoramn.sip.ssl7.net - Adjust SIP transport protocol. Default is UDP use TCP if you are facing connectivity issues.
- Enter your SIP username into field
SIP User IDandAuthenticate ID - Enter your SIP password into field
Password - (optional) Adjust Registration Expiration Timmer.
- Allow DTMF via RFC2833 and SIP INFO
- Change Dialplan to
{ x+ | *x+ | *xx*x+ | *xxx*x+ | #xxx+ | #x+ | #x+* } - Click
Update
Check Registration status
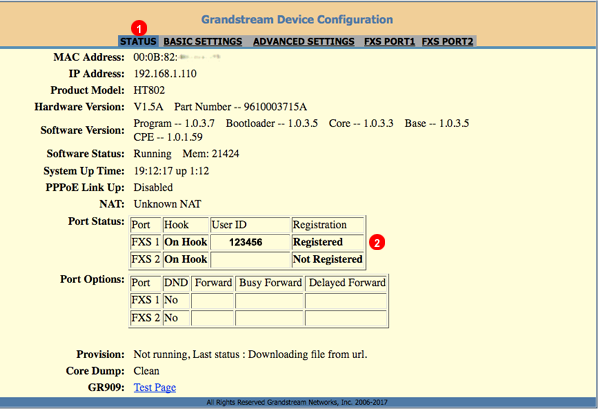
Figure 50.14 GrandStream ATA Registration status.
- Navigate to (1)Status
- Check if corresponding FXS port (2) is registered.