Hardware Configuration - Manual Configuration - Polycom
If your phone was purchased from VoIPstudio, it has been already pre configured and there is no need to provision it.
Please refer to Phone edit section to assign extensions.
If your phone was not purchased from VoIPstudio, please perform a Factory Reset described in Factory Reset section above and Firmware upgrade.
You can obtain your phone IP by following the steps described in Find phone IP section above.
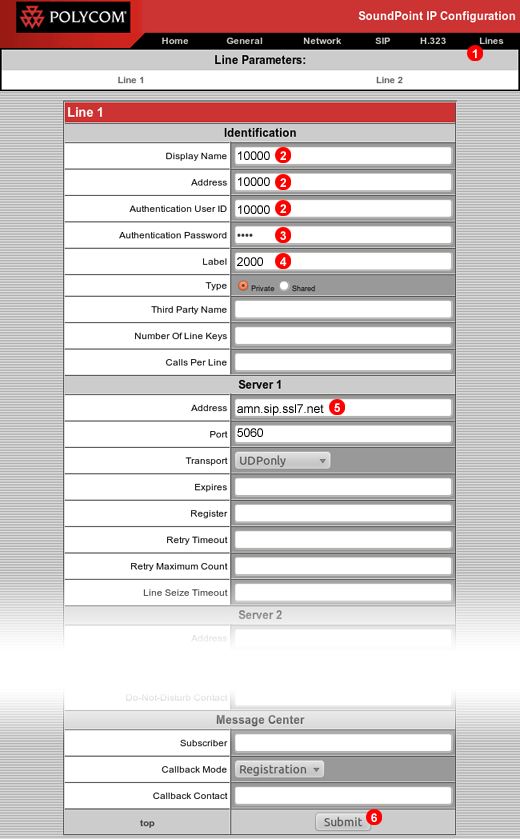
To configure Polycom phone to work with VoIPstudio service login into web interface (default username: Polycom, default password: 456) of the device and follow steps below:
- Click
Lineslink in the top menu. - Enter your SIP username into fields
(2). - Enter your SIP password into filed
(3). - Enter your extension into field
(4). - Enter your SIP domain into field
(5). - Click
Submitbutton(6).
After a short while the Polycom phone will connect to VoIPstudio servers and you will be able to start making and receiving calls.
VVX400

- Click Simple Setup.
- Enter your SIP domain into fields
(2). - Enter your Any Identifier into filed
(3). - Enter your SIP User name into field
(4). - Enter your SIP Password into field
(5). - Enter your Any Identifier into filed
(6). - Click To Submit and Save all Changes.
(7).
Digitmap and dialling adjustments
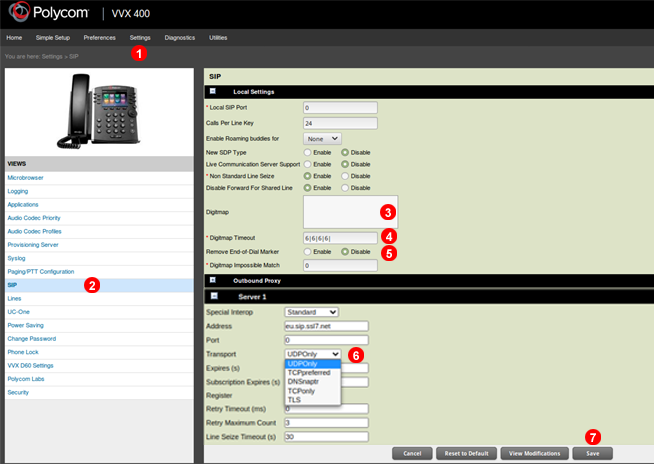
It is recommended to leave Polycom Digitmap pattern empty, set Digitmap Timeout and disable End-of-Dial Marker. To adjust this setting follow steps bellow:
- Navigate to Settings
(1). - Select SIP section
(2). - Make sure
Digitmaptext area is empty. - Fill
Digitmaptime out with: 6|6|6|6| - Make sure check box
Remove End-of-Dial Markeris disabled. - Adjust transport protocol to
UDPOnly. - Save changes
Voice Mail message button
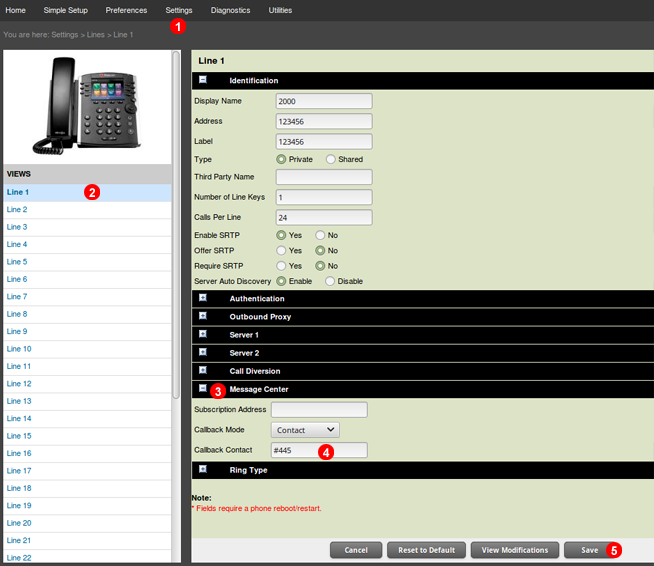
To set number Polycom phone calls to retrieve a voice mail message. Follow steps bellow:
- Navigate to Settings > Lines
(1) - Select appropriate line
line 1. - Expand
Message Centersection. - Set Callback Contact as
#445. - Save changes
Busy Lamp Filed
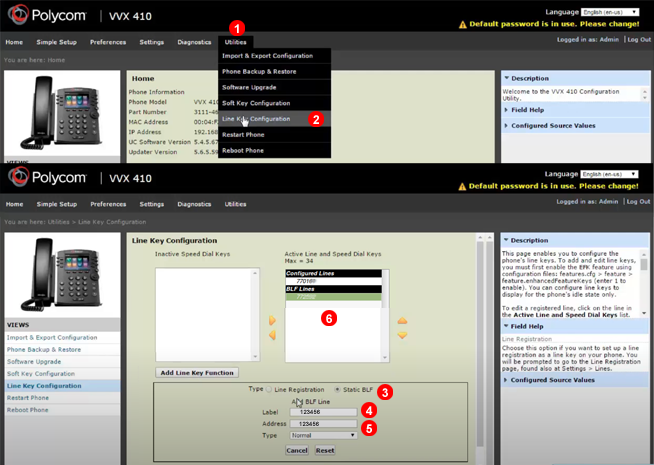
To set up BLF key for hot key dialling and Lamp monitoring. Follow steps bellow:
- Navigate to
Utilities. - Access
Line Key Configurationsection. - From
Add Line Key Sectionthere selectStatic BLFtype. - Fill
Labelwith SIP user you like to monitor. - Fill
Addresswith SIP user you like to monitor. - Phone lines and BLF keys should appear under
Active Keyssection. - Apply and Save changes
You should be able to direct call SIP user by pressing key and also see Red status when monitored user is on call.