Telephone - Desktop Softphone
Desktop application allows for making and answering calls. It needs to be installed and running on every PC, which you want to use for VoIP calls.
Download
Softphone application can be downloaded from:
- Download page of our website at https://voipstudio.com/download/
- Home page of our website at https://voipstudio.com/
Install
Windows
To install Desktop application on Microsoft Windows follow steps below:
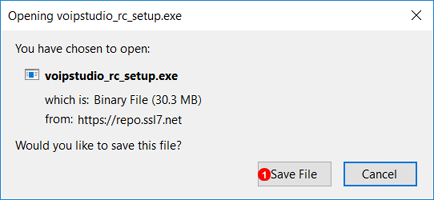
- Click Download link and Save file.
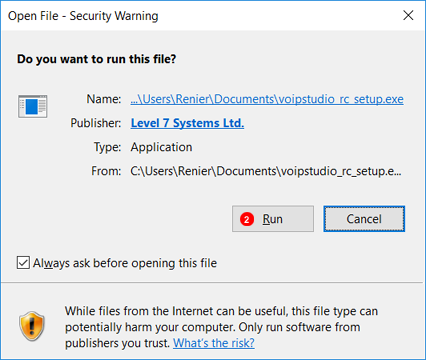
- Locate and double click VoIPstudio-ver.exe icon to start set up program.
- Wait for Installation to complete.
Mac OS
To install Desktop application on a Mac follow steps below:
- Download VoIPstudio-ver.dmg package and open it.
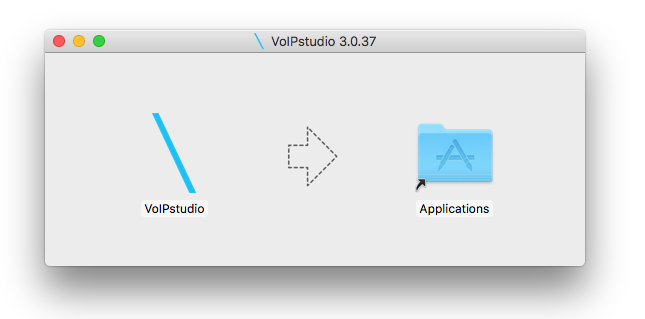
- Drag and drop VoIPstudio icon into Applications folder.
Linux
deb
Follow instructions below to install Desktop on Linux distribution using deb packages (Debian, Ubuntu, Mint etc.):
- Install the GPG key:
wget -O - http://repo.ssl7.net/repo/key | sudo apt-key add - - Add repository:
echo "deb http://repo.ssl7.net/repo/voipstudio/stable/main/binary /" | sudo tee /etc/apt/sources.list.d/voipstudio.list - Update and install:
sudo apt-get update & sudo apt-get install voipstudio
Login
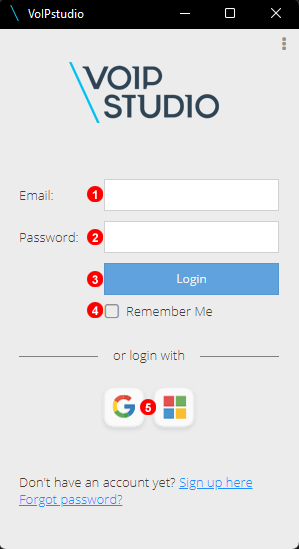
To start making VoIP calls you need to login into Softphone application with your email and password (the same you use for web Control Panel). Enter your email address into field (1) and password into field (2). Click Login button (3) and verify there is a green icon  in your taskbar which indicates the application is running correctly - see Figure 4.6 below. (4) Remember Me saves login details to make future logins easier. For Single Sign up using Windows or Google quick and easy access can be found on login page (5).
![]()
Active Call Display
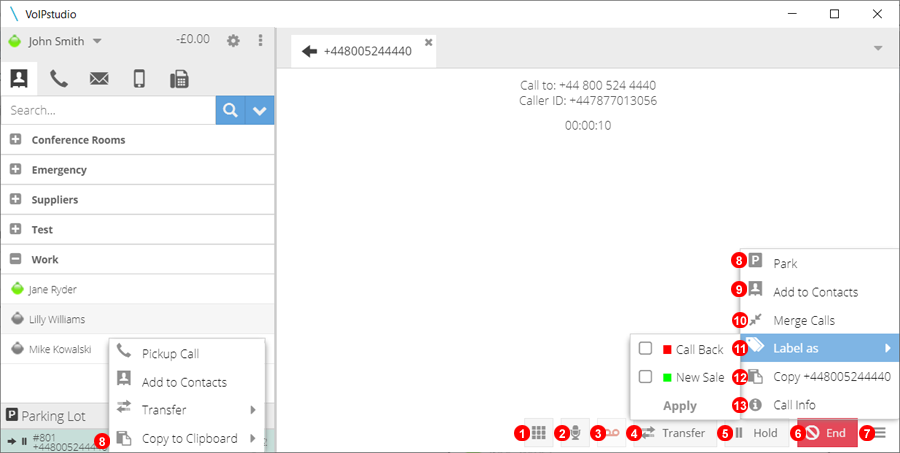
- Shows dialpad to make use of DTMF (Dual Tone – Multi Frequency) for option selection or entering details on a call. This can be achieved by clicking or typing the keys 0 - 9, # or *
- Mute call.
- Toggle call recording, will show flashing red if call is being recorded.
- Transfer a call, once selected input destination and select Attended (Speak to Recipient of call first) or Blind (Instant) Transfer.
- Place call on hold.
- Ends the current active call.
- Click to expand call options.
- Click to Park a call. Click on Parking Lot to open contextual menu and furhter direct a call or retreive it.
- Click to add current active call to contacts.
- Start a Conference between 2 or more active calls. More Than one active call is required, can receive and make additional calls to conference.
- Click and select what label to assign to the active call.
- Click to save number to clipboard to easily paste/save.
- Displays Network statistics of active call.
Call Transfer
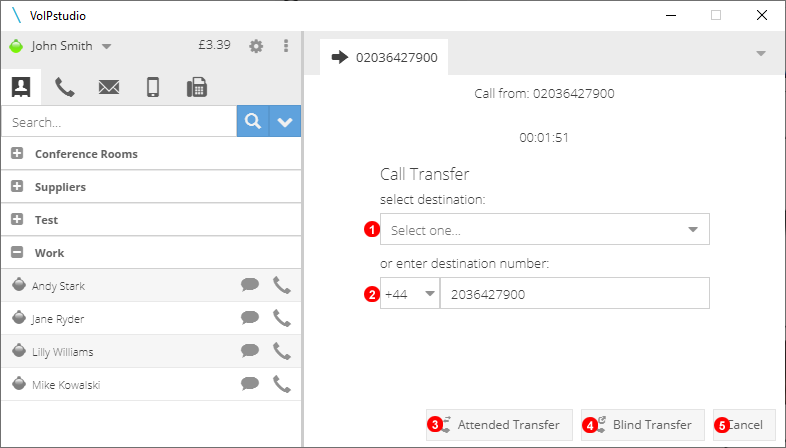
While on an Active call Click Transfer to start the process.
- Select From Dropdown the user to transfer to.
- Type in Number to transfer to an External Number.
- Select Attended Transfer to speak to the receiver of the call first before completing the transfer.
- Select Blind Transfer to do an Immediate tranfer.
- Click Cancel to go back to the Main Active Call Display.
Contacts
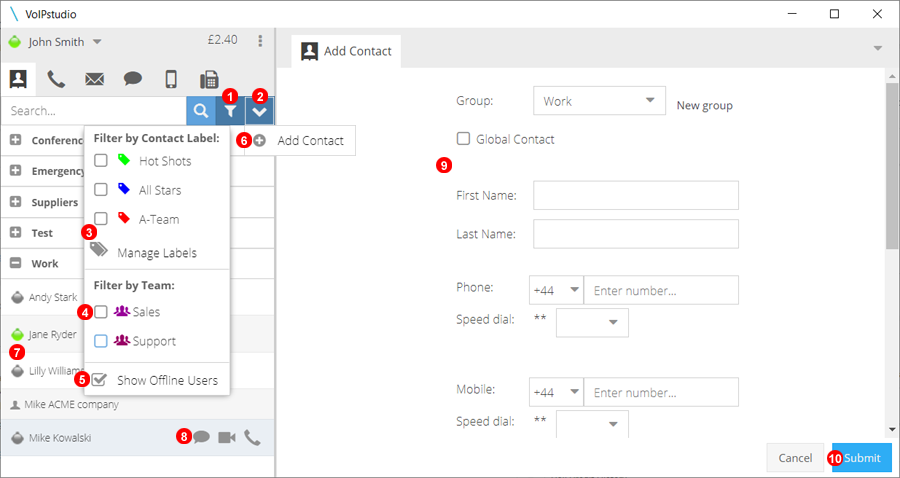
- Click to Open Contact Filter Menu.
- Click to Open Contextual Menu.
- Filter Contact Labels and Manage Labels.
- Filter By Team.
- Select to show all offline contacts.
- Click do add new Contact.
- Icon Displays Other user/extension status, green online, amber away, red do not disturb and Grey Offline.
- Click to start chat, call or video call with user/extension. Icon will display call state of extension/user red on call, grey available, yellow indicate incoming call.
- Fill In New Contact Details.
- Submit to Save new Contact information.
Queues and Campaigns
Users can logout and into any Queues or Auto Dial Campaigns they are members of with two clicks.
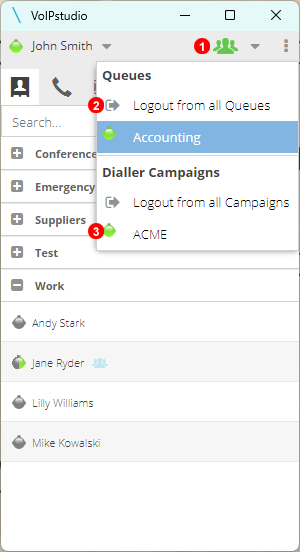
- Click to Open the Contextual Menu, this icon will change depending on login status, full green for 100% login, full red for 100% logout and Part Red if logged out from at least One Queue or Campaign.
- Click to logout or In on all Queues or campaigns.
- Or Individual Logins can be done.
Video Calls

- To start a video call click the Cam button under contacts or on the chat window.
- To click end the video call.
- Both Preview and Contact Video will display in the main window.
Video Conference
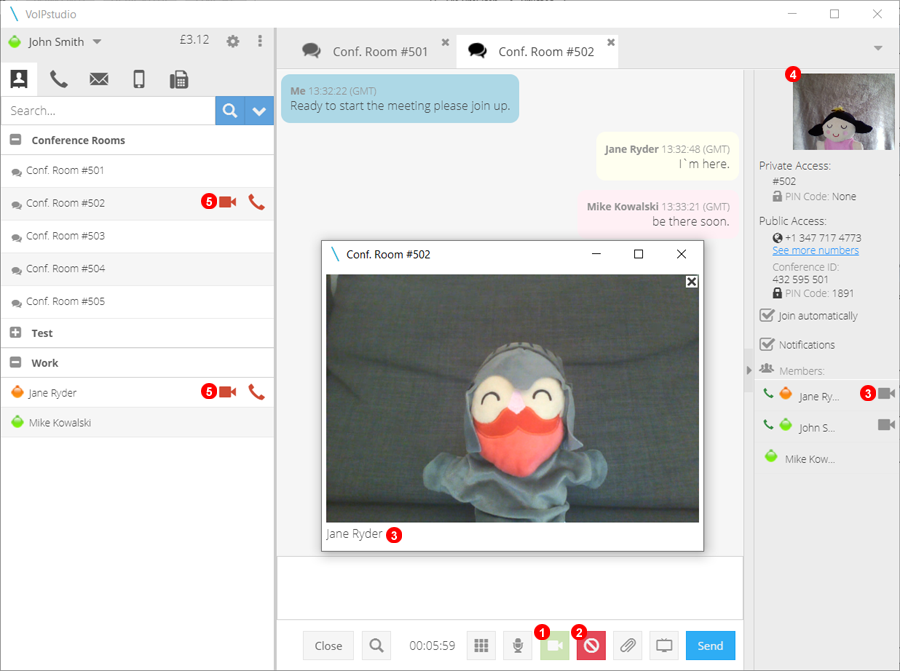
- To Join or Start a Video Conference simply open the Chat window of the conference room and click the Camera Icon.
- To Leave a Video conference simply click the cancel button.
- To View the Video feed of other users click on the Cam Icon next to their name, this will open a seperate window that will house all open video feeds.
- You can view your video feed here.
- Status of the conference room and any users participating will change to indicate this.
Chat Window
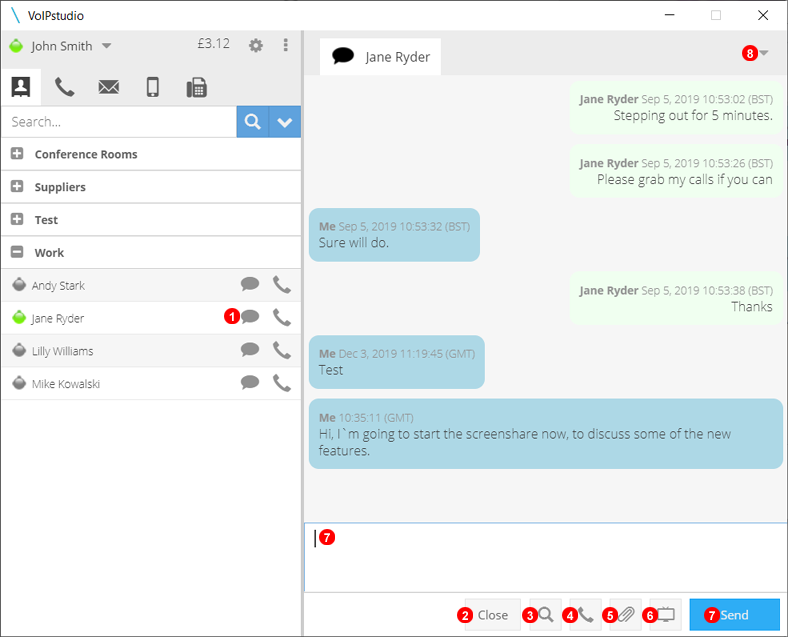
- Click on Speech Bubble Icon to start chat with desired user.
- Click Close to close the chat window of a specific user.
- Click to search for specific details of chats with selected user.
- The Phone Icon will start a call with the selected user.
- Click to send a file to the selected user.
- Click to start a screenshare with the selected user, they will receive an invite notification and when accepted will open a new window sharing your screen.
- Type in the text box and then click send or press enter to send a message to selected user.
- If multiple chat windows are open the upside down triangle can be selected to show a dropdown list of all chats for quick navigation.
File Transfer
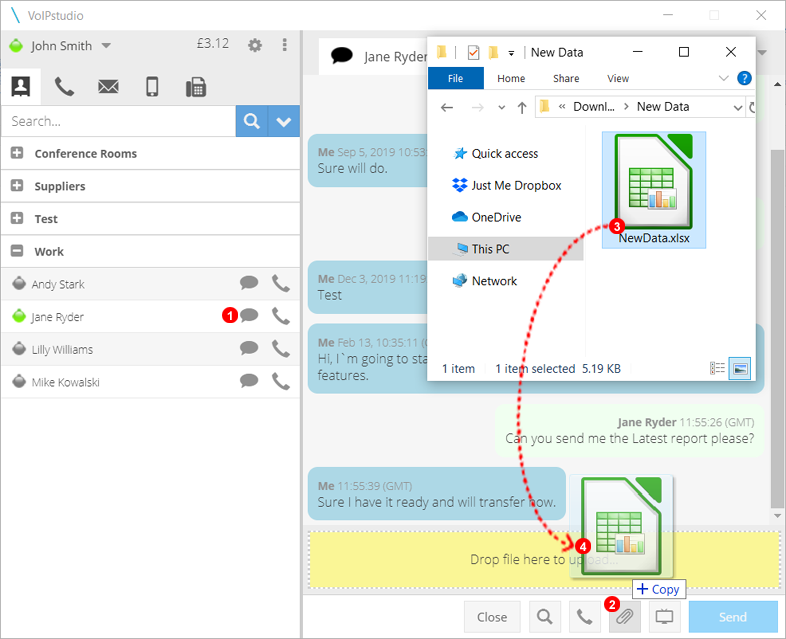
- Click the Chat Bubble to open chat window with required user.
- Click the Paperclip Icon to start the File Transfer and show the "Drag file here to upload..." Prompt.
- Open the Folder containing the file you wish to transfer then click, hold and drag the file to the "Drag file here to upload..." Prompt.
- Release the file to send to the current Chat. Accepting a File will be discussed further below.
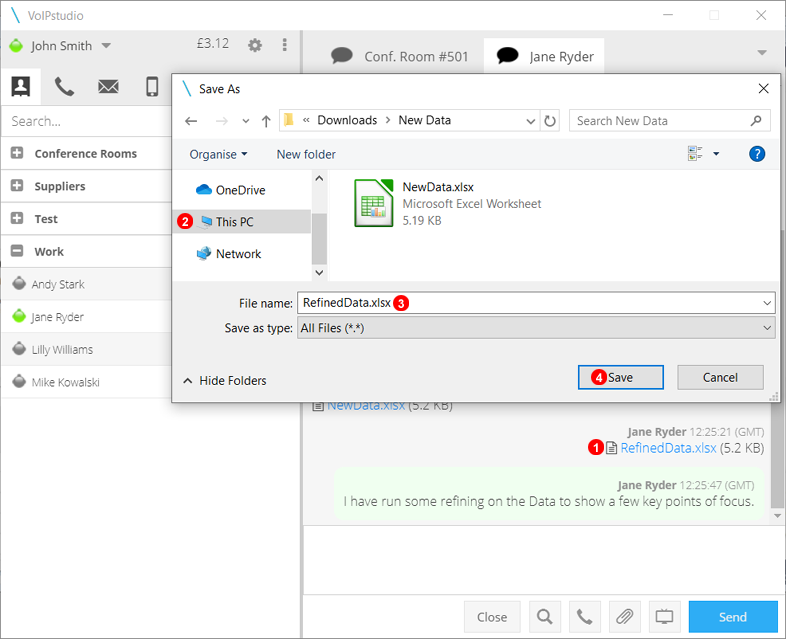
- Click on the File Name to open the save file dialog box.
- Navigate to the desired folder to set as the save location.
- Leave file name as it was sent or change as needed.
- Click Save to complete the transfer.
Screen Sharing
Starting a Screenshare
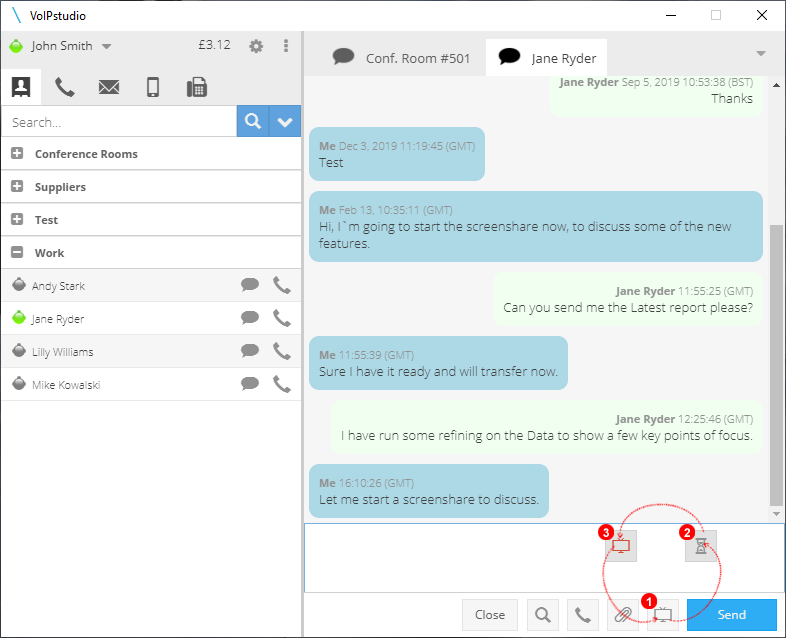
- At the bottom of all chat windows including Conference rooms you can start a screenshare by clicking the share screen button.
- Once Selected the Icon will change to a hour glass indicating invites have been sent.
- Once the invite has been accepted the icon will change again to a red flashing Icon indicating you are sharing your screen clicking this one last time will return to the normal grey icon stoping the screen share.
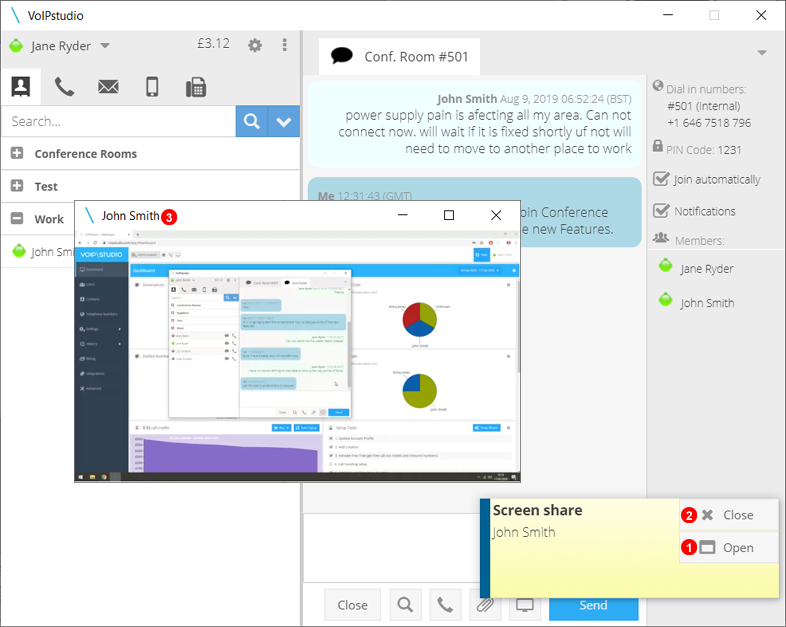
A Pop up will appear to indicate an incomming screenshare invite
- Click accept to start the screenshare and see the invitee screen.
- CLick close to dismiss the pop up and screenshare will not start.
- Screenshare will be in a new seperate window that can be resized as needed.
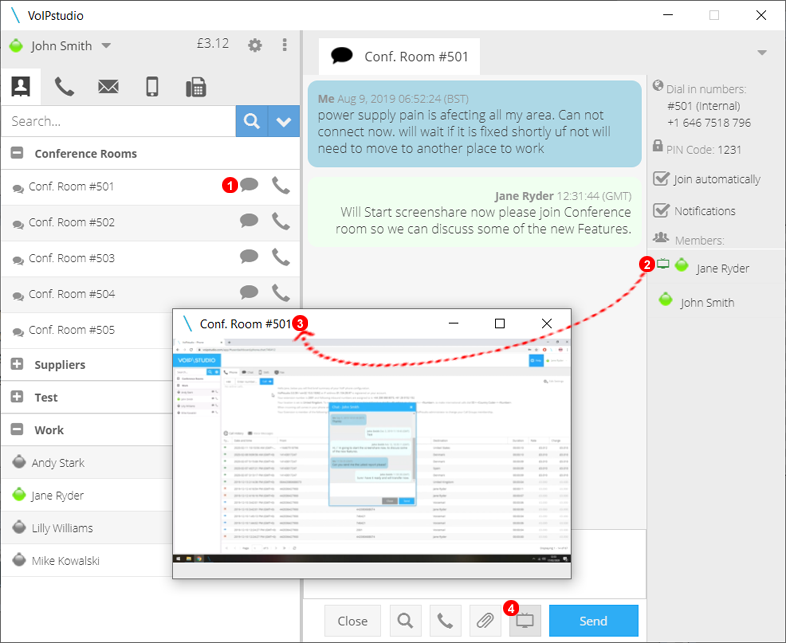
- Click the Chat bubble next to a Conference Room to open the chat window for that Room.
- Any Users sharing their screen will have a Green Screen Icon next to their name. Clicking this Icon will open the screenshare window.
- A new Window will Pop up showing the user screen, this can be moved and resized as needed.
- Click the Share screen button to start sharing your screen with all users in the conference Room chat.
Note: Screensharing can be accompanied by a conference call in the same room or another.
Chat Rooms
Starting a Screenshare
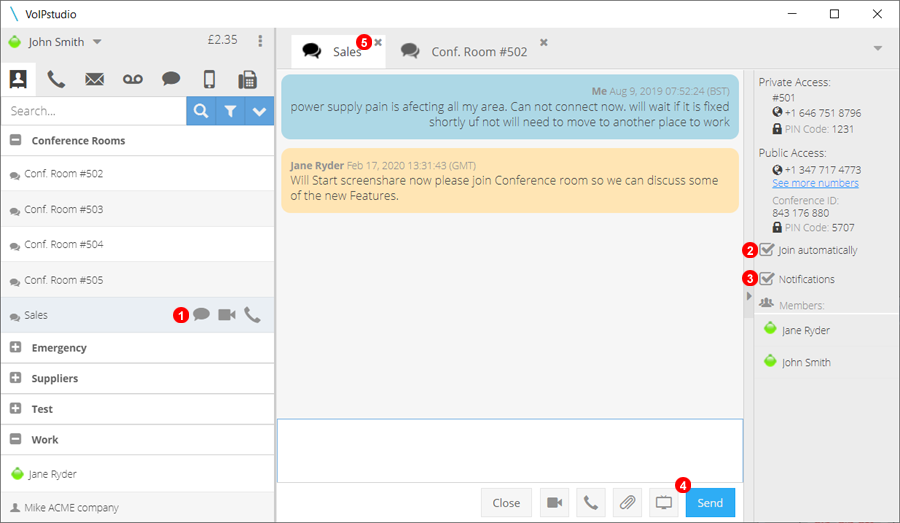
- Join any Conference Room chat to join the chat room.
- Select to Automatically join Chat Room
- Select to receive notifications if any messages are sent in this chat room.
- Any messages sent will be received by all participants.
- Chat room can be left by closing using the "x"
Pick UP calls
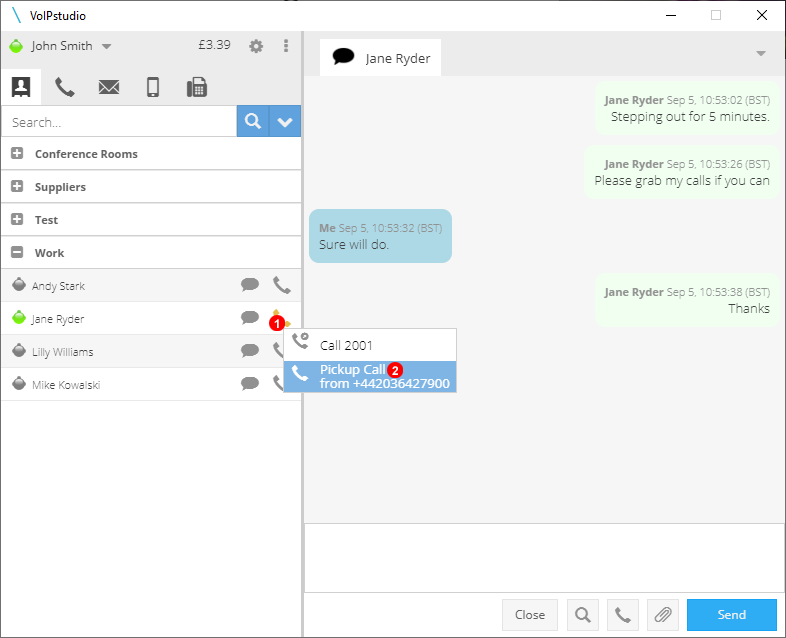
Click over phone status icon under contacts sections while phone is ringing (yellow status indicator) displays a contextual menu allowing to Pick Up ringing call.
- Click phone status icon while it is in yellow. Contextual menu will appear.
- Click
Pick Up call
Note: in order to be able to Pick Up a call appropriate rights must be managed.
Barge In
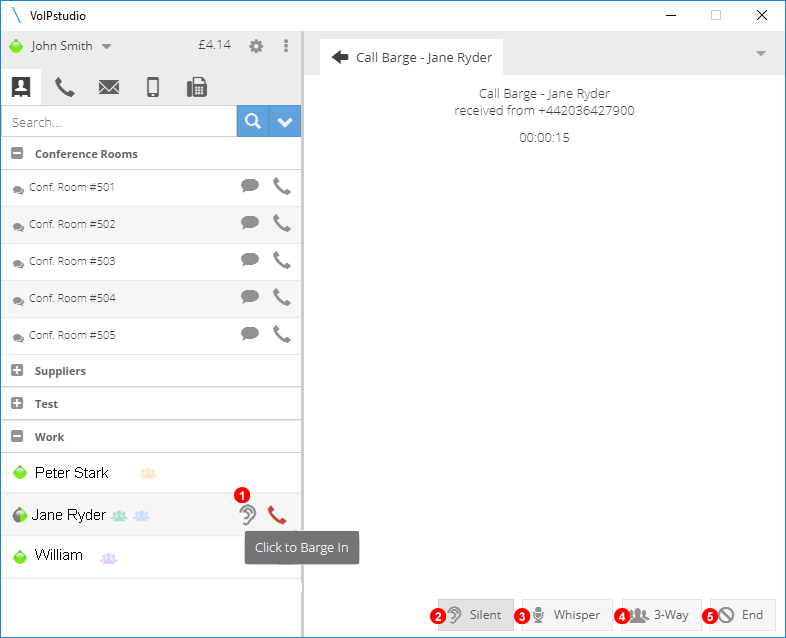
Click over phone status icon under contacts sections while remote extension is on call (red status indicator) displays a contextual menu allowing to Barge In the desired call.
- Click Barge Call to connect and Listen to the active call.
- Silent Button will be Selected initially to indicate Callers cannot hear Listening Agent.
- Select Whisper to Speak to Agent only.
- Select 3-Way to Initiate a 3 way conference call.
- Select to end the Barge In call allowing Initial callers to remain connected.
Note: In order to be able to Barge In a call appropriate rights must be managed as indicated here: https://voipstudio.com/docs/administrator/advanced/#callbarging
Settings
General

- Click Gear Icon to Open Settings.
- Change number of minutes before Softphone changes to away status due to inactivity.
- Select Default Language.
- Select to enable/disable automatic start of Softphone when Device starts up.
User Profile
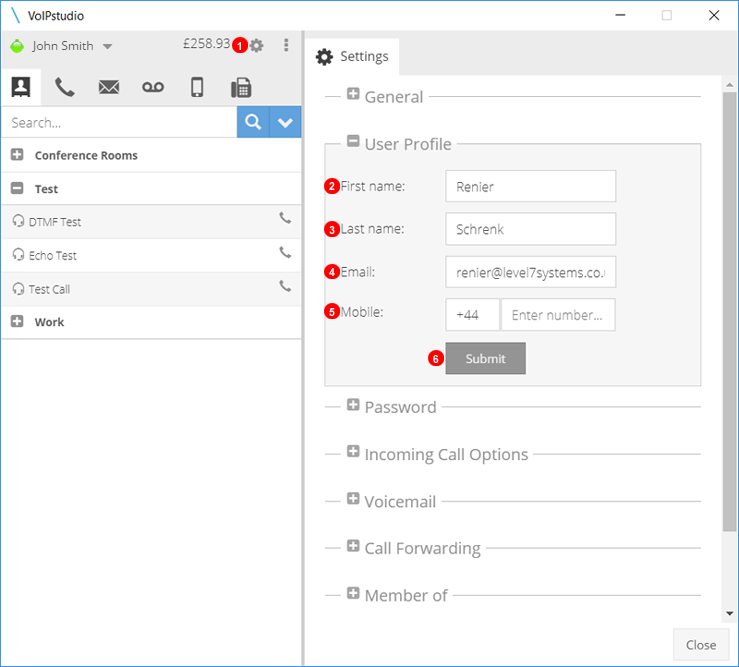
- Click Gear Icon to Open Settings.
- Edit First name or Identifier of User.
- Edit First name or Second Identifier of User.
- Edit login and voicemail email address of User.
- Click Submit to complete and save any changes.
Password
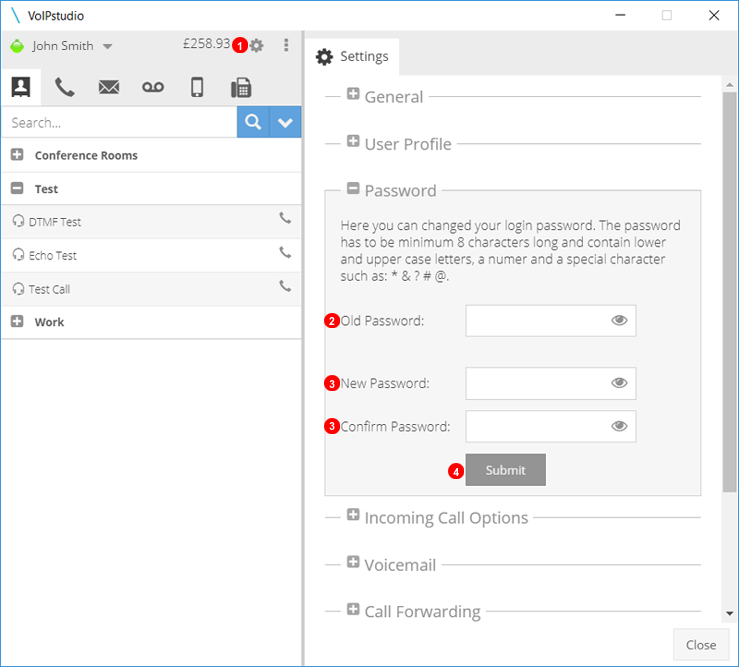
- Click Gear Icon to Open Settings.
- Enter Current Password for Authentication.
- Enter and Confirm new Password.
- Click Submit to complete and save any changes.
Incoming Call Options

- Click Gear Icon to Open Settings.
- Select time before Incoming call is transfered to Destination if no answer setting.
- Enable or Disable Call Waiting.
- Select Action when incoming is not answered.
- Click Submit to complete and save any changes.
Voicemail
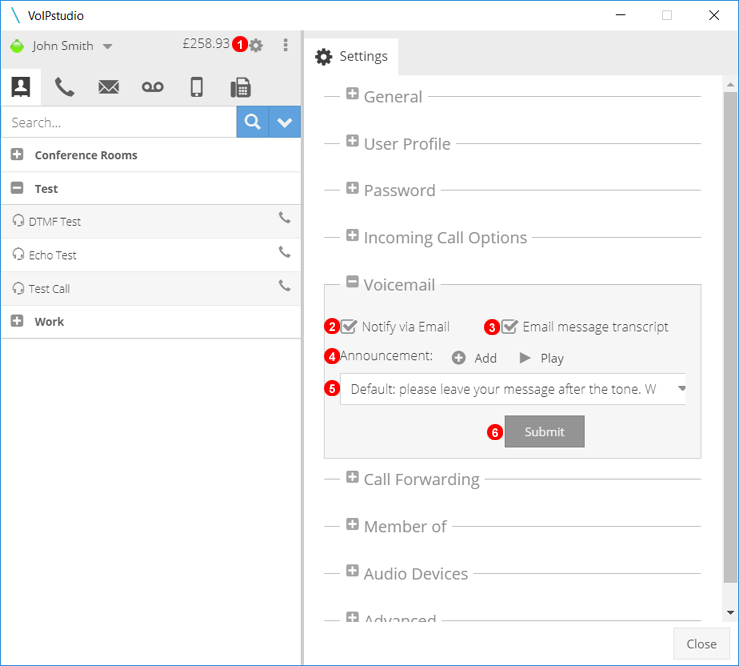
- Click Gear Icon to Open Settings.
- Select to Enable Email Notification with Audio file of Message.
- Select to Enable Transcription of Message to Text.
- Click Add to upload a new Voicemail Greeting Message and Play to Listen to the currently selected Greeting.
- If Multiple Files are Uploaded the Active Message can be selected from the dropdown list.
- Click Submit to complete and save any changes.
NOTE: Voicemail can be retrieved and modified by dialing #445 and following the prompts.
Call Forwarding
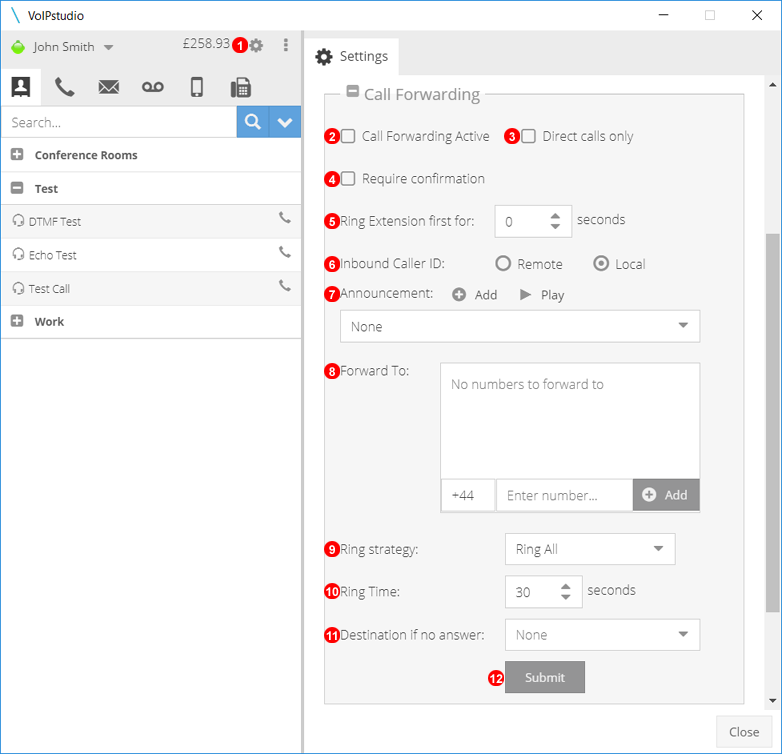
- Click Gear Icon to Open Settings.
- Click to Enable Call Forwarding.
- Click to Enable only direct calls being forwarded if Disabled Calls from Ring Groups and Queue`s will be forwarded too.
- Enable the use of # as confirmation of Forwarded call on receiving device.
- If a VoIP Phone is online a time can be set to ring VoIP Device first before Call Forward Starts.
- Select Remote(Callers) or Local(VoIP) Number to display as caller ID on Receiving Device.
- Add, Play or Upload Message played to caller before call is forwarded.
- Enter and add number(s) to forward calls to.
- If multiple numbers are selected to forward to a Ring Strategy can be used to change call distribution.
- Select how long Forwarded call will ring before going to No Answer.
- Select action to be taken is call is not answered.
- Click Submit to complete and save any changes.
Member of
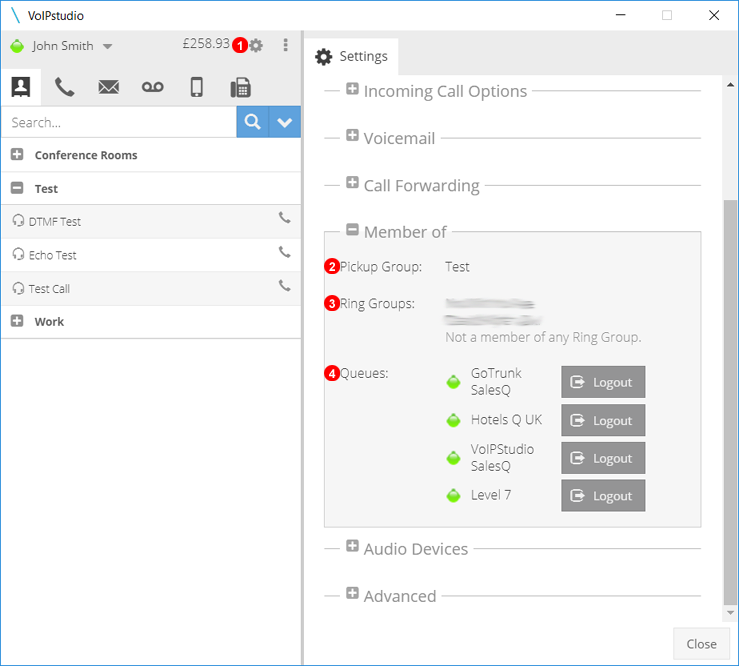
- Click Gear Icon to Open Settings.
- Displays all Pick Up Groups user is a member of.
- Displays all Ring Groups User is a member of.
- Shows all Queues User is a member of and allows user to log in and out of Queues.
Keyboard Shortcuts
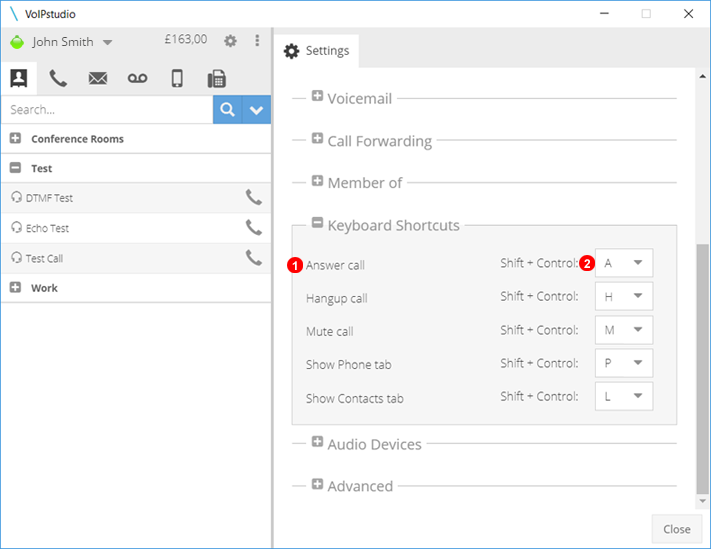
- Allows for quick use of the application through Keyboard combinations. These Shortcuts are global and will work even while the app is minimized or if working on a different tab/app.
- If any conflict occurs with a different application the Keys can be mapped as needed.
Audio Devices
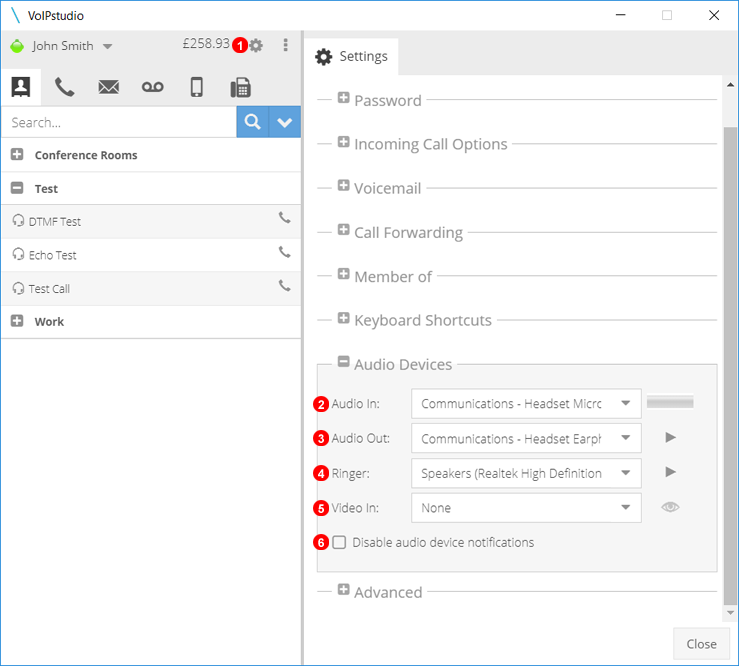
- Click Gear Icon to Open Settings.
- Change Microphone settings.
- Change Call Audio Settings.
- Select Ringer Device.
- Select Webcam or other Video Device.
- Disable notifications regarding misconfigured audio devices.
Advanced
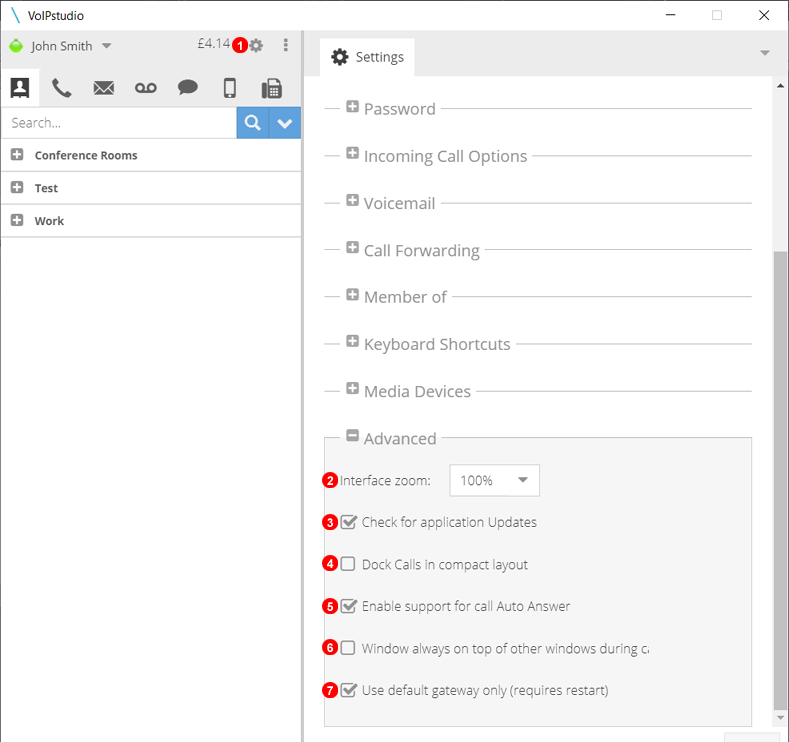
- Click Gear Icon to Open Settings.
- Select from the Dropdown list a new Zoom level to increase size of text and buttons, after new Zoom is selected Window might need to be resized.
- Enable Automatic Update Checks.
- Enable to have more compact view of Active Call.
- Enable When Using Click to call with auto answer feature.
- Call and Softphone Window will always be at front of other windows or applications.
- This setting should make the app NOT use your VPN, but go directly to the internet via the default router.
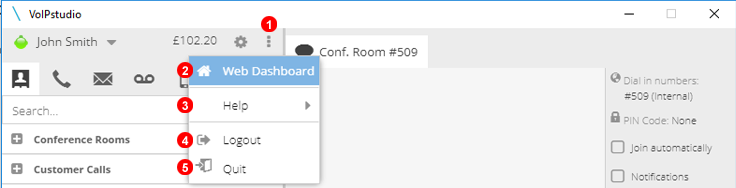
Options Panel
By clicking button tagged as 1 drop down list will expand and allow to:
- Quick access to the
Web Dashboard. - Access to the
Helpsection. - Logout from the Desktop application.
Quitto close the application.
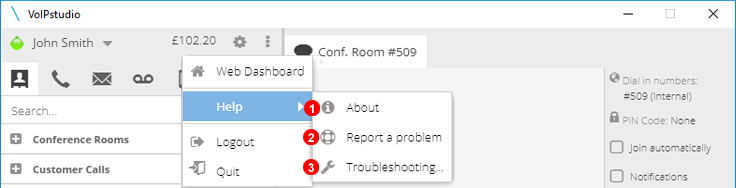
Help menu
From within Softphone Help menu you have access to:
- Check current release and search for softphone Updates.
- Open and reply to current support tickets.
- Several troubleshooting and debug tools.
Troubleshooting
Below is a listing of commonly asked questions, answers and basic troubleshooting steps for the Desktop application.
Invalid email / password
"Wrong email/password entered" message displayed when I try to login.
Make sure the email address and password is the same you use to login into a Control Panel at https://voipstudio.com/login/. If you forgot your password, go to https://voipstudio.com/recover-password/ and we will send a new password to your email address.
Firewall
"Firewall error" message displayed when I try to make calls.
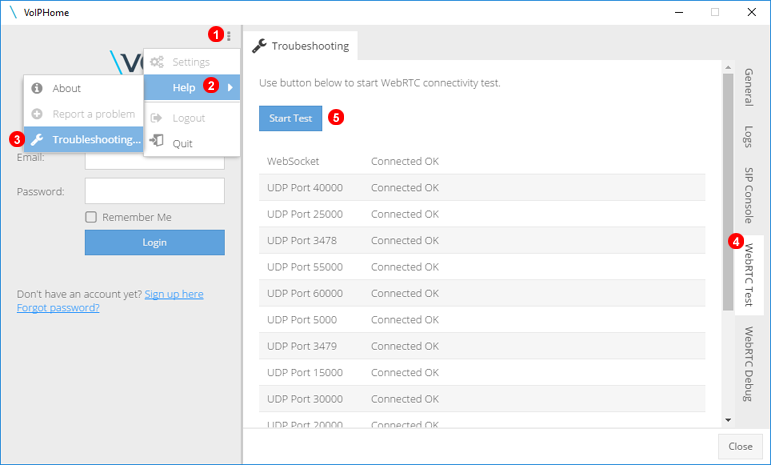
Some ISPs (Internet Service Providers) block UDP ports which are required for our Softphone Application to work. To check if your PC can successfully connect to our network:
- Click main menu icon.
- Select
Helpfrom the contact menu. - Select
Troubleshooting...fromHelpsub-menu. - Click
WebRTC Testtab. - Click
Start Testbutton.
After few moment you will see list of ports being tested. If any shows connection and Failed you will need to inspect your firewall / router configuration and/or contact your Internet Service Provider to have ports unblocked.
Reporting a problem
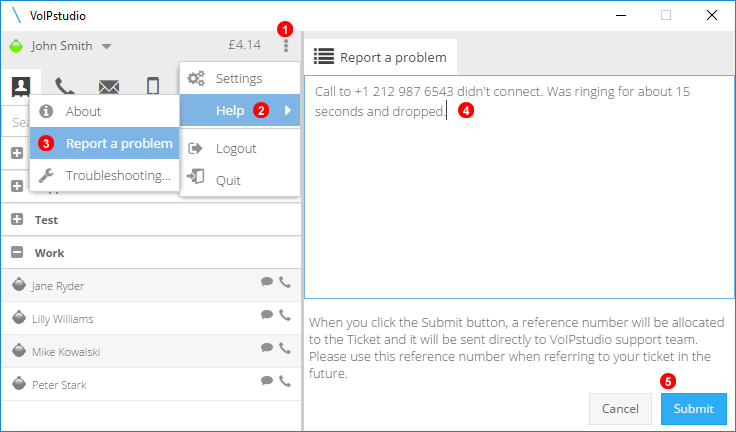
To report a problem with a softphone application or calls made / received:
- Click main menu icon.
- Select
Helpfrom the contact menu. - Select
Report a problemfromHelpsub-menu. - Enter details of the issue. If problem relates to a particular phone call make sure to include date and time of the calls and number dialed (for outbound calls) or Caller ID for inbound calls.
- Click
Submitbutton to open Support Ticket.