Integrations - CTI Connector
VoIPstudio CTI Connector allows for Computer Telephony Integration (CTI) of customer website or application. It does not matter if it's simple Content Management System (CMS), e-commerce application or advanced Customer Relationship Management (CRM). Connector can be used as a standalone component in almost any kind of environemnt that supports JavaScript. Connector supports both outbound (click to call also known as c2c) and inbound calls - this has been described below:
1) Outbound click to call connections to PSTN (Traditional Telephony Network) from within Customer application involves clicking telephone number link or button in the user interface which triggers VoIPstudio network to place a call to SIP endpoint (IP Phone or Softphone) registered on the user account. As soon as this call is answered it is being transferred to the number clicked.
2) Incoming calls received from PSTN (Traditional Telephony Network) generate real time notifications about call state (Ringing, Connected, On Hold, Disconnected) which should be handled in customer's application user interface.
In both scenarios described above once the call is established user can control call state using VoIPstudio CTI Connector API. Ongoing connections can be transferred to a different PBX user or external number or disconnected.
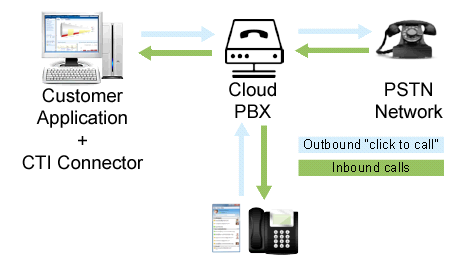
Figure 17.1 VoIPstudio Connector diagram.
Requirements
Cti.Connector requires sip.js - SIP library for JavaScript to be included before connector code. SIP uses WebSockets to maintain a persistent two-way connection to an SIP server which is used as a bridge between JavaScript and SIP telephony network.
Connector's Events
To integrate Connector into you application you need to respond to Cti.Connector events. To be able to receive events and respond to them, we need to pass callable function as a onMessage config parameter.
Note: Event flow has been also described in VoIPstudio` example integration.
Types of events
Connector sends (fires) the following events:
LOOGED_IN - after successful authentication to VoIPstudio;LOGGED_OUT - after successful logging out from VoIPstudio;INITIAL - when caller SIP endpoint is ringing - occurs only for OUTBOUND calls;ACCEPTED - when caller SIP endpoint accept the call (picks up the phone) - occurs only for OUTBOUND calls;READY - after connection has been established with SIP server;RINGING - when server is trying to established OUTBOUND or INBOUND call;CONNECTED - after OUTBOUND or INBOUND call has been established with callee;ON_HOLD - when caller or callee suspends the call;HANGUP - when caller or callee ends the call;CANCEL - when call is not yet connected and error occurs;INFO - when action cannot be executed for some reason but the error did not occur;ERROR - when any kind of error occurs, for example: incorrect username and password during the authentication, incorrect phone number format, not permitted call action etc.
Event flow
Here are some typical scenarios.
OUTBOUND call:
INITIAL - caller SIP endpointACCEPTED - caller SIP endpointRINGING - dialled number is ringingCONNECTED - connection with dialled number establishedHANGUP - call terminated
INBOUND call:
RINGING - user phone is ringing as a result of an inbound callCONNECTED - inbound call establishedHANGUP - call terminated
Event structure
There are two types of events:
- ''activity'' events:
LOOGED_IN, LOGGED_OUT, READY, INFO, ERROR;
- ''call'' events:
INITIAL, ACCEPTED, RINGING, CONNECTED, ON_HOLD, HANGUP, CANCEL;
Each ''activity'' event sent by Connector contains two attributes:
name - event name;message - message with event description / reason;
Example events:
{
    name: "READY",
    message: "Connection with SIP server has been successfully established."
}
Each ''call'' event contains also two attributes:
- name - event name;
- call - call details as described below;
{
    name: "CONNECTED",                      // event name
    call: {
        id: "1432310571129"                 // unique call ID
        cid: "100"                          // internal call ID used by Connector
        cause: ""                           // cause for call events: CANCEL or HANGUP
        destination: "+123456789"           // callee phone number or extension
        destinationName: "John Smith"       // callee name if available
        direction: "OUTBOUND"               // call direction: INBOUND / OUTBOUND
        source: "anonymous"                 // caller phone number if available
        sourceName: "anonymous <anonymous>" // caller name if available
        status: "CONNECTED"                 // call status
    }
}
Available call statuses (same as ''call'' events):
INITIAL - when caller softphone is ringing - occurs only for OUTBOUND calls;ACCEPTED - when caller softphone accept the call (picks up the phone) - occurs only for OUTBOUND calls;RINGING - when callee softphone is ringing;CONNECTED - when callee accepts the call (picks up the phone)ON_HOLD - when caller or callee suspend the call;HANGUP - when caller or callee ends the call;
Available call directions:
OUTBOUND - for outgoing calls;INBOUND - for incoming calls;
Connector API
Connector offers API:
login - used for authenticating user in VoIPstudio application and for opening new connection with SIP serverlogout - used for logging out and closing the connectionisConnected - used to indicate if user is already authenticated and connected to VoIPstudioanswer - used to answer incoming call in ringing state. Note: this method only works with VoIPstudio Desktop Softphone min. v. 3.0.50call - used to make a new connection with destination numberterminate - used for terminating given calltransfer - used for transferring given call to other phone number or extension
All those methods have been described below.
Creating Connector
To create Connector instance we need to set the config option and pass it into constructor:
// function that will be called whenever the connector sends event
var onMessageCallback = function(event) {
    console.info("Event received" + event.name);

    if (event.name === Cti.EVENT.READY) {
        document.title = "Connector is ready";

        // ...
    }

    // your code goes here
}

var connector = new Cti.Connector({
    // callback
    onMessage: onMessageCallback
});
After setting up connector we can start using connectors's api.
login
Required parameters:
username - e-mail address provided during registration on voipstudio.compassword - user password
or:
apip_key - REST API key assigned to user account;
To verify if user is already authenticated and connector already connected we should call isConnected method.
connector.isConnected(); // for now this will return false
If user is not yet connected, the first step is to login into VoIPstudio app:
var email = "user@example.com",
    password = "secretpass";
connector.login(email, pass);
or:
var apiKey = "%%rest_api-key%%";
connector.login(apiKey);
After login attempt the following events will be sent by Connector:
LOGGED_IN - after successful authentication;READY - as soon as the connection with SIP server will be established;ERROR - if any error occur;
logout
If user is authenticated and connected, we can disconnect him with logout method:
connector.logout();
After that the following events will be send by Connector:
LOGGED_OUT - after successful logging out;ERROR - if any error occur;
call
Required parameters:
destination - destination phone number in E164 format or internal extension without special characters;
To make a phone call, call method should be called with destination parameter:
var destination = "+123456789";
connector.call(destination);
After that the following events will be send by Connector:
INITIAL - when caller SIP endpoint is ringing - occurs only for OUTBOUND calls;ACCEPTED - when caller SIP endpoint accept the call (picks up the phone) - occurs only for OUTBOUND calls;RINGING - to inform app that OUTBOUND call is being established. During OUTBOUND call RINGING event is send after caller softphone accepts the call;CONNECTED - when callee accepts (answers) the call;INFO - if action cannot be executed;ERROR - if any error occur;
terminate
Required parameters:
callId - unique call ID that has been received with RINGING / CONNECTED events; This ID should be stored to identify future call changes;
To terminate given call, terminate method should be called with callId parameter:
var callId = "1432549154470";
connector.terminate(callId);
After that the following events will be send by Connector:
HANGUP - after successful call termination;INFO - if action cannot be executed;ERROR - if any error occur;
transfer
Required parameters:
callId - unique call ID that has been received with RINGING / CONNECTED events; This ID should be stored to identify future call changes;destination - destination phone number in E164 format or internal extension without special characters;
To transfer given call to other phone number or extension, transfer method should be called with callId and destination parameters:
var callId = "1432549154470",
    destination = "+987654321";
connector.transfer(callId, destination);
After that the following events will be send by Connector:
HANGUP - after successful call transfer;INFO - if action cannot be executed;ERROR - if any error occur;
Example implementation - Cti.Platform
For better understanding we have created sample implementation that uses Cti.Connector to create Click to call user interface and to show you how easy it is to integrate it. The example code can be found in CTI Connector repository.
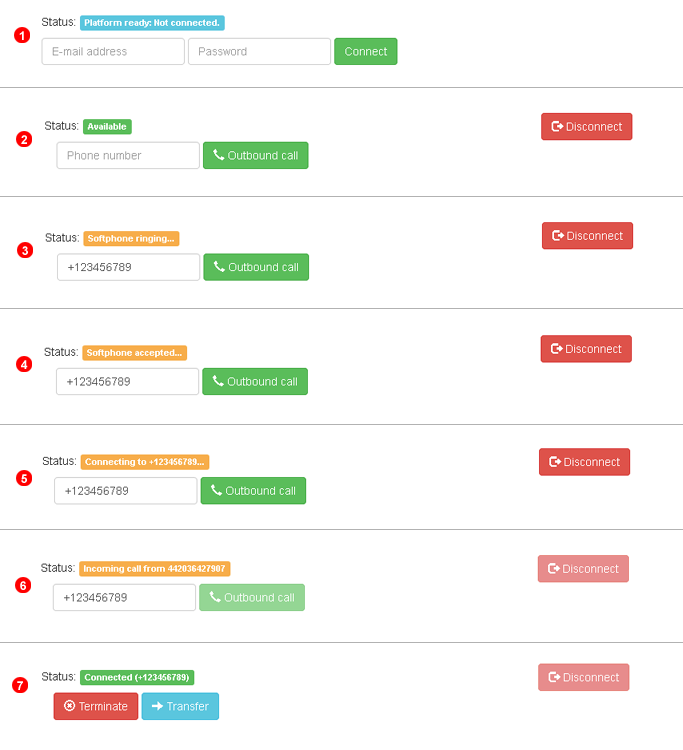
Figure 17.2 VoIPstudio Connector example integration.
The above image shows five steps:
- Platform ready:
Connector and other JavaScript files have been successfully loaded, user is not authenticated yet; The first step is to connect to VoIPstudio application via Cti.Connector. This requires providing valid e-mail address and password from you VoIPstudio account; Entering invalid data will trigger ERROR event with proper message;
- Connector is now
READY: after successfully authentication we have received LOGGED_IN event, and later after the connection has been established connector sent READY event - we are now ready to make outbound calls and to receive INBOUND calls;
- Making outbound call: after entering phone number and clicking
Outbound call button, Connector sent INITIAL event. It means that the caller's softphone is now ringing and waits for call acceptance. ''This occurs only for OUTBOUND calls'';
- After accepting the call by caller (picking up the phone),
Connector sends ACCEPTED event. Now the ringing process can start. If callee could not accept the call, was busy or unreachable, Connector will send CANCEL event with proper cause property. ''This occurs only for OUTBOUND calls'';
Connector sent RINGING event to notify our app that is trying to establish new connection - callee phone is now ringing; If connection could not be established, the ERROR event with proper message will be returned;- Receiving INBOUND call: when connection is being established, connector will send
RINGING event with caller information. This information can be used for example to identify caller, open call history or to display caller details;
- Connector in now
CONNECTED: when callee answer our OUTBOUND call or after answering INBOUND call, connector will send CONNECTED event which means that call has been established. Having active call we can terminate it or transfer to other phone number. After terminating or transferring call we will return to step 1.
We encourage you to familiarize yourself with this implementation.
We called it Cti.Platform as it contains all necessary code to integrate Cti.Connector with example app build with Bootstrap. With this sample code you can authenticate to VoIPstudio app and make, transfer and terminate calls. This basic functionality can be easily extended depending on customer needs.


