5. Settings
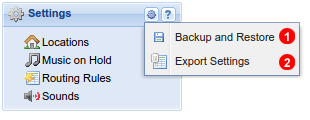
Figure 5.1 Setting panel.
- Backup and Restore provides the function to save all configuration settings to a backup before making large scale changes.
- Exports account settings to a file that can later be used to restore account to a previous configuration.
Additional JSON(Machine Readable File) can be obtained using FTP access as follows:
https://voipstudio.com/manual/Admin_Calls-History/#FTP-Access
Locations
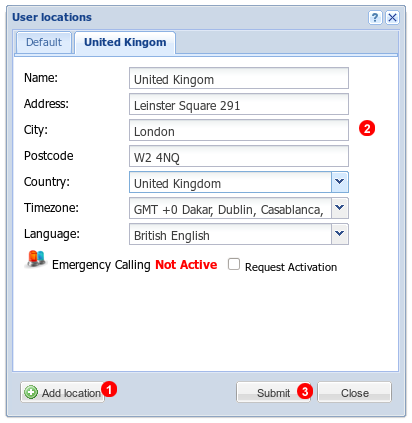
Figure 5.2 Locations.
Dial plan of each user depends on their geographical location. For example in most European countries prefix 00 for international numbers and single 0 for local numbers is used. In United States prefix 011 for international numbers and no prefix for local numbers is used. By default all your users are assigned to the location (country and time zone) as defined in your Company profile - see Figure 4.2 above. However if some of your users are located in different countries you can define additional location and assign users to them.
To add or modify locations click Locations link located in Settings panel - see Figure 5.1 above - and follow steps below:
- Click
Add location button.
- Enter your new location address details.
- Click
Submit button.
Emergency Services Calling
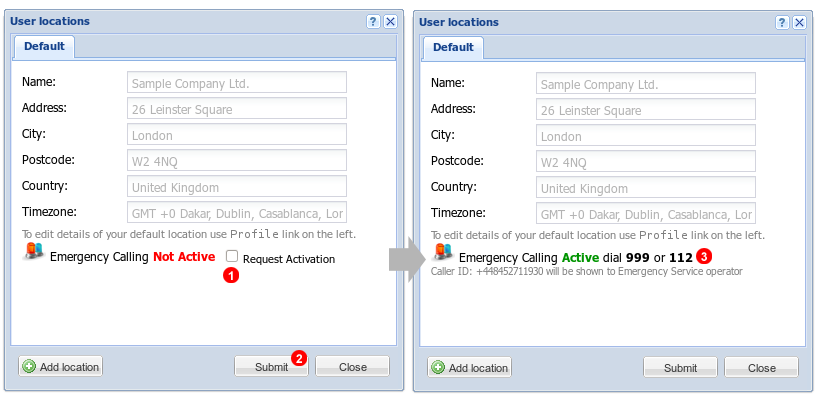
Figure 5.3 Emergency Services calling
In some locations you can enable Emergency Services Calling (Police, Ambulance and Fire Brigade). To enable this feature please ensure your address details are correct as they will be passed to Emergency Centre and used to dispatch Emergency vehicles in case of a "silent call" (when operator is unable to speak with person who called emergency number).
To enable Emergency Calling click Locations link located in Settings panel - see Figure 5.1 above - and follow steps below:
- Select
Request Activation checkbox
- Click
Update button.
- Once you address is successfully validated you will be able to call Emergency Services by dialling 999 in the United States or 999 / 112 in the United Kingdom.
Important: you will not be able to make emergency call in case your Internet connection is down. Please use your mobile (cell) phones in this case.
Music on Hold
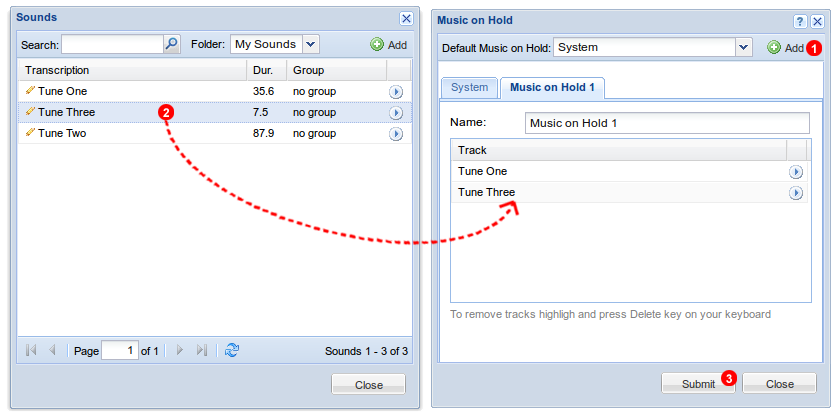
Figure 5.4 Custom Music on Hold.
By default there is one set of music tunes which are being played to callers while they are awaiting for connection. It is possible to create up to 20 custom Music on Hold sets which can include marketing messages and other announcements.
To create custom Music on Hold set click Music on Hold link located in Settings panel - see Figure 5.1 above - and follow steps below:
- CLick
Add button located in top right part of Music on Hold window.
- Drag and drop music tines you want to include in custom Music on Hold set.
- Click
Submit button.
Routing Rules
Using Routing Rules it is possible to overwrite default settings for inbound and outbound calls based on pre-defined conditions.
Inbound rules
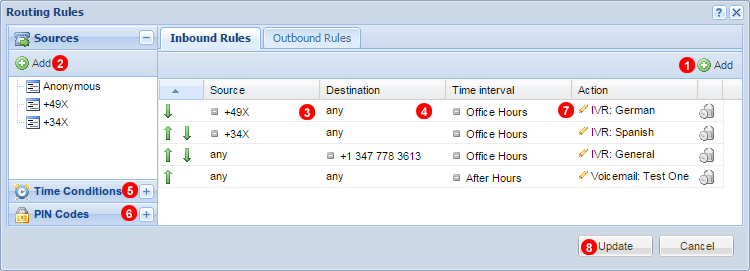
Figure 5.5 Inbound rules.
To define inbound routing rules:
- Click
Add button (1) to create new Inbound rule.
- Optionally you can add one or more
Source numbers and/or patters using Add button (2). If no Source patterns are added inbound routing rule will apply to calls from any Caller ID numbers. Characters listed below are interpreted as a pattern rather than a literal:
X - any digit from 0-9Z - any digit from 1-9N - any digit from 2-9[1235-9] - any digit in the brackets (in this example, 1,2,3,5,6,7,8,9)X. - (dot) one or more of X - for example +442X. will match any number starting with 442
- Drag and drop number and/or patters from
Sources panel to Source column in Inbound rules tab.
- Drag User, Inbound Number, IVR or Queue into
Destination column.
- Optionally you can add Time Conditions using panel
(5).
- Using PIN Codes panel
(6) you can defined 4-8 digit long codes and protect certain Destinations using them as Action.
- Set
Action that PBX should perform if inbound call matches defined conditions using drop down list (6).
- Click
Update button to save your rules.
Time conditions
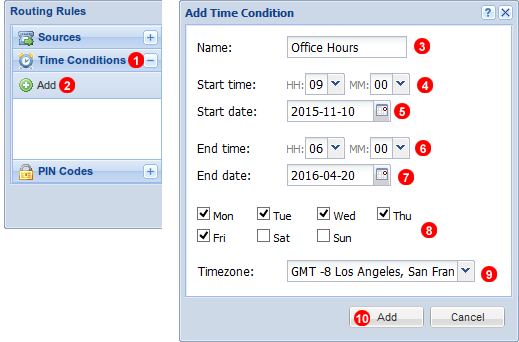
Figure 5.6 Inbound rules Time Conditions.
In order for routing rules to be triggered only during specified time window Time Conditions need to be defined as described below:
- Provide descriptive Name.
- Select Time that rule condition is applied to will come into effect.
- Select Date that rule condition is applied to will come into effect, leave black for permanently active.
- Select Time that rule condition is applied to will cease to be in effect.
- Select Date that rule condition is applied to will cease to be in effect.
- Select which days of the week rule will be active.
- Time`s specified will be in accordance to selected Timezone.
- Click add to finalize time Condition.
PIN Codes
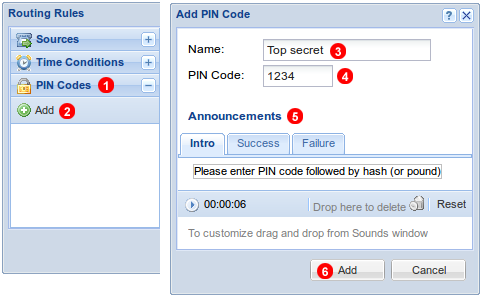
Figure 5.7 Inbound rules PIN Codes.
To protect access to selected destinations with a PIN Code please follow steps below:
- Open
PIN Codes panel.
- Click
Add button.
- Enter descriptive Name.
- Enter 4-8 digits long PIN code.
- Optionally you can adjusted audio announcements using panel
(5).
- Click
Add to save your PIN code.
Once PIN Code is created it can be used as an Action (see (7) in Figure 5.5 above) in Inbound Routing rule to protect access to selected Destinations.
Example
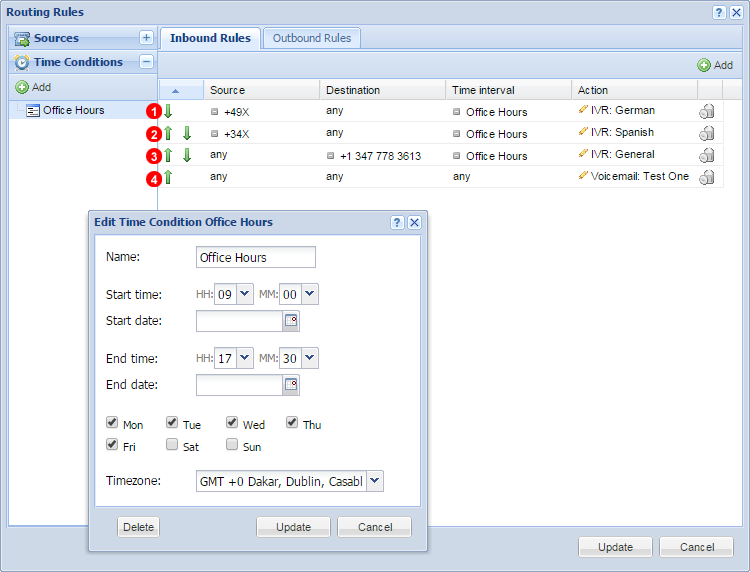
Figure 5.8 Inbound routing rule - example.
Call routing system will try to match all incoming calls according to their source (Caller ID), destination and time interval. In the example above there are four rules defined.
Rule 1:
Only Calls from numbers starting with +49 (Germany) and match the time comdition Office Hours will be forwarded to IVR:German.
Call from +49123456789 at 10:30 On a Monday will pass.
Rule 2:
Only calls from numbers starting with +34 (Spain) and match the time condition Office Hours will be forwarded to IVR: Spanish.
Call from +3123456789 at 13:00 on a Wednesday will pass.
Rule 3:
Calls form any Number to +13477783613 that match the time condition Office hours will be forwarded to IVR General.
Rule 4:
Any Call that does not match the first 3 Rules will be forwarded to a Voicemail Box.
For Example:
Call From: +44123456789 to +13477783613 at 14:00 on a Saturday will go to the Voicemail box of Test One.
Outbound rules
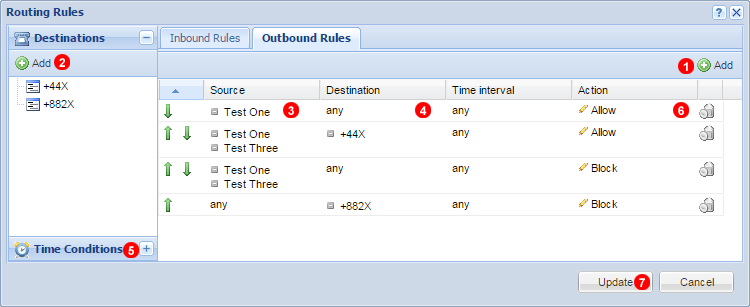
Figure 5.9 Outbound rules.
To define outbound routing rule:
- Click
Add button (1) to add new rule.
- Add one or more
Destination numbers and/or patters using Add button (3). Characters listed below are interpreted as a pattern rather than a literal:
X - any digit from 0-9Z - any digit from 1-9N - any digit from 2-9[1235-9] - any digit in the brackets (in this example, 1,2,3,5,6,7,8,9)X. - (dot) one or more of X - for example +442X. will match any number starting with 442
- Drag and drop users into
Source column (3).
- Drag and drop number and/or patters from
Destinations panel to Destination column in Outbound rules tab.
- Optionally you can add Time Conditions using panel
(5).
- Set
Action that PBX should perform if inbound call matches defined conditions using drop down list (6).
- Click
Update button to save your rules.
Sounds
Add sound
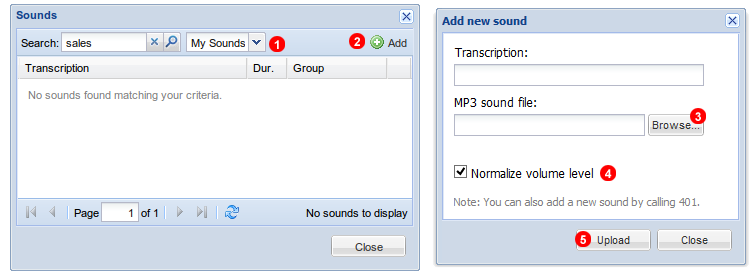
Figure 5.10 Add sound.
Sounds window gives you access to many pre-recorded announcements that can be used to compose your own IVR menus. Here you can upload you own announcements:
- Select "My Sounds" from the drop down list.
- Click
Add button.
- Select an .mp3 file you want to upload.
- Check if you want to normalize volume level
- Click
Upload button.
Edit sound
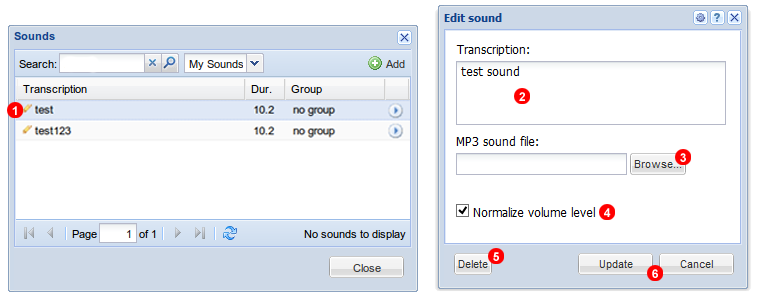
Figure 5.11 Edit sound.
To edit your existing recordings:
- Click on Edit button of the sound file.
- You can rename the file from here.
- You can browse another mp3 and replace the sound file.
- Check if you want to normalize volume level
- To delete this file, Click on
Delete
- To save your settings, click on
Update or to cancel, click on Cancel.
Backup and Restore
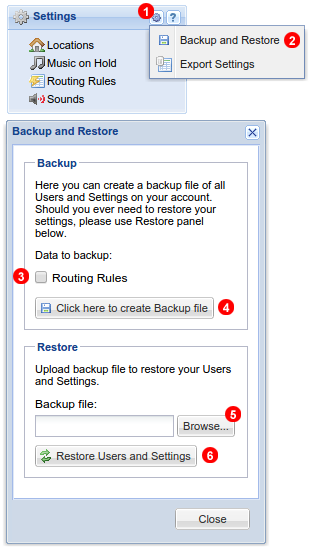
Figure 5.12 Backup and restore.
Using Backup and Restore you can create a backup file of your PBX settings and later use it to restore your configuration.
To create a backup file:
- Click gear icon located in top right part of
Settings panel.
- Select
Backup and Restore from the menu.
- Select which part of your PBX configuration you want to backup.
- Click
Create Backup file button. A backup file will be downloaded to your local computer.
To restore configuration from backup file:
- Select backup file previously downloaded.
- Click
Restore Users and Settings button.
Note: all existing configuration will be overwritten when using Restore functionality.
Export Settings
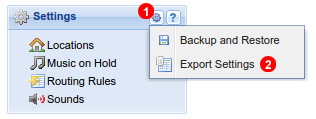
Figure 5.13 Export settings.
To export all your PBX settings (Users, Inbound Numbers, Ring Groups etc.):
- Click gear icon located in top right part of
Settings panel.
- Select
Export Settings from the menu.
An Excel file will be downloaded to your local computer with details of your PBX configuration.


