Introduction
General
VoIPstudio is a complete fully featured business class Hosted VoIP PBX system.
It allows you to make and receive phone calls from the Internet and traditional telephone network at the same time. It makes managing your communication easier and helps to reduce operating costs and increase productivity.
Requirements
The web control panel is compatible with the following browsers:
- Microsoft Edge
- Mozilla Firefox
- Google Chrome
- Apple Safari
It is optimized for a screen resolution of minimum 1024 x 786 pixels.
Softphone application requires one of the following operating systems:
- Microsoft Windows
- Apple OSX
- Linux
Intended Audience
This guide is intended for personnel involved in operating hosted VoIP PBX. Readers of this guide should possess the following recommended knowledge and skill sets:
- Basic computer skills
- Familiarity with standard PBX features
Conventions
In this manual, you will find a number of styles of text that distinguish between different kinds of information. Here are some examples of these styles, and an explanation of their meaning.
| style | meaning | ||
www.example.com/login | Text you need to type into a program. | ||
email field (1) |
|

Key concepts
VoIP (Voice over IP)
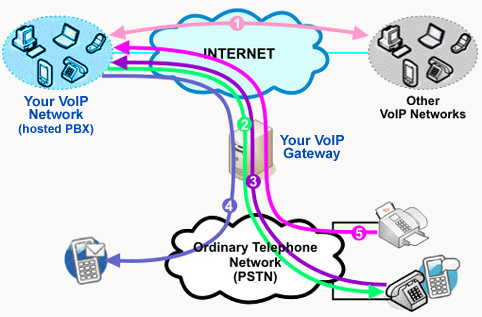
VoIP or Internet telephony refers to communication services - voice, facsimile, and/or voice-messaging applications - that are transported via the Internet, rather than the Public Switched Telephone Network (PSTN - traditional telephony). Thanks to VoIP technology you can:
- (1) make and receive free Internet calls to other VoIP networks.
- (2) call any land line or mobile (cell) phone at very low rates.
- (3) receive calls from traditional telephone network.
- (4) send text messages (SMS) to mobiles (cells) world wide at very low rates.
- (5) receive faxes to your email address for free.
Hosted PBX
Hosted PBX is a service provided by us, using equipment located in our premises. This means you don't need to buy or install PBX equipment in your office in order to benefit from advanced PBX features.
Extension
A telephone extension is an internal telephone line attached to a PBX system which allows multiple phones to connect without each phone requiring a separate outside line (inbound number) assigned to it.
Inbound number
Inbound number also called Direct Inward Dialing (DID) in USA, Direct Dial-In (DDI) in Europe, is a range of telephone numbers connected to your PBX, so it can route the call to the desired person or Ring Group (IVR etc.) within the organization.
Control Panel
This is a web based application which allows to manage all aspects of your hosted PBX system. Create new user accounts, ring group, pickup groups, assign inbound numbers and provision VoIP phones.
The same Icons and Methods apply to several menus, the following will assist in getting familiar with how they work.
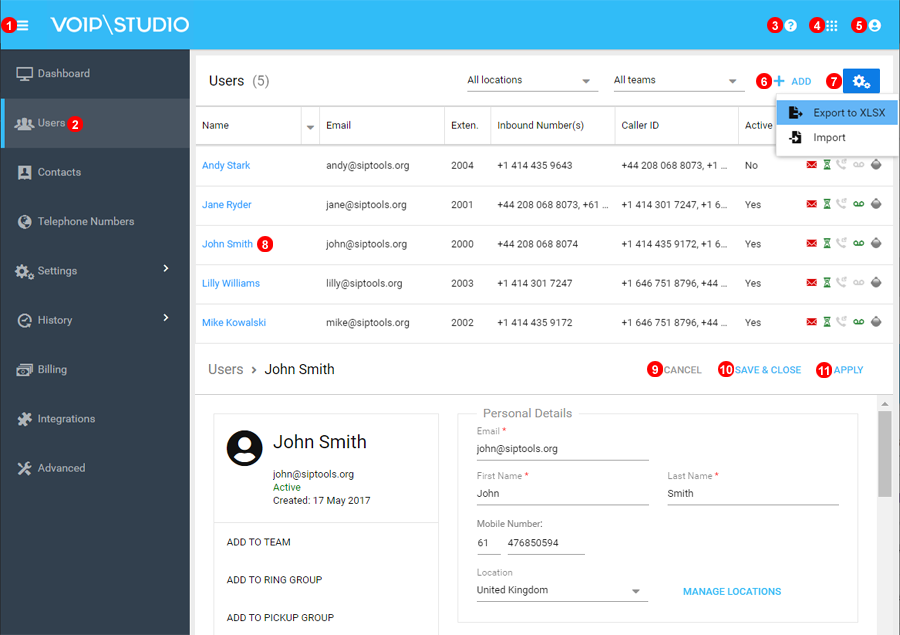
- Click to Toggle between compact and normal Sidebar Menu.
- Select Menu Items on the left to switch between Panels.
- To get Help Select
?from any menu. - The Bento Box Menu allows for switching between different Role Pages.
- Select the Profile Icon to see your User status details and to log out.
- The
+orAddIcons allow for adding new Items to your account like Numbers or Ring Groups. - To Export or Import from different Menu
s like Contacts and CDRs Select Gear Icons. - To Edit Any Items simply click the name of the user, IVR, Telephone number etc.
- While doing an edit simply click
CANCELto discard any changes and close the menu. - Click
SAVE & CLOSEto commit any changes made and close the menu. APPLYwill save any changes made but keep the menu open to allow for further changes to be made.