
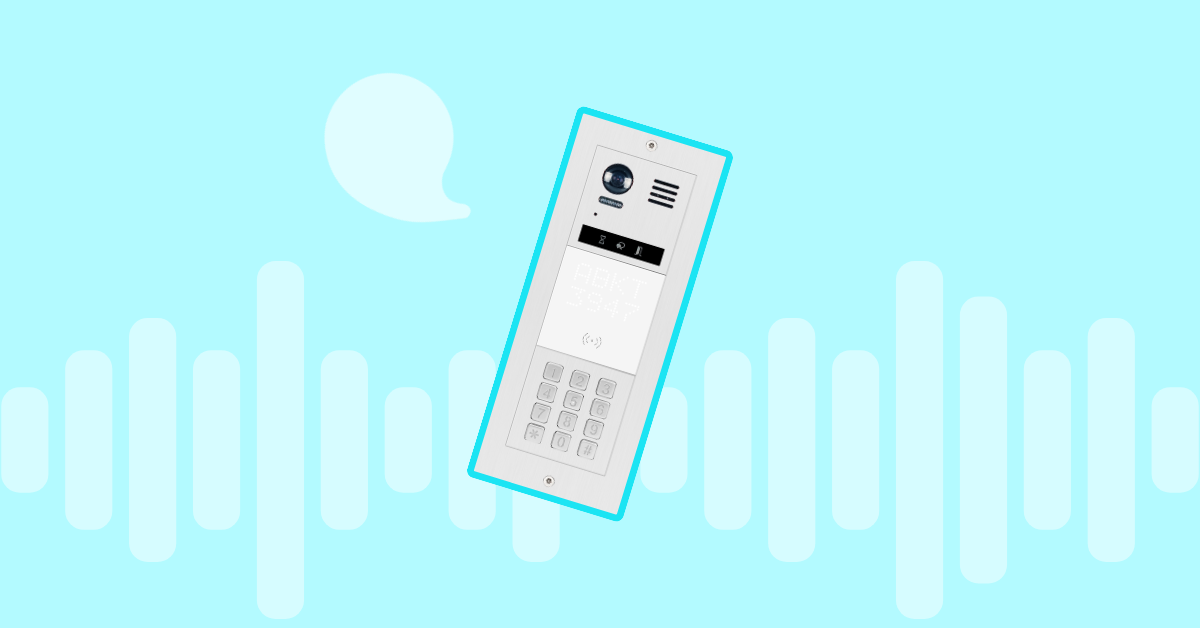
Imagine unlocking your front door for a guest while miles away from home or letting a delivery driver in without leaving your desk.. This level of convenience and security is now a reality thanks to SIP door openers.
SIP (Session Initiation Protocol) technology, traditionally used for voice and video communication, is now being used to develop innovative, secure, and scalable access control solutions. In this blog post, we’ll explore SIP door openers, how they work, and why they might be the perfect addition to your home or business.
What is a SIP Door Opener?
A SIP door opener is a device that integrates Session Initiation Protocol (SIP), a communication protocol commonly used for voice and video calls over the Internet, with access control systems. It allows you to remotely control and monitor door access using VoIP technology.
Here’s how SIP Door Openers work
When a visitor presses the doorbell or intercom, the SIP door opener calls your smartphone, tablet, or computer. You can then see and speak to visitors through a video or audio. If you choose to grant access, you can unlock the door remotely with a simple tap on your device.
Key features of SIP door openers
- Remote Access Control: Unlock doors from anywhere in the world.
- Two-Way Communication: Speak to visitors via audio or video.
- Integration with VoIP Systems: Works seamlessly with existing VoIP infrastructure.
- Scalability: Can be used in residential, commercial, or industrial settings.
- Security: Encrypted communication ensures secure access.
How Does a SIP Door Opener Work?
The functionality of an SIP door opener is based on the Session Initiation Protocol (SIP), which is widely used to initiate and manage communication sessions over the Internet.
Here’s a step-by-step breakdown of how it works:
- Visitor Arrives: A visitor presses the doorbell or intercom at the entrance.
- Call Initiation: The SIP door opener initiates a call to your smartphone, tablet, or computer using your VoIP system.
- Two-Way Communication: You receive the call and can see and speak to the visitor through a video or audio feed.
- Access Decision: You can grant or deny access based on the interaction.
- Remote Unlocking: If you decide to grant access, you can unlock the door remotely with just a tap on your device.
- Logging and Monitoring: Many SIP door openers log access events, so you can track who entered and when.
Installation and Setup
Installing a SIP door opener typically involves the following steps:
- Hardware Installation: Mount the door opener unit at the entrance and connect it to your door lock mechanism.
- Network Configuration: Connect the device to your local network
- Configure VoIP platform.
- Connect to VoIP PBX.
- Software Setup: Install any necessary apps or software on your smartphone or computer.
- Testing: Test the system to ensure it works as expected.
We’ll now walk you through the general steps to connect your PBX to a SIP door opener and configure it properly.
Configure PBX to connect the door opener.
To allow door opener interconnection, you may need to adjust your VoIP settings as described below:
Create a SIP Account for the Door Opener:
- Log in to your SIP PBX admin panel.
- Create a new SIP extension or account for the door opener.
- Locate the extension number and password.
Set Up Call Routing:
- Configure the PBX to route calls from the door opener to the desired destination (e.g., a specific phone, group of phones, or a mobile app).
- For example, when a visitor presses the doorbell, the call can be routed to a receptionist’s phone or a mobile app.
Enable Two-Way Communication:
- Ensure the PBX supports audio and video communication (if your door opener has a camera).
- Test the audio and video quality to ensure clear communication.
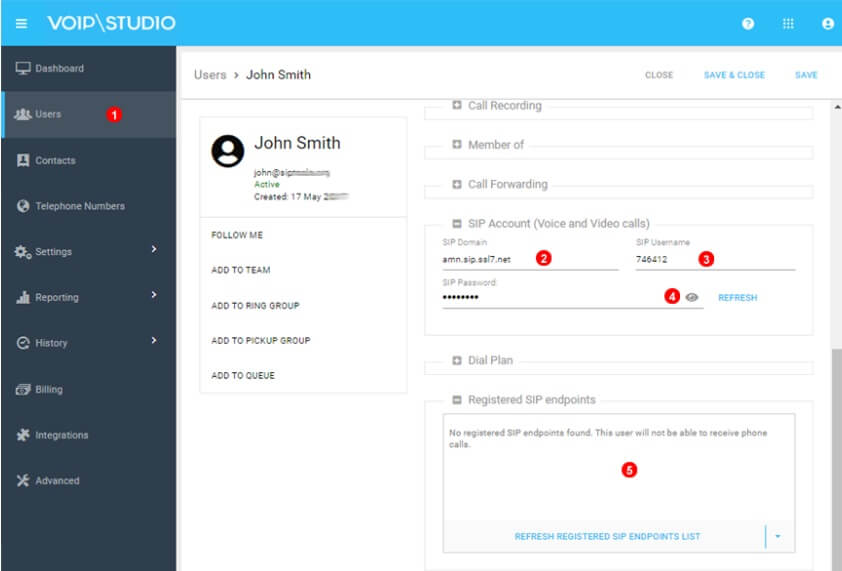
If you are a VoIPstudio customer, you just need to open your Dashboard and create or edit an existing user. Once created, you may find SIP details under the “SIP account section.”
Not a customer yet?

We need to find out SIP Domain (2), SIP username (3), and SIP password (4). Once we add these details to the SIP door opener, we will see the device registered under “Registered SIP endpoints” (5).
Connecting SIP door opener to your PBX
Connecting a door opener to a SIP PBX (Private Branch Exchange) is a great way to integrate access control with your existing communication infrastructure or to get a door opener to reach an external phone number. This setup allows you to manage door access remotely using VoIP technology. Below is a step-by-step guide to help you connect a door opener to a SIP PBX:
Access the Door Opener’s Interface:
- Most SIP door openers have a web-based interface or mobile app for configuration.
- Connect the door opener to your local network (via Ethernet or Wi-Fi).
Enter SIP Credentials:
- Log in to the door opener’s configuration panel.
- Navigate to the SIP settings section.
- Enter the following details:
- SIP Server: The IP address or domain of your SIP PBX. For example eu.sip.ssl7.net
- SIP Username: The extension or username assigned to the door opener.
- SIP Password: The password for the SIP account.
- Port: Typically 5060 (default SIP port).
- Test SIP Registration: Save the settings and check if the door opener registers successfully with the SIP PBX.
- Look for a “Registered” status in the door opener’s interface or the SIP PBX dashboard.
Link Fanvil door opener to VoIPstudio PBX
Fanvil i31S IP is a robust mechanical device designed for operation in outdoor conditions, especially for fences.

It has many options and features, but for this simple test, we only need to connect VoIPstudio SIP credentials and set up where the device needs to “call” when the button is pressed.
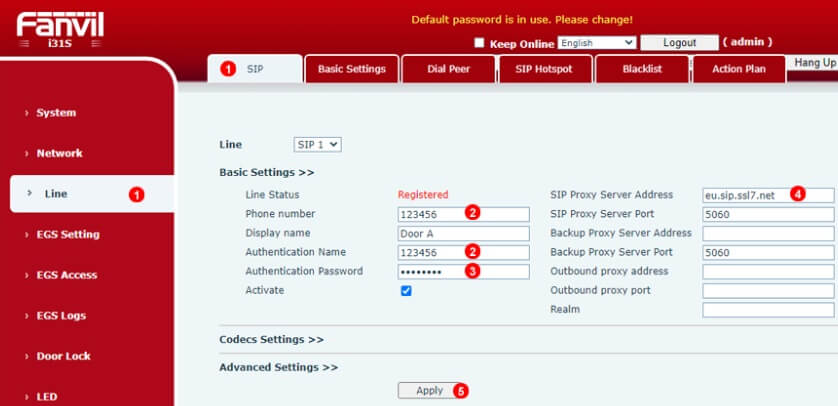
- First step: Navigate to the “SIP” tab on your Fanvil web interface and find the “Line” sub-menu. You need to fill in your VoIPstudio details in the fields: User name, authentication name, Password, and SIP server, as shown in the picture below:
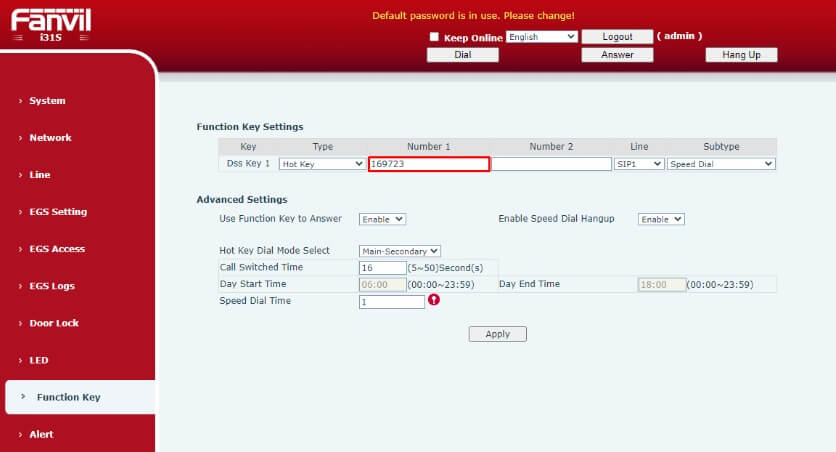
- Step two: now, you must set up action when the button is pressed. You will find this setting for the Fanvil door opener under “Function Keys”. You’ll need to enter the external number or internal extension to be dialed when the button is pressed:
The device is now ready for testing.
Link the Hickvision door opener to VoIPstudio PBX.
The Hikvision DS-KB8113-IME is a versatile and advanced video intercom door station designed for secure and convenient access control in residential, commercial, and industrial settings.
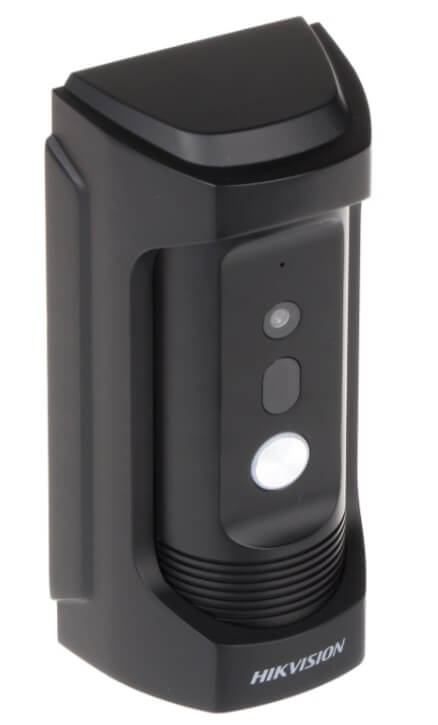
It combines high-quality video and audio communication with robust security features, making it an excellent choice for modern access control systems.
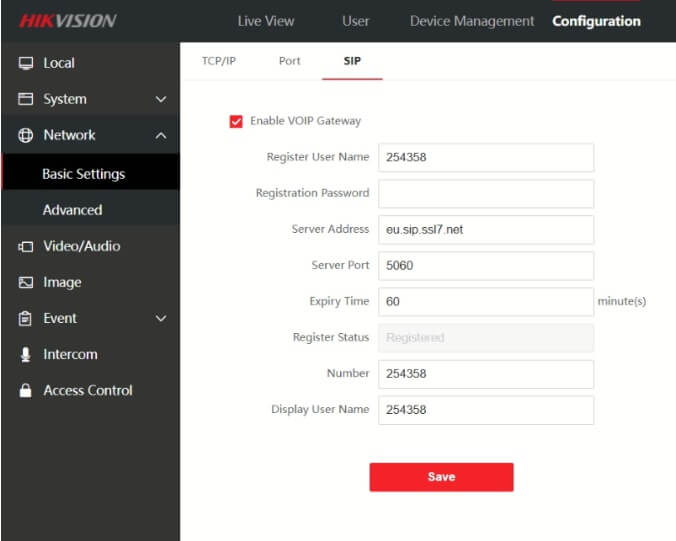
- First step: From the Hickvision “Configuration” panel, browse “Network” > “Basic settings.” In this section, select the “SIP” tab. You need to fill in your VoIPstudio details in the fields: Register Name, Number, Password, and SIP server as shown in the picture below:
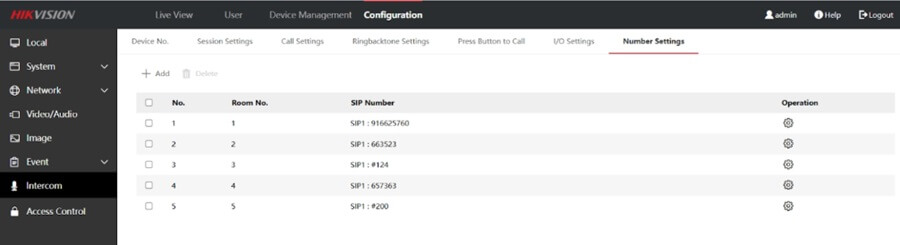
- Step two: From your Hickvision “Intercom” left side menu, select the “Number Settings” Tab and click “Add.”
When the intercom button is pressed, you must add resources or numbers you would like to call. You may add:
- External phone number to call
- Internal PBX extension phone number
- Some internal resources, like ring groups or even IVR.
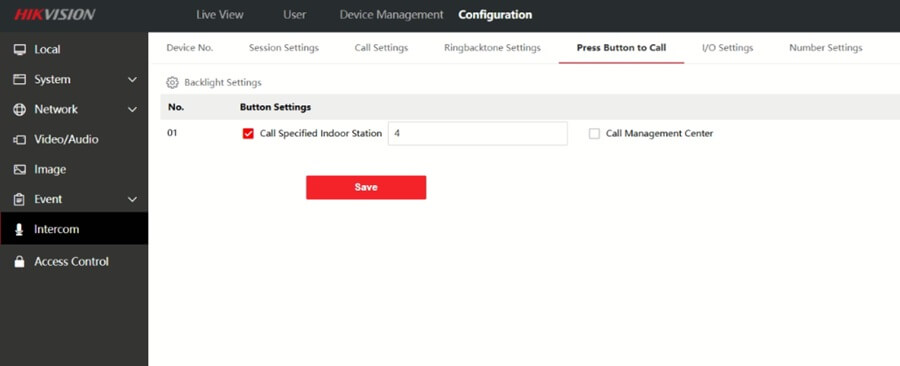
- Step three: Now, we need to set up the action when the button is pressed. From your Hickvision “Intercom” left-side menu, select “Press Button to Call” and choose the indoor station number from the step before that needs to be called when pressing the Hickvision intercom button.
Optimizing call handling
Improving call handling on an intercom system integrated with a PBX (Private Branch Exchange) can significantly enhance user experience, security, and efficiency. Below are actionable tips and strategies to optimize call handling for your intercom setup:
1. Implement Call Routing Rules
Set up intelligent call routing on the PBX to handle intercom calls efficiently:
- Time-Based Routing: Route calls to different destinations based on the time of day (e.g., receptionist during business hours, security guard after hours).
- Fallback Routing: If the primary destination doesn’t answer, route the call to a secondary device or group.
- Holiday Schedules: Configure special routing rules for holidays or non-working days.
2. Use Call Groups and Ring Strategies
- Call Groups: Create a group of extensions (e.g., security team or receptionists) to ensure calls are answered promptly.
- Ring Strategies: Use simultaneous ringing (all devices ring simultaneously) or sequential ringing (ring one device at a time).
3. Enable Call Recording
- Record calls for security and training purposes.
- Ensure compliance with local privacy laws when implementing call recording.
4. Add IVR (Interactive Voice Response)
- Set up an IVR system to greet visitors and provide options (e.g., “Press 1 for Reception, Press 2 for Security”).
- This reduces staff workload and ensures calls reach the right department.
5. Integrate with Mobile Apps
- Use mobile apps like Hik-Connect (for Hikvision devices) or PBX-specific apps to handle intercom calls remotely.
- Enable push notifications for incoming calls to ensure quick responses.
6. Automate Door Unlocking
- Configure the PBX to trigger door unlocking via DTMF tones or API commands when authorized users press a specific key (e.g., “#”).
- Use SIP NOTIFY messages to send unlock commands directly from the PBX to the intercom.
7. Monitor and Analyze Call Logs
- Use PBX call logs to monitor intercom call activity.
- Identify patterns (e.g., peak call times) and optimize resources accordingly.
8. Advanced Features
- AI Integration: Use AI-powered voice recognition to identify frequent visitors and automate responses.
- CRM Integration: Integrate the PBX with a CRM system to log visitor interactions and provide personalized responses.