Table of contents
In this post we will show how to use VoIPstudio REST API to make all Agents join or leave selected Queue. Normally Agents can join or leave the queue by dialling service code #423* or #424* respectively or using Softphone settings panel. However in some situations it might be beneficial to automate this process by running scheduled task. How to create a scheduled task is beyond the scope of this article, however there is plenty of documentation and tutorials available on this topic.
Install NodeJS
Note: if you already have NodeJS installed on your computer, you can skip this section and move on to “Get the API client code” below.
VoIPstudio REST API is programming language agnostic interface available over HTTPs protocol. So any scripting tool which is capable of making HTTPs requests can be used. We have opted for JavaScript for this example as it is fast becoming general scripting language of choice in many environments. As a prerequisite you will need to install NodeJS on your computer in order to be able to execute JavaScript API client code from terminal window or as scheduled task. Installing NodeJS is beyond the scope of this tutorial, but in general it should be as simple as downloading and running installer for your platform.
Once we have NodeJS installed lets make sure it works correctly. Open terminal window (on Windows open Start menu and run “Command Prompt”) and execute:
node -v
this should produce output as below (version number may vary):
v8.12.0
Get the API client code
API client JavaScript code for this tutorial is available on GitHub. You can either use git to clone the code, or simply download latest release as .zip file and decompress on your computer. Once we have obtained the code, lets try to run it. In the terminal window execute:
cd queue-api
node queue.js
this should produce output similar to below:
Error: VoIPstudio API credentials file [api.credentials] not found
This is expected error message, as before we can start using the API Client code, we need to obtain and API credentials and save them to `api.credentials` file.
Obtain API credentials
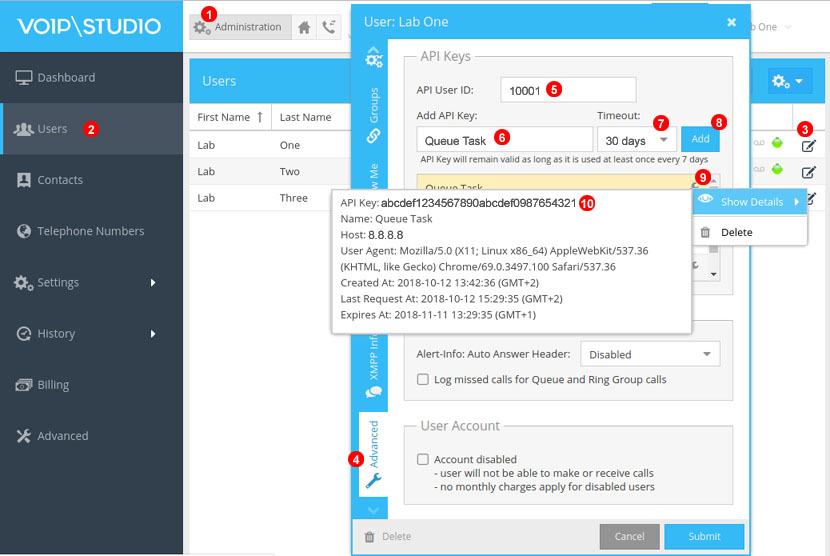
We need to save API credentials to a text file in the same folder where queue.js file is. Open any text editor (such as Notepad on Windows), so we can copy/paste data we will obtain when following instructions in this section. To get API credentials login into your VoIPstudio account – note: it has to be one of the Administrators – and follow steps below:
1. Switch to Administration dashboard.
2. Open Users panel.
3. Click “Edit” icon next to one of the Administrator accounts.
4. Switch to Advanced tab.
5. Copy into clipboard “API User ID” and next paste it into text editor. Follow the User Id with “:”, so the content of text editor looks like: 10001: (your API User ID will be of course a different number).
6. Enter name of your API key. This can be anything – we will use “Queue Task”.
7. Select “30 days” as a Timeout. For security reasons if your API Key is not used within 30 days, it will be automatically invalidated.
8. Click “Add” to generate API Key.
9. Find API Key we just added on the list and click “Wrench” icon and select “Show Details” from the context menu.
10. Copy API Key into clipboard and paste it into text editor. The content of text editor should now look like below:
10001:abcdef1234567890abcdef0987654321
Note: API User ID number and the API Key will be different for you. The above is just an example text which is not a valid API Key.
Now save this text file as api.credentials file in the same folder where queue.js file is.
Run the code
We should be now ready to run the code. In the example below we will use “EST Support” as a Queue name, but of course you will use name of the Queue which exists on your VoIPstudio account. Lets open the terminal window and execute:
cd queue-api
node queue.js
The above should produce output:
This script allows to make all Agents in selected Queue join or leave

Usage: queue.js '<Queue Name>' <join|leave>
The message above indicates the script has correctly recognised api.credentials file we created in previous step. However the script requires two parameters:
* “Queue Name” which is our example wil be “EST Support”
* join or leave depending which operation we want to perform.
So lets try to make all Agents of “EST Support” join the queue:
node queue.js 'EST Support' join
This time the output is:
2 Agents has joined queue "EST Support"
and in a similar way we can make all Agents leave “EST Support” queue by running:
node queue.js 'EST Support' leave
which returns:
2 Agents has left queue "EST Support"
Now to automate the operation of joining and leaving queue by our Agents we just need to setup scheduled task which will execute node queue.js 'EST Support' leave or node queue.js 'EST Support' join at certain time of the day and days of the week.
More from the blog
Want to improve your business communication?
Unlock enterprise-class call center power at affordable prices – no hardware, no delays, no surprises!


