Hardware Configuration - Manual Configuration - Cisco
PAP2 and SPA112
If your Cisco phone was purchased from VoIPstudio, it has been already pre configured and there is no need to provision it.
Please refer to Phone edit section to assign extensions. If your phone was not purchased from VoIPstudio, please perform a Factory Reset described in Factory Reset section above and Firmware upgrade.
You can obtain your phone IP by following the steps described in Find phone IP section above.
Cisco PAP2
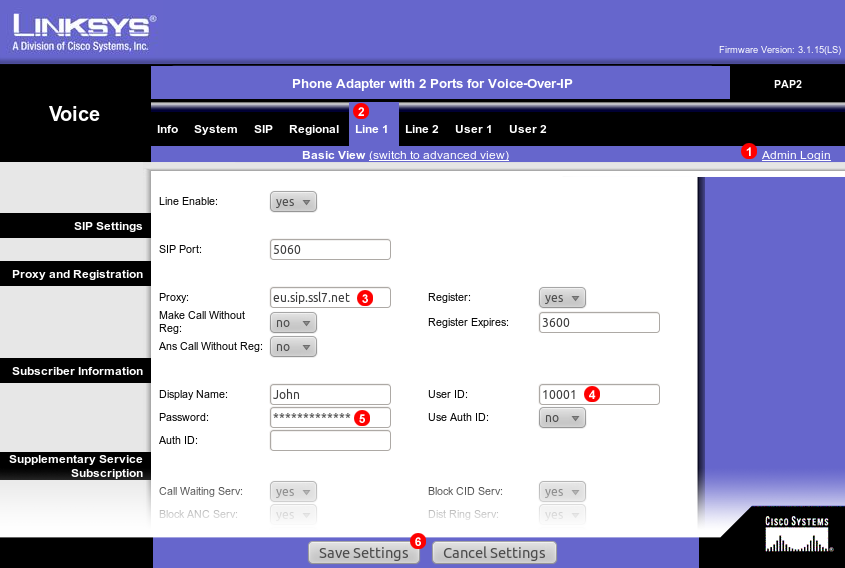
To configure Cisco PAP2 adapter to work with VoIPstudio service login into web interface of the device and follow steps below:
- Click
Adminlink at the top. - Select
Line 1tab. - Enter your SIP domain into field
(3). - Enter your SIP username into field
(4). - Enter your SIP password into field
(5). - Click
Save Settings.
After a short while Cisco PAP2 adapter will connect to VoIPstudio servers and you will be able to start making and receiving calls.
SPA112
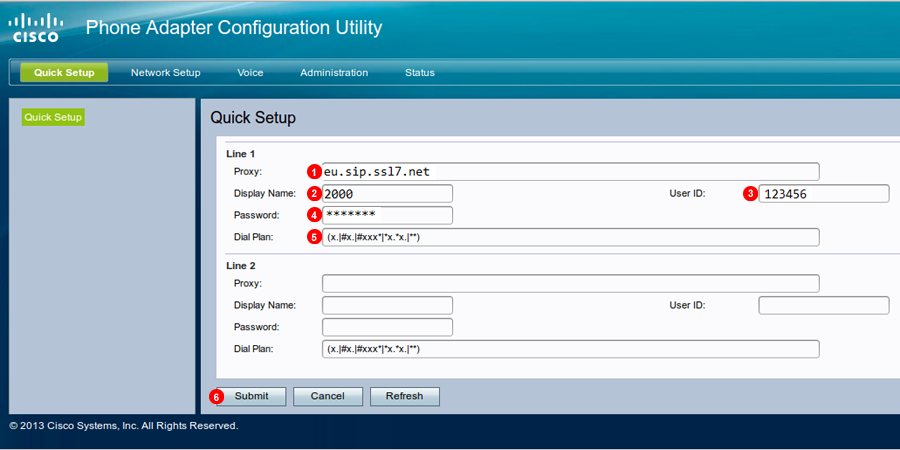
- Enter your SIP domain into field
(1). - Enter Display name of Choice.
- Enter your SIP username into field
(3). - Enter your SIP password into field
(4). - Enter following Dial-plan is not default: (x.|#x.|#xxx|x.x.|*)
- Click
Save Settings.
NOTE: Line 2 Can be set up the same way for a second extension.
SPAXXX
If your phone was purchased from VoIPstudio, it has been already pre configured and there is no need to provision it. Please refer to Phone edit section to assign extensions. If your phone was not purchased from VoIPstudio, please perform a Factory Reset described in Factory Reset section above and Firmware upgrade.
You can obtain your phone IP by following the steps described in Find phone IP section above.
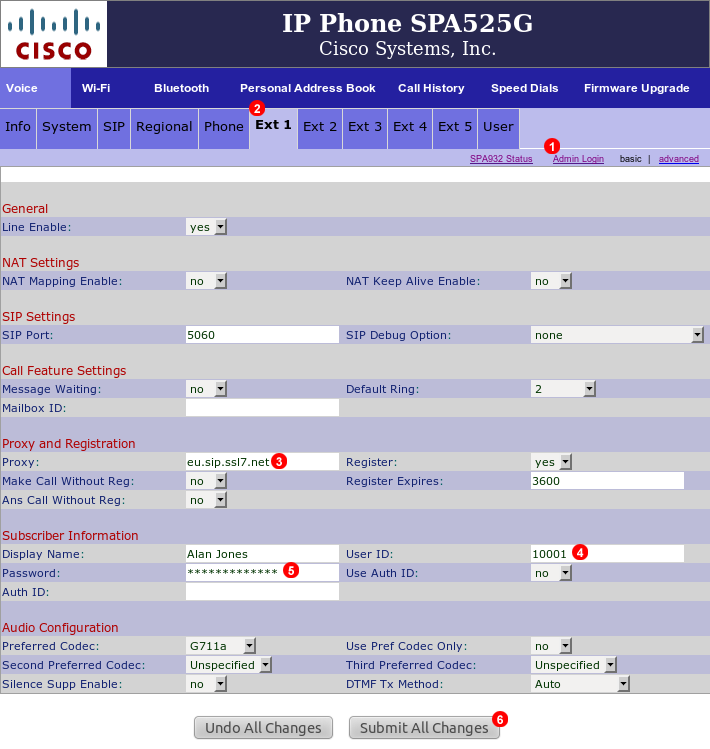
To configure Cisco SPA525G phone to work with VoIPstudio service login into web interface of the device and follow steps below:
- Click
Adminlink at the top. - Select
Ext 1tab. - Enter your SIP domain into field
(3). - Enter your SIP username into field
(4). - Enter your SIP password into field
(5). - Click
Submit All Changes.
After a short while Cisco SPA525G phone will connect to VoIPstudio servers and you will be able to start making and receiving calls.
Dial Plan
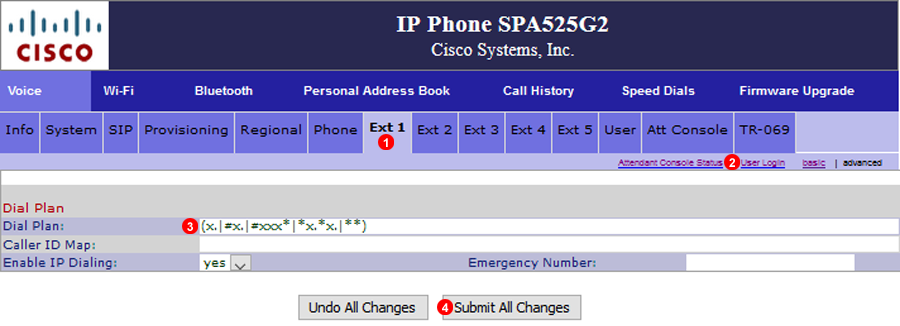
- Select Extension to apply dial plan.
- Select both Administrator Login and Advanced.
- Paste the following into Dial Plan field:
(x.|#x.|#xxx*|*x.*x.|**) - Click
Submit all changesto save new dial plan.
BLF (Busy Lamp Field)
Busy Lamp Field on the Cisco monitors other extension and the current status for example when the extension is on a call.
The LED lights will change colour and state depending on the current status of the Phone as follows:
- Green = Available
- Flashing Red: Ringing
- Red = On Call
- Amber Solid = Failed to subscribe, possibly an error in the syntax
- Amber flashing slow = No Response to the SIP Subscribe, most likely cause is the Phone or extension is off-line.
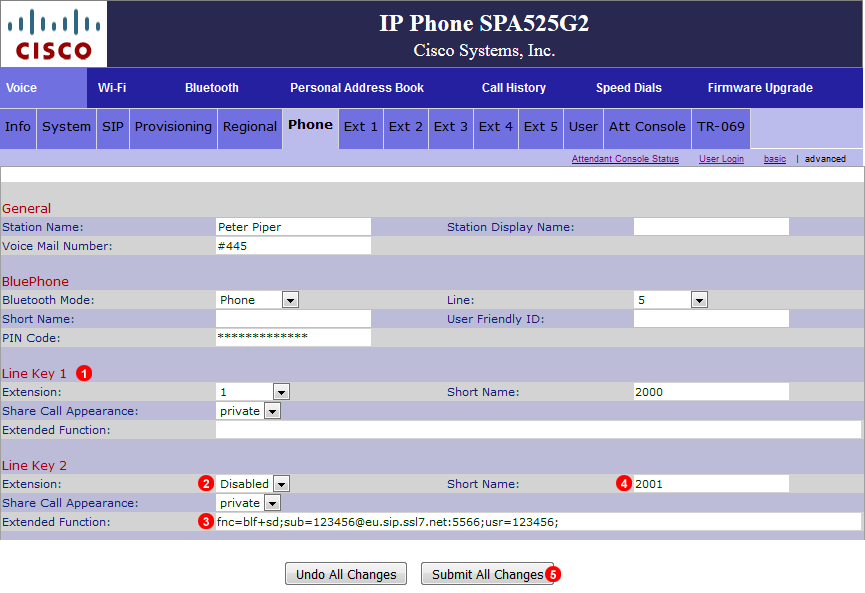
- Line 1 is the main extension used for making and receiving calls, do not modify.
- Leave extension Disabled.
- Enter syntax as follows:
fnc=blf+sd;sub=123456@__SIP_DOMAIN__:5566;usr=123456;(replace__SIP_DOMAIN__with your actual SIP Domain)- fnc = function
- blf = Busy Lamp Field
- sd = Speed Dial
- 123456 = User/extension that will be monitored
- Enter any identifying name or in this example the extension number.
- Click Submit to save changes.
CP-88XX and CP78XX
Note: Before attempting to configure Cisco CP-88XX or CP-78XX with VoIPstudio service please follow steps below "Verify CP-88XX and CP-78XX compatibility" to make sure it is the 3PCC firmware model. Otherwise, it won't work with our system.
If your phone was purchased from VoIPstudio, it has been already pre configured and there is no need to provision it. Please refer to Phone edit section to assign extensions. If your phone was not purchased from VoIPstudio, please perform a Factory Reset described in Factory Reset section above and Firmware upgrade.
You can obtain your phone IP by following the steps described in Find phone IP section above.
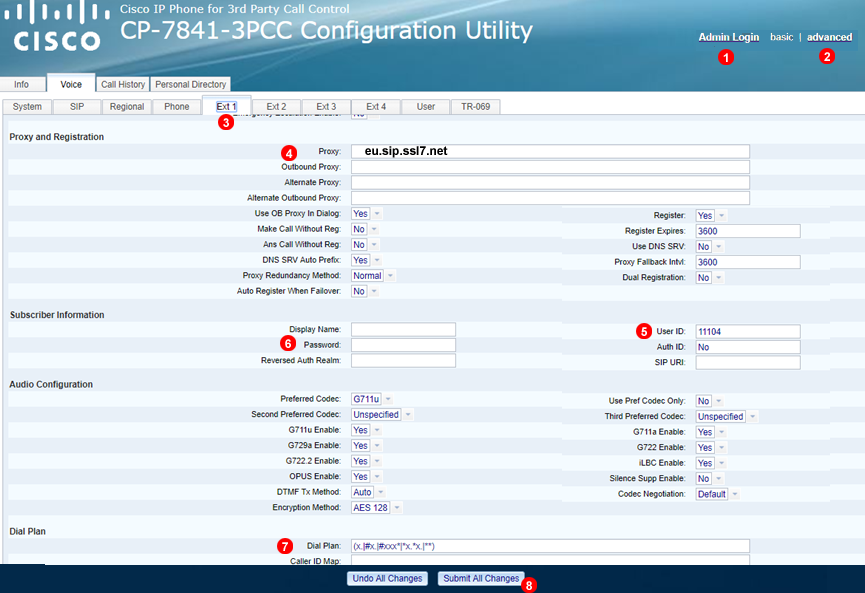
To configure Cisco CP-78XX or CP-88XX phone to work with VoIPstudio service login into web interface of the device and follow steps below:
- Click
Advancedlink at the top. - Click
Adminlink at the top. - Select
Ext 1tab. - Enter your SIP domain into field
(4). - Enter your SIP username into field
(5). - Enter your SIP password into field
(6). - Paste the following into Dial Plan field:
(x.|#x.|#xxx*|*x.*x.|**) - Click
Submit All Changes.
After a short while Cisco phone will connect to VoIPstudio servers and you will be able to start making and receiving calls.
BLF (Busy Lamp Field)
Busy Lamp Field on the Cisco monitors other extension and the current status for example when the extension is on a call.
The LED lights will change colour and state depending on the current status of the Phone as follows:
- Green = Available
- Flashing Red: Ringing
- Red = On Call
- Amber Solid = Failed to subscribe, possibly an error in the syntax
- Amber flashing slow = No Response to the SIP Subscribe, most likely cause is the Phone or extension is off-line.
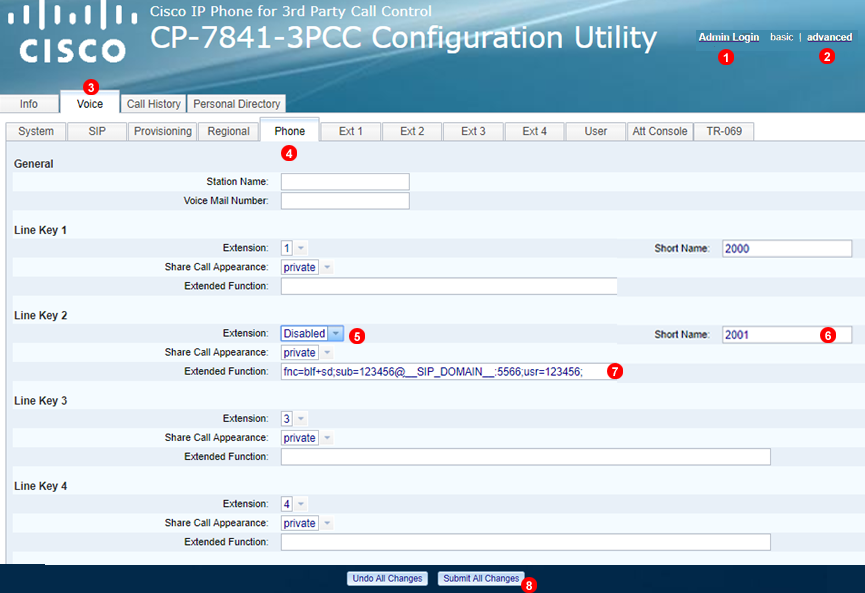
- Click
Advancedlink at the top. - Click
Adminlink at the top. - Click 'Voice' tab.
- Select
Phonetab. . Line 1 is the main extension used for making and receiving calls, do not modify. - Leave extension Disabled.
- Enter any identifying name or in this example the extension number.
- Enter syntax as follows:
fnc=blf+sd;sub=123456@__SIP_DOMAIN__:5566;usr=123456;(replace__SIP_DOMAIN__with your actual SIP Domain)- fnc = function
- blf = Busy Lamp Field
- sd = Speed Dial
- 123456 = User/extension that will be monitored
- Paste the following into Dial Plan field:
(x.|#x.|#xxx*|*x.*x.|**)then please Click Submit to save changes.
Verify CP-88XX and CP-78XX compatibility

To discover your CP-78XX or CP-88XX phone firmware type in order to verify if it is compatible with VoIPstudio service please follow steps below:
- Press
Settingsbutton on the phone, marked as1 - Scroll down to
Status. - Press
selectto enter into the status submenu. - Press
selectto seeProduct information. - Verify that product name has the
3PCCtag.
This indicates that it is the multiplatform firmware called: Third-Party Call Control Release (3PCC)