Integrations - Oracle Sales Cloud
VoIPstudio Oracle Sales Cloud connector allows for Computer Telephony Integration (CTI) of CRM activities which greatly improves productivity and customer experience.
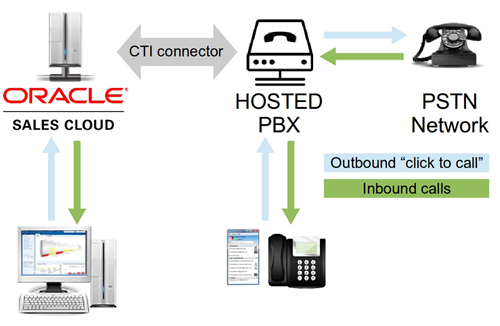
The connector can be used for both outbound (click to call) and inbound connections (incoming caller screening). The two scenarios are described below:
1) Outbound “click to call” connections to PSTN (Traditional Telephony Network) from within Oracle Sales Cloud environment involves clicking telephone number link in the user interface which triggers VoIPstudio network to place a call to SIP endpoint (IP Phone or Softphone) registered on the user account. As soon as this call is answered it is being transferred to the number clicked.
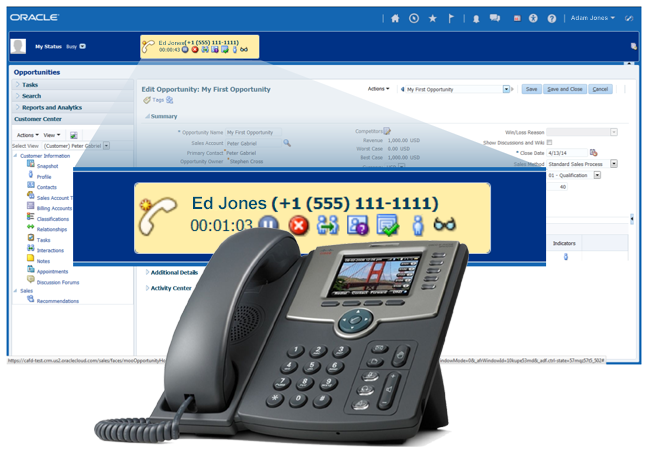
2) Incoming calls received from PSTN (Traditional Telephony Network) are generating real time notifications about call state (Ringing, Connected, On Hold, Disconnected) which can be handled in Oracle Sales Cloud CTI widget embedded in user interface.
In both scenarios described above once the call is established users can control call state using Oracle Sales Cloud CTI widget. Ongoing connections can be Transferred to a different PBX user or external number or Disconnected.
Configuration
Communication connector

- Click your name in top right corner to open menu.
- Select
Setup and maintenance...from the menu. - In
All Taskstab enterconnectorinto name field. - Click
Searchbutton. - Click
Go to taskicon next toManage Communication Connectorstask. - Switch to
Connector Typetab. - Click
+icon to add new connector type record. - Enter
Hosted PBXas Name andDefines communication parameters with Hosted PBXas Description. - Click
+icon to add newAgent Connection Parameter. - Add two parameter names:
AcdExtensionandAcdUserId. Leave default values blank. - Switch to
Connectorstab. - Click
+icon to add new connector record. - Enter
Hosted PBX Connectoras Connector Name, selectHosted PBXas Connector Type and enterHosted PBX Connectoras Description. - Enter
https://ssl7.net/js/oracle-connector.js?domain=voipstudio.cominto JavaScript location field. - Click
Save and Closebutton.
Agent Settings
- Click
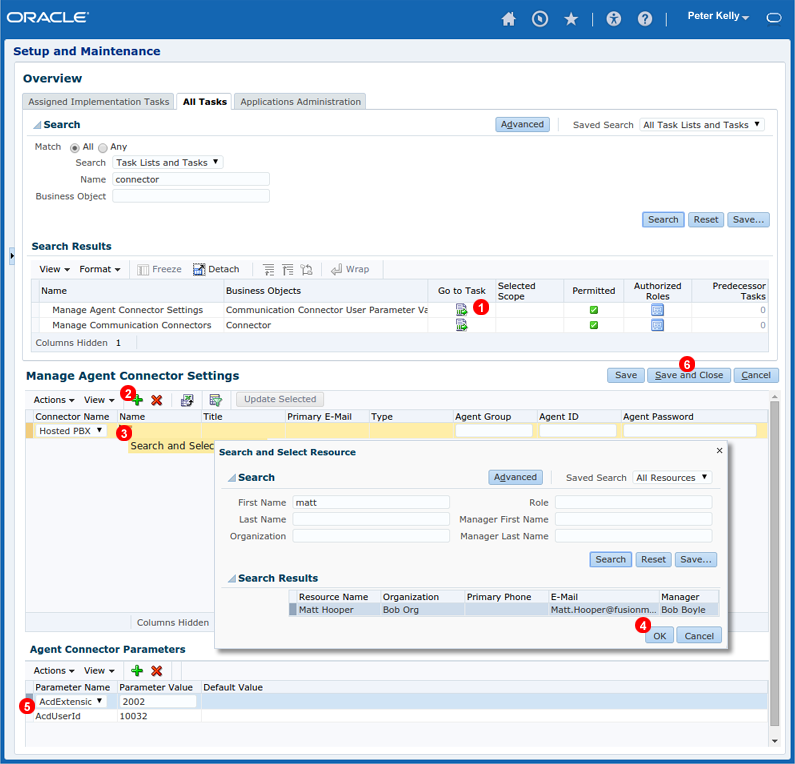
Go to taskicon next toManage Agent Connector Settingstask. - Click
+icon to add new Agent record. - Click search icon in Name field.
- Use
Search and Select Resourcewindow to select an Agent. - Enter Agent's VoIPstudio extension number into
AcdExtensionsfield. Extension number can be found in VoIPstudio User Edit window General tab - see Figure %IMG_USERS_GENERAL_SETTINGS% field shown as(7). Enter Agent's VoIPstudio SIP Username intoAcdUserid field. SIP Username can be found in VoIPstudio User Edit window SIP Info tab - see Figure %IMG_USERS_SIP_INFO% field shown as(1). Repeat steps 2-5 to add all agents who require CTI functionality. - Finally click
Save and Closebutton.
Contact Centre Profile
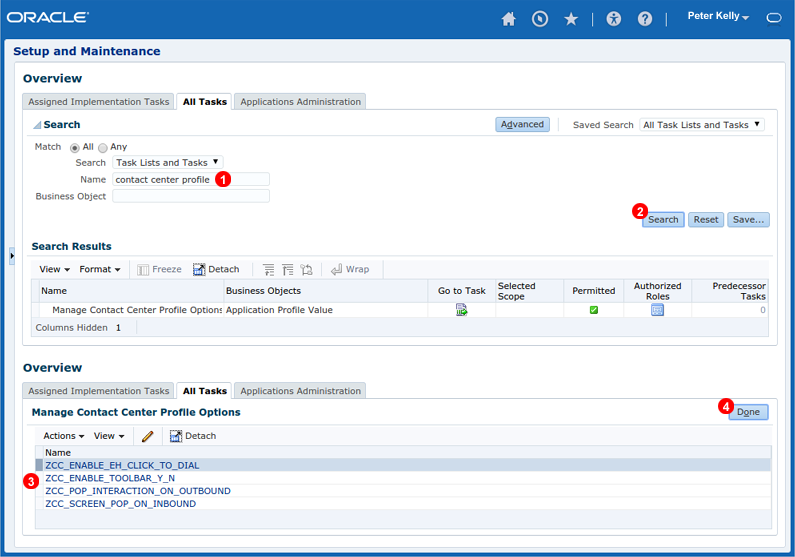
- Enter
contact center profileinto Name field. - Click
Searchbutton. - Make sure all features shown in Figure 71.5 above are enabled.
- Click
Donebutton.
Connector Login
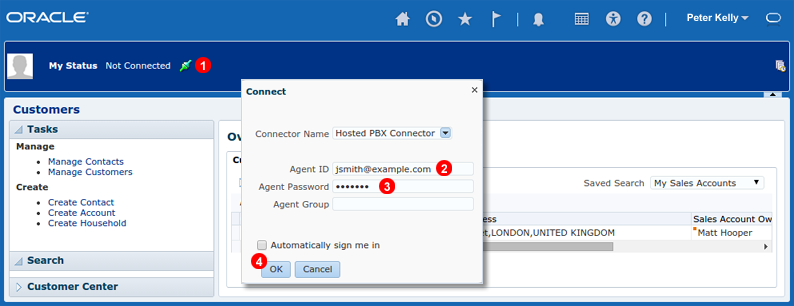
Before agents can start making or receiveg phone calls using Oracle Sales Cloud CTI connector they need to login using their VoIPstudio email and password. To login into CTI connector:
- Click green icon shown as
(1)in Figure 71.6 above. - Enter VoIPstudio email address into field
Agent ID. - Enter VoIPstudio password into field
Agent Password. - Click
OKbutton. After a short while connector status should change fromNot ConnectedtoAvailable.
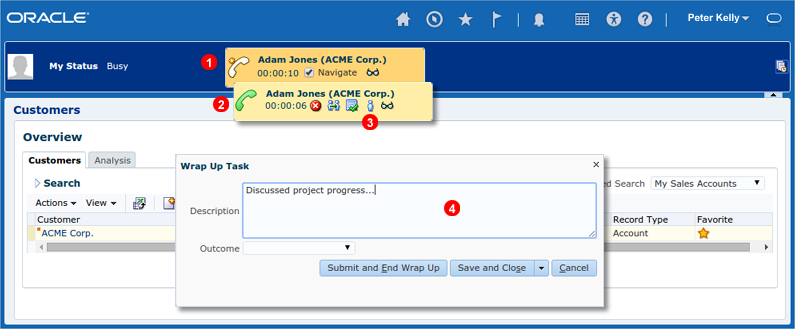
Making calls
To make an outbound call from Oracle Sales Cloud environment:
- Click on a telephone number link you want to place a call to.
- Call status widget will show up indicating call progress. In the first stage VoIPstudio network will attempt to contact SIP Endpoint (Softphone or IP Phone) registered on Agent's account.
- Once SIP Endpoint accepts connection a call is being placed to the number clicked.
- When call is completed
Wrap Up Taskwindow shows up where Agent's can make notes about their activities. - Call history can be accessed via icon shown as
(5)in Figure 71.6 above.
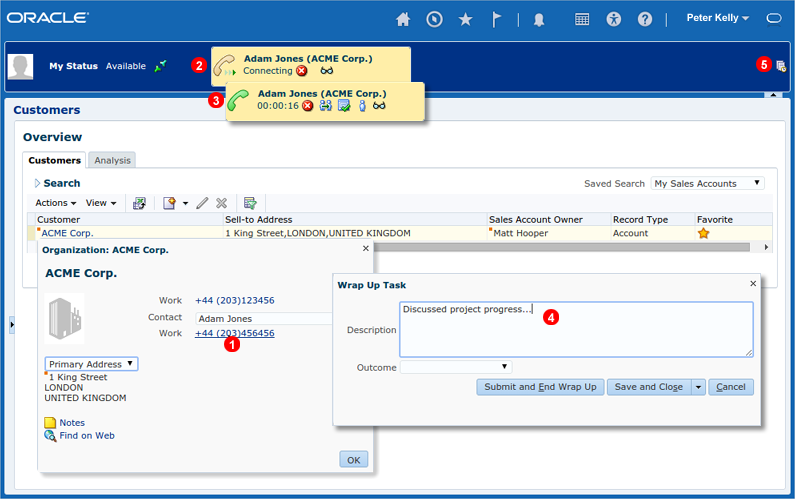
Receiving calls
When incoming call is received by an Agent logged into Oracle Sales Cloud CTI connector instant pop-up notification is shown as a call widget:
- When call is in ringing state new of the Contact (if known) is shown.
- Answered call is indicated by green icon in CTI toolbar
- At any time caller can be identified by clicking icon shown as
(3)in Figure 71.8 above. - When call is completed
Wrap Up Taskwindow shows up where Agent's can make notes about their activities.
Transferring call
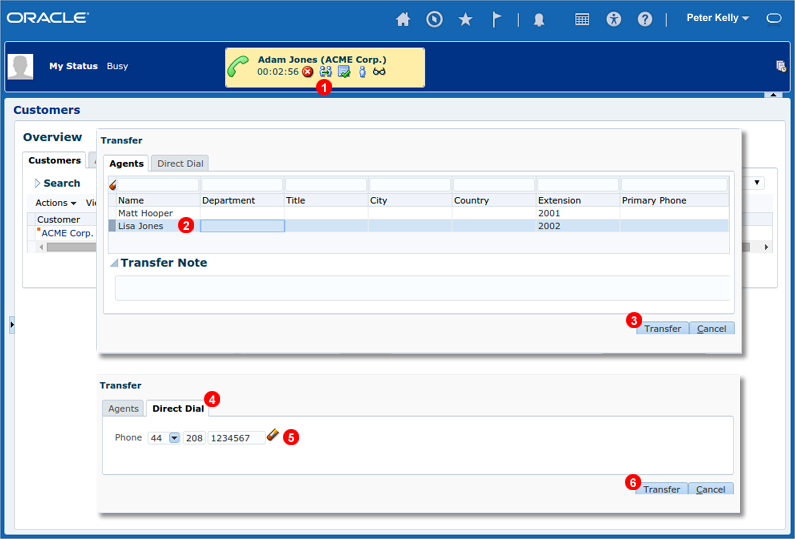
Established call (both outbound or inbound) can be transfered either to another Agent (internal transfer) or to PSTN number (external transfer).
- Click transfer icon shown as
(1)in Figure 71.9 above. - For internal transfer select agent where call should be transfered to.
- Click
Transferbutton to complete the transfer. - For external transfer click
Direct Dialtab. - Enter number where call should be transfered to.
- Click
Transferbutton to complete the transfer.