Hardware Configuration - Manual Configuration - Yealink
- While doing manual configuration, it is always best to perform a Factory Reset described in Factory Reset section above. You can obtain your phone IP by following the steps described in Find phone IP section above.
To configure Yealink phone to work with VoIPstudio service login into web interface of the device and follow steps below:
- Upgrade Firmware from below link -
http://www.yealink.co.uk/downloads/
Follow below Steps:
- Login to your phone via web browser
- Upgrade
- Browse the Firmware you downloaded
- upgrade
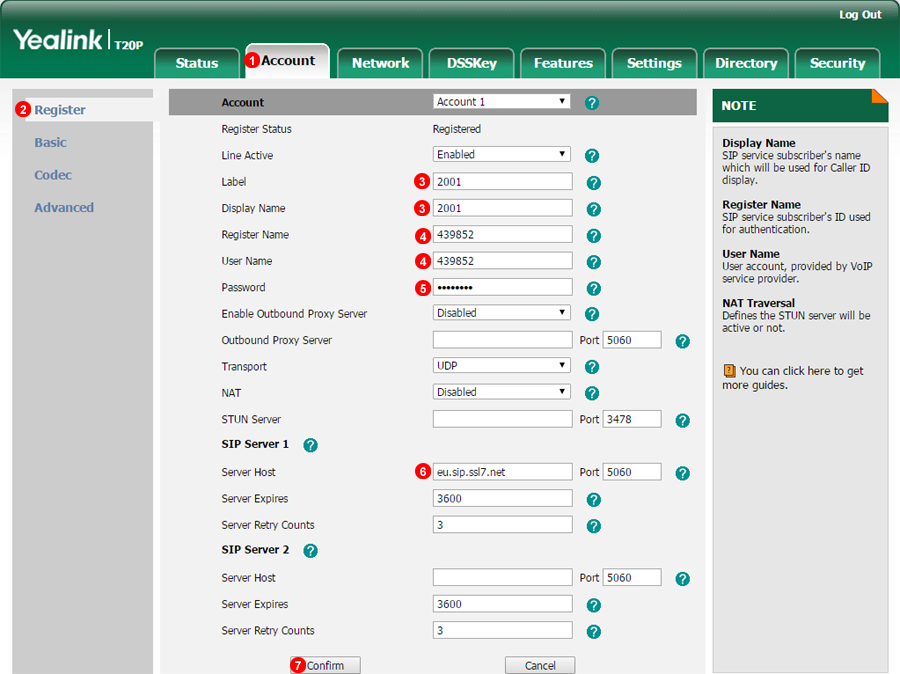
- Select Account.
- Select Register.
- Enter Extension Number.
- Enter SIP Username.
- Enter SIP Password.
- Enter SIP Domain.
- Click Confirm to save changes.
Note Reboot may be required.
Voice Mail Set UP
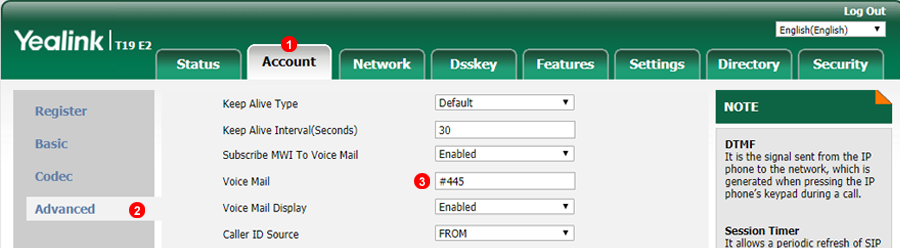
To configure Yealink voicemail button with our voicemail service please do the following:
- Navigate to Account tab.
- Select Advanced section.
- Enter Voicemail number
#445into Voice Mail field.
Yealink BLF(Busy Lamp Field)
Busy Lamp Field on the Yealink, enables fast call to the user by pressing the button and monitors other extension current status for example when the extension is on a call.
The LED lights will change colour and state depending on the current status of the Phone as follows:
- Green = Available
- Flashing Red: Ringing
- Red = On Call
- From
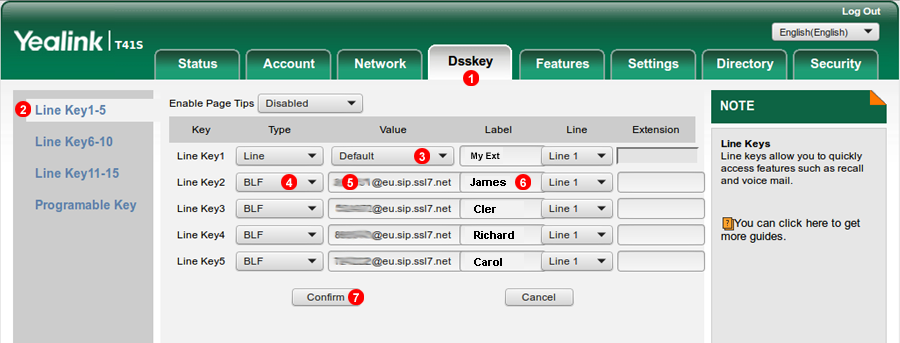
DssKeytab - Select the key set you like to edit.
-
The number of available programmable keys will depend on your Yealink device model
-
Line 1 is the main extension used for making and receiving calls, do not modify
- Over the the line Key you will edit select:
BLF - Enter syntax as follows:
__SIP_USER__@__SIP_DOMAIN__(replace__SIP_USER__for 6 digit SIP username that will be monitored and replace__SIP_DOMAIN__with your actual SIP Domain) - Enter any identifying label.
- Click
Confirmto save changes.
Security
IP phone that is reachable from the internet is the most common way an account ends up making calls it never intended to make. Steps below enforce device security and reduce that risk.
Change the default administrator password
Every Yealink phone ships with the same well-known admin login. If this hasn't been changed, treat it as the first thing to fix.
- From
Securitytab. - Select
Passwordoptions. - Choose
adminas the user type. - Enter a new password - avoid anything short, guessable, or reused from another device.
- Confirm changes.
Disable Direct IP Calls
Direct IP calling lets the phone place or receive calls straight to an IP address, bypassing your SIP account entirely. Leaving this enabled gives an attacker on the network a way to call out through the phone without ever needing your SIP credentials.
- From
Featurestab. - Select
General Information. - Set
Allow IP CalltoDisabled. - Confirm changes.
Enforce SIP Trust Servers
This restricts the phone to only accept SIP signalling from your actual SIP server, rejecting anything sent by an attacker spoofing or injecting SIP traffic on the network.
- From
Featurestab. - Select
General Information. - Set
Accept SIP Trust Server OnlytoEnabled. - Confirm changes.
VoIP TLS/SRTP Encryptation setup
Transport Layer Security (TLS) is a security protocol designed to facilitate privacy and data security encrypting voice traffic. To enalbe this feature follow steps bellow:
step 1 adjust transport protocol
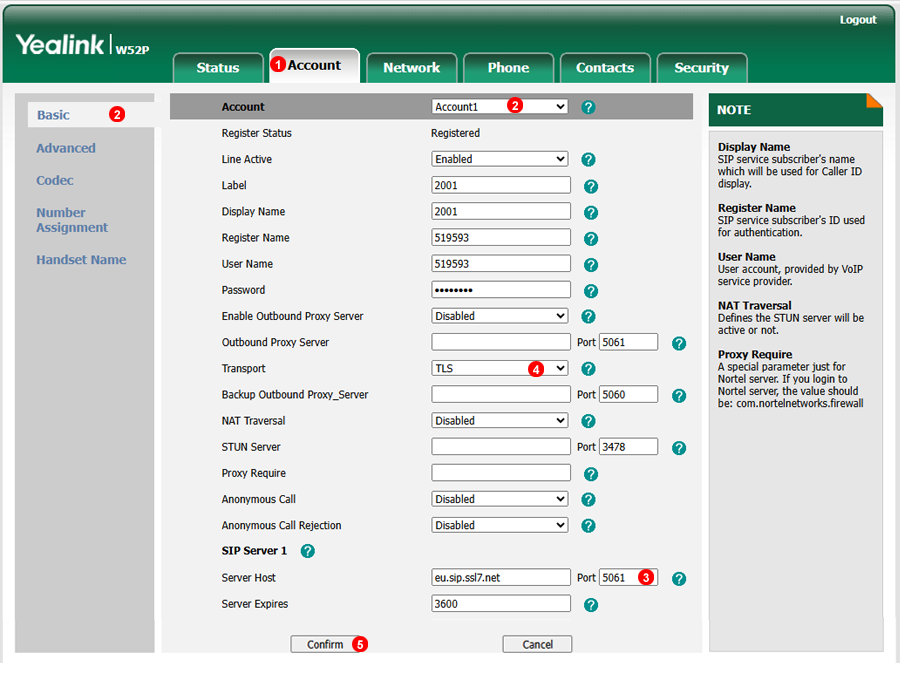
- From
Accounttab. - Select
Registeroptions from desired account you like to edit. - Update the server port number to 5061.
- Set transpor protocol to TLS.
- Confirm changes.
Step 2. Set SRTP as compulsory
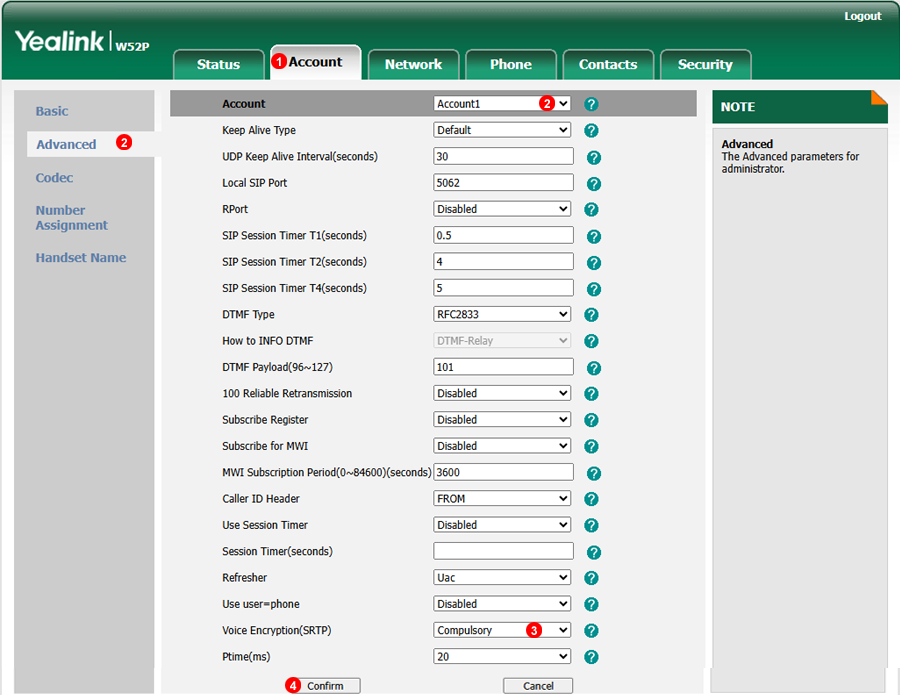
- From
Accounttab. - Select
Advancedoptions from desired account you like to edit. - Set
RTP Encryptation(SRTP)to compulsory . - Confirm changes.
Date and time sincronization with NTP
Network Time Protocol (NTP) is an internet protocol used to synchronize with global servers sources. To set this on yur yealink please follow steps bellow:
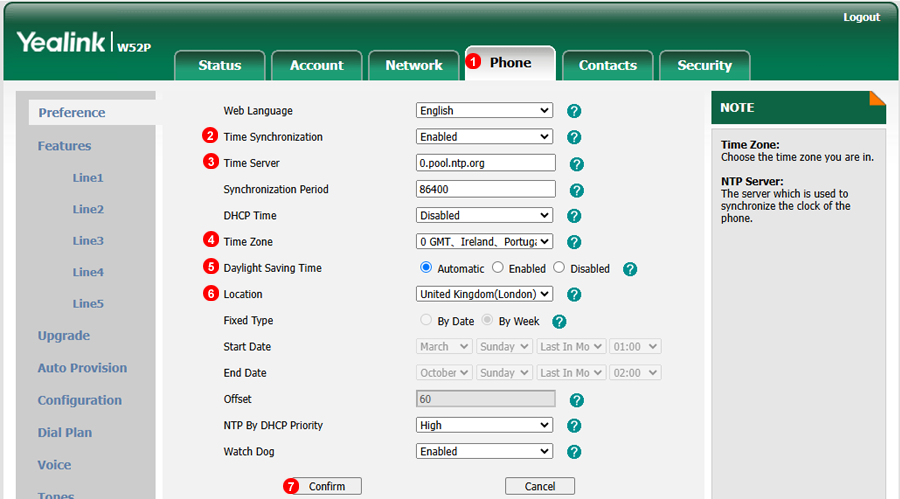
- From
Phonetab. - Enable
Time Synchronization - Set some global NTP server, for example
0.pool.ntp.org. - Select your device Time Zone.
- Set
Daylight Saving Timeasauthomatic. - Select corresponding city for this summer adjustment setting.
- Confirm changes.