Settings - Queues
Queues allow to automatically distributes phone calls to a specific group of agents on the first come, first serve basis.
Using VoIPstudio Control Panel you can adjust maximum queue times, toggle whether callers are told their queue position and average wait time.
Here you can add a Queue or view and edit their settings.
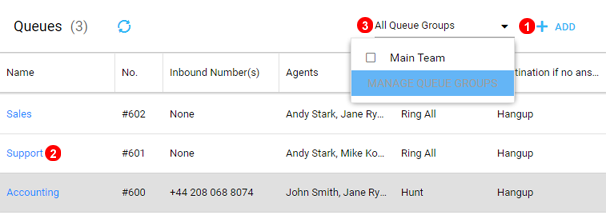
- Click to Add a New Queue.
- Click on Queue Name to Edit an Existing Queue.
- Queues can be grouped to allow call position sharing.
NOTE: Queue Groups allow Queues to share call position. This means any call that enters one of the Queues in the group first will be considered First amongst all Queues in the group.
Example:
- Queue A and B are grouped.
- Queue A has 5 calls waiting when a call Enters Queue B.
- Instead of Being seen as the first call in Queue B and potentially ringing agents before any of the 5 in Queue A this call is set to position 6 in the Queue Group.
General Settings
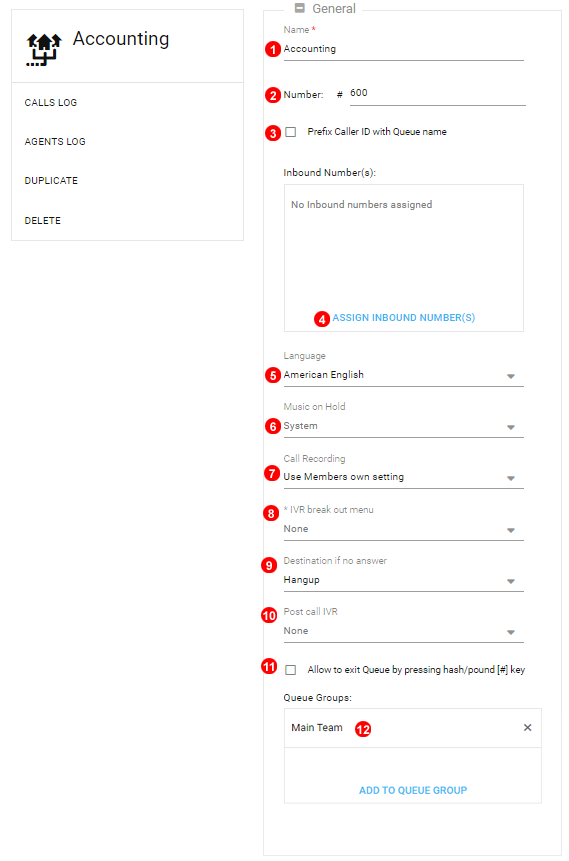
- Enter unique name.
- Queue Number - Agents will use the following dial codes to login and log out of the queue:
- Log in -
#421followed by queue number - Log out -
#422followed by queue number Note: Queue Number used to transfer calls directly into a Queue, this can be changed to between #600 - #799. To Transfer use #600 as shown in this example.
- Log in -
- Prefix Caller ID with Queue name - If enabled Caller ID will be prefixed with queue name to help agents identify which queue a call is coming from.
- Select Inbound Numbers assigned to a queue.
- Language: British English, American English, Portuguese, Spanish.
- Music on Hold while callers wait for connection.
- Select call recording mode:
Use Members own settingAlways recordNever record
- IVR break out of menu - Allows call to break out of the Queue to the IVR specified by dialing
*. - Destination if no answer: Allows to send call to another queue, IVR or extension voice-mail.
- Post call IVR - allows to transfer caller to specific IVR (for example Satisfaction Survey) after call is finished.
- Allow caller to exit the queue by pressing
#. This action will forward the call to destination if no answer option. - Add Queue to Queue group to share call Queue Position with other Queues in Group.
- Enter email addresses to receive notifications of missed calls
Agent Settings
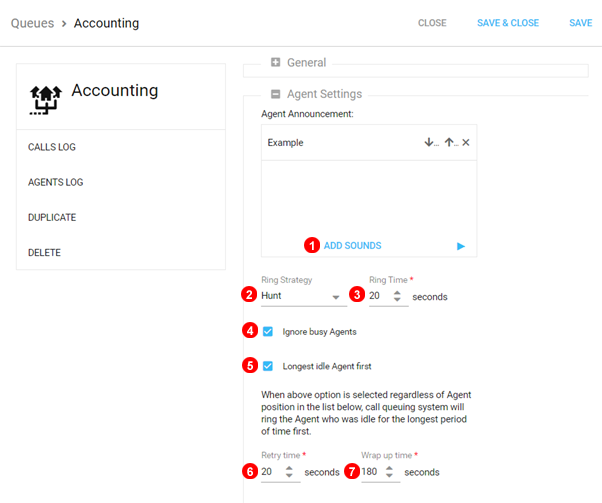
- Here you can set announcement played to the agent prior to connecting a call.
- Ring Strategy when calling available agents - see Ring Strategy sub-chapter below for details.
- Ring Time: How long to ring each agent before we consider it time out.
- Ignore busy agents: If enabled the system will not ring agents already on the call.
- Longest idle Agent first: When this option is selected regardless of Agent position in the list, call queuing system will ring the Agent who was idle for the longest period of time first. This applies to Hunt and Memory Hunt ring strategies.
- Retry Time: The time it takes before the system rings an agent again, 0 seconds will ring the agent only once.
- Wrap up time: After a successful call, how many seconds to wait before sending a potentially free agent another call. Retry time + Wrap up time.
Caller Settings
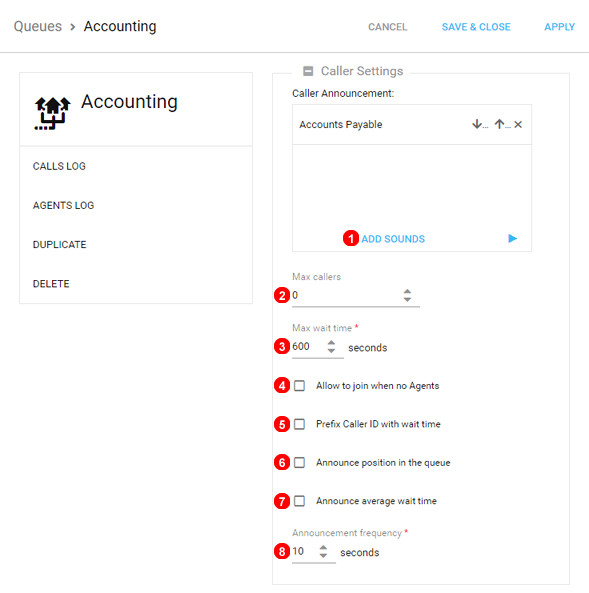
- Announcement played to the caller prior to joining the queue.
- Maximum number of callers allowed in the queue.
- The maximum number of seconds caller can wait in the queue. Value '0' means infinite time.
- If enabled allow callers to join the queue even when no agents are currently present.
- If enabled Caller ID will be prefixed with total wait time in minutes.
- Announce position of the caller in the queue.
- Announce average wait time in the queue.
- How often to announce position and/or wait time.
Members Settings
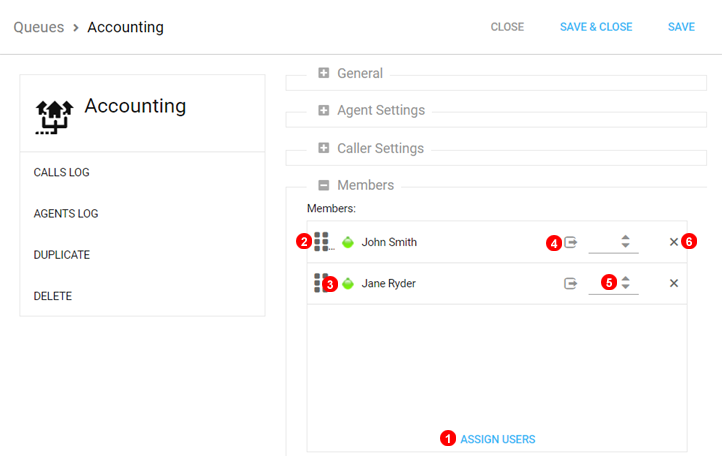
- Click to add users to the Queue. By default users assigned to a queue are logged to it.
- Use "six dots" icon to modify the order of the user in the queue by dragging and dropping them (only applies to
HuntandMemory Huntring strategies). - Icons
 display current status of the user: green logged-in, grey logged-out.
 - With this icon
 you can manually log-in or log-out the user from the Queue.
 - Here you can use a number between 1 to 100 which can group Agents into priority groups. For example in a group of 30 agents, 5 most highly skilled agents could be assigned Priority 1 and remaining 25 agents varying levels greater than 1. For incoming calls to reach one of the 25 less skilled agents, all of the 5 most skilled ones would have to be unavailable.
- Use the cross icon to remove user from the queue.
Note: Once users are assigned to a Queue they are able to log-in and log-out from themselves from their dashboard, mobile app or softphone.
Queue Logs
To edit a Queue click button shown as (2) in Figure 16.1 above.
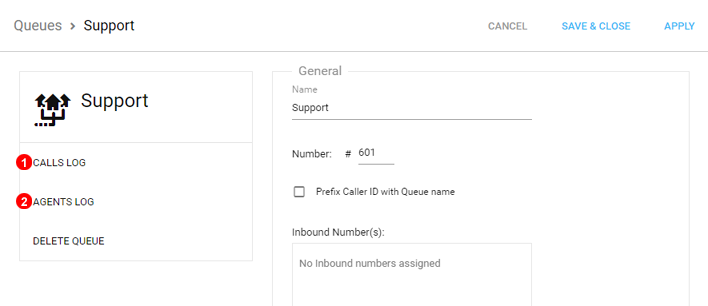
- Select to open the Call Logs related to Queue.
- Select to open Logs showing Agent Activity on Queue.
Calls Log
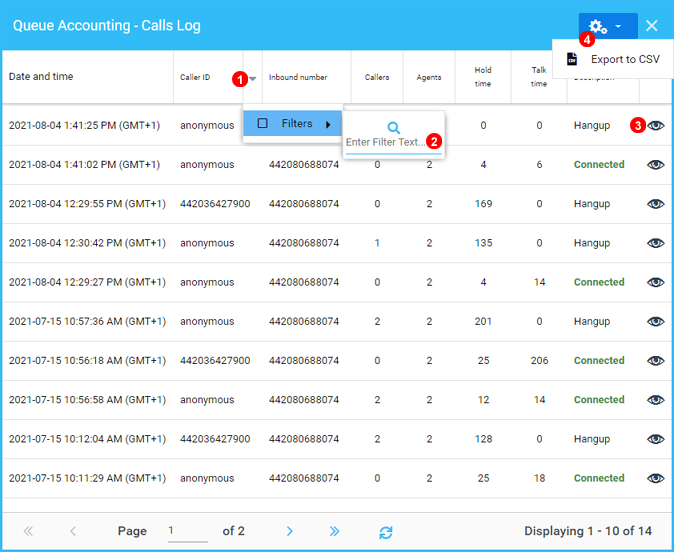
- Select Arrow while hovering cursor over headers to apply Filters.
- Enter details to apply filter for example a number or name.
- Click Eye Icon to see flow of specific call.
- Queue call logs can be exported to a .CSV file here.
Agents Log
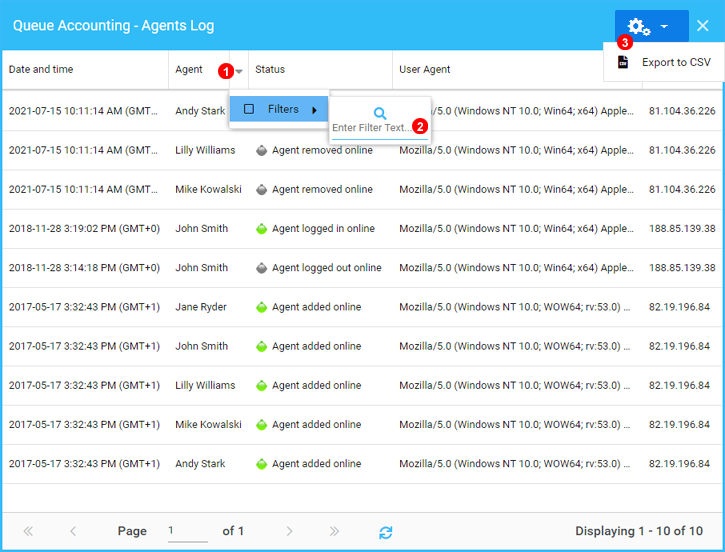
- Select Arrow while hovering cursor over headers to apply Filters.
- Enter details to apply filter for example a number or name.
- Agent Activity logs can be exported to a .CSV file here.
Ring Strategies
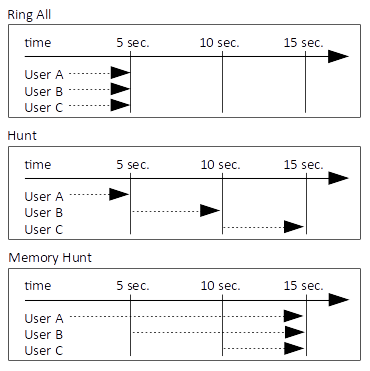
Diagram above illustrates Ring Strategies for an example Ring Group with users: User A, User B and User C and Ring Time set to 5 seconds.
Random Ring Strategy
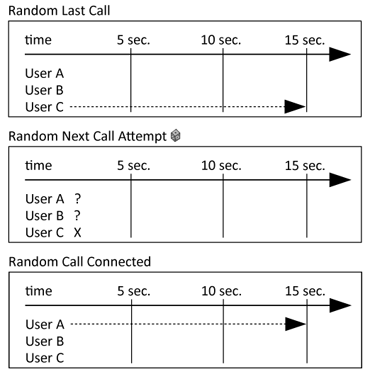
In the above example the last call was handled by User C when the next call enters the queue the system randomly selects the next agent while ignoring the last agent to have a call. The Call after this user A will be ignored when the random selection happens and only user B and C considered.